作者:TeaOf
連結:https://www.jianshu.com/p/8a031a945b79
一、前言
上次開啟掌閱的時候看到書籍開啟動畫的效果還不錯,正好最近也在做閱讀器的專案,所以想在專案中實現一下。
二、思路
講思路之前,先看一下實現效果吧:

書籍開啟關閉動畫.gif
看完實現效果,我們再來講一下實現思路:

1、獲取RecyclerView(或GridView)中的子View裡面的ImageView在螢幕的位置,因為獲取的是Window下的位置,所以Y軸位置取出來還要減去狀態列的高度。
2、圖書的封面和內容頁(其實是兩個ImageView)設定成剛剛取出的子View裡面的ImageView的位置和大小。
3、設定動畫,這邊縮放動畫的軸心點的計算方式需要註意一下,等下文講解程式碼的時候再具體解釋,還有就是利用Camera類(非平常的相機類)實現的開啟和關閉動畫(如果你對Camera不熟悉,建議先看GcsSloop大佬的這篇Matrix Camera)。
https://github.com/GcsSloop/AndroidNote/blob/master/CustomView/Advance/%5B11%5DMatrix_3D_Camera.md
三、具體實現
我會在這個過程中一步一步教你如何實現這個效果:
1、佈局
activity_open_book.xml:
<RelativeLayout xmlns:android="http://schemas.android.com/apk/res/android"
    xmlns:app="http://schemas.android.com/apk/res-auto"
    xmlns:tools="http://schemas.android.com/tools"
    android:layout_width="match_parent"
    android:layout_height="match_parent"
    tools:context=".ui.activity.OpenBookActivity">

    <android.support.v7.widget.RecyclerView
        android:id="@+id/recycle"
        android:layout_width="match_parent"
        android:layout_height="match_parent"/>

    <ImageView
        android:id="@+id/img_content"
        android:layout_width="wrap_content"
        android:layout_height="wrap_content"
        android:visibility="gone"
        android:contentDescription="@string/app_name" />

    <ImageView
        android:id="@+id/img_first"
        android:layout_width="wrap_content"
        android:layout_height="wrap_content"
        android:scaleType="centerCrop"
        android:visibility="gone"
        android:contentDescription="@string/app_name" />

RelativeLayout>
recycler_item_book.xml:
RecylerVIew中的子佈局,其實也就是ImageView和TextView,這裡就不貼放了。
2、動畫
我們只講解旋轉動畫,因為旋轉動畫中也會涉及縮放動畫。
想一下,如果想要在介面中實現縮放動畫,我們得找好軸心點,那麼,軸心點的x,y坐標如何計算呢?
為了更好的求出坐標,我們先來看一張圖:
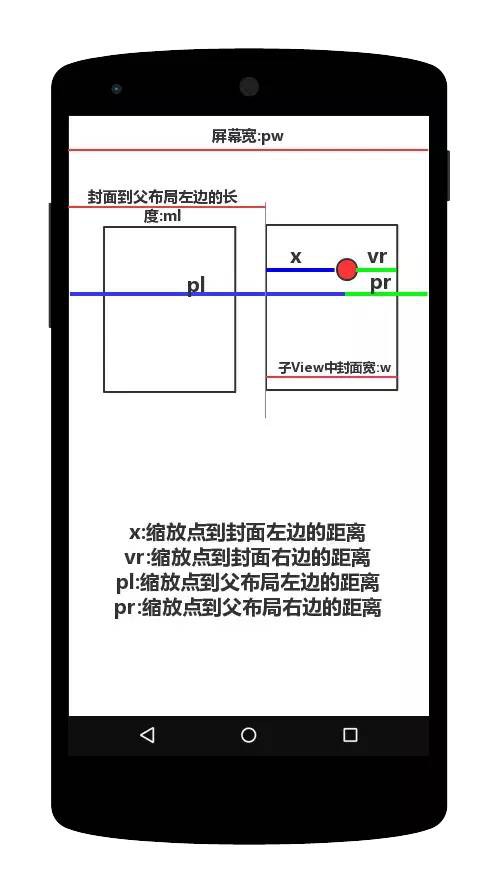
縮放講解圖.png
我們可以得出這樣的公式:x / pl = vr / pr,而對於pl、vr和pr,則有pl = ml + x,vr = w – x和pr = pw -pl,綜合以上的公式,最終我們可以得出的x = ml * pw / (pw – w),y的坐標可以用同樣的方式求得。
下麵我們來看程式碼:
public class Rotate3DAnimation extends Animation {
    private static final String TAG = "Rotate3DAnimation";

    private final float mFromDegrees;
    private final float mToDegrees;
    private final float mMarginLeft;
    private final float mMarginTop;
    // private final float mDepthZ;
    private final float mAnimationScale;
    private boolean reverse;
    private Camera mCamera;

    // 旋轉中心
    private float mPivotX;
    private float mPivotY;

    private float scale = 1;    //

    public Rotate3DAnimation(Context context, float mFromDegrees, float mToDegrees, float mMarginLeft, float mMarginTop,
                             float animationScale, boolean reverse) {
        this.mFromDegrees = mFromDegrees;
        this.mToDegrees = mToDegrees;
        this.mMarginLeft = mMarginLeft;
        this.mMarginTop = mMarginTop;
        this.mAnimationScale = animationScale;
        this.reverse = reverse;

        // 獲取手機畫素密度 (即dp與px的比例)
        scale = context.getResources().getDisplayMetrics().density;
    }

    @Override
    public void initialize(int width, int height, int parentWidth, int parentHeight) {
        super.initialize(width, height, parentWidth, parentHeight);

        mCamera = new Camera();
        mPivotX = calculatePivotX(mMarginLeft, parentWidth, width);
        mPivotY = calculatePivotY(mMarginTop, parentHeight, height);
        Log.i(TAG,"width:"+width+",height:"+height+",pw:"+parentWidth+",ph:"+parentHeight);
        Log.i(TAG,"中心點x:"+mPivotX+",中心點y:"+mPivotY);
    }

    @Override
    protected void applyTransformation(float interpolatedTime, Transformation t) {
        super.applyTransformation(interpolatedTime, t);

        float degrees = reverse ? mToDegrees + (mFromDegrees - mToDegrees) * interpolatedTime : mFromDegrees + (mToDegrees - mFromDegrees) * interpolatedTime;
        Matrix matrix = t.getMatrix();

        Camera camera = mCamera;
        camera.save();
        camera.rotateY(degrees);
        camera.getMatrix(matrix);
        camera.restore();

        // 修正失真,主要修改 MPERSP_0 和 MPERSP_1
        float[] mValues = new float[9];
        matrix.getValues(mValues);                //獲取數值
        mValues[6] = mValues[6] / scale;            //數值修正
        mValues[7] = mValues[7] / scale;            //數值修正
        matrix.setValues(mValues);                //重新賦值

        if (reverse) {
            matrix.postScale(1 + (mAnimationScale - 1) * interpolatedTime, 1 + (mAnimationScale - 1) * interpolatedTime,
                    mPivotX - mMarginLeft, mPivotY - mMarginTop);
        } else {
            matrix.postScale(1 + (mAnimationScale - 1) * (1 - interpolatedTime), 1 + (mAnimationScale - 1) * (1 - interpolatedTime),
                    mPivotX - mMarginLeft, mPivotY - mMarginTop);
        }
    }

    /**
     * 計算縮放的中心點的橫坐標
     *
     * @param marginLeft  該View距離父佈局左邊的距離
     * @param parentWidth 父佈局的寬度
     * @param width       View的寬度
     * @return 縮放中心點的橫坐標
     */
    public float calculatePivotX(float marginLeft, float parentWidth, float width) {
        return parentWidth * marginLeft / (parentWidth - width);
    }


    /**
     * 計算縮放的中心點的縱坐標
     *
     * @param marginTop    該View頂部距離父佈局頂部的距離
     * @param parentHeight 父佈局的高度
     * @param height       子佈局的高度
     * @return 縮放的中心點的縱坐標
     */
    public float calculatePivotY(float marginTop, float parentHeight, float height) {
        return parentHeight * marginTop / (parentHeight - height);
    }

    public void reverse() {
        reverse = !reverse;
    }
}
計算縮放點我們在上面已經討論過,這裡我們就只看函式applyTransformation(float interpolatedTime, Transformation t),我們先判斷我們當前是開啟書還是合上書的狀態(這兩個狀態使得動畫正好相反),計算好當前旋轉度數再取得Camera,利用camera.rotateY(degrees)實現書本圍繞Y軸旋轉,之後拿到我們的矩陣,圍繞計算出的中心點進行縮放。
3、使用
這一步我們需要將動畫運用到我們的介面上去,當點選我們的RecyclerView的時候,我們需要取出RecyclerView中的子View中的ImageView,在配接器中利用監聽器傳出:
public interface OnBookClickListener{
    void onItemClick(int pos,View view);
}
接著,我們在OpenBookActivity中實現OnBookClickListener介面,省略了一些程式碼:
public class OpenBookActivity extends AppCompatActivity implements Animation.AnimationListener,BookAdapter.OnBookClickListener {
    private static final String TAG = "OpenBookActivity";

    //  一系列變數 此處省略
    ...
    // 記錄View的位置
    private int[] location = new int[2];
    // 內容頁
    private ImageView mContent;
    // 封面
    private ImageView mFirst;
    // 縮放動畫
    private ContentScaleAnimation scaleAnimation;
    // 3D旋轉動畫
    private Rotate3DAnimation threeDAnimation;

    @Override
    protected void onCreate(Bundle savedInstanceState) {
        super.onCreate(savedInstanceState);
        setContentView(R.layout.activity_open_book);

        initWidget();
    }

    private void initWidget() {
        ...

        // 獲取狀態列高度
        statusHeight = -1;
        //獲取status_bar_height資源的ID
        int resourceId = getResources().getIdentifier("status_bar_height", "dimen", "android");
        if (resourceId > 0) {
            //根據資源ID獲取響應的尺寸值
            statusHeight = getResources().getDimensionPixelSize(resourceId);
        }

        initData();
        ...
    }

    // 重覆新增資料
    private void initData() {
        for(int i = 0;i<10;i++){
            values.add(R.drawable.preview);
        }
    }

    @Override
    protected void onRestart() {
        super.onRestart();

        // 當介面重新進入的時候進行合書的動畫
        if(isOpenBook) {
            scaleAnimation.reverse();
            threeDAnimation.reverse();
            mFirst.clearAnimation();
            mFirst.startAnimation(threeDAnimation);
            mContent.clearAnimation();
            mContent.startAnimation(scaleAnimation);
        }
    }

    @Override
    public void onAnimationEnd(Animation animation) {
        if(scaleAnimation.hasEnded() && threeDAnimation.hasEnded()) {
            // 兩個動畫都結束的時候再處理後續操作
            if (!isOpenBook) {
                isOpenBook = true;
                BookSampleActivity.show(this);
            } else {
                isOpenBook = false;
                mFirst.clearAnimation();
                mContent.clearAnimation();
                mFirst.setVisibility(View.GONE);
                mContent.setVisibility(View.GONE);
            }
        }
    }

    @Override
    public void onItemClick(int pos,View view) {
        mFirst.setVisibility(View.VISIBLE);
        mContent.setVisibility(View.VISIBLE);

        // 計算當前的位置坐標
        view.getLocationInWindow(location);
        int width = view.getWidth();
        int height = view.getHeight();

        // 兩個ImageView設定大小和位置
        RelativeLayout.LayoutParams params = (RelativeLayout.LayoutParams) mFirst.getLayoutParams();
        params.leftMargin = location[0];
        params.topMargin = location[1] - statusHeight;
        params.width = width;
        params.height = height;
        mFirst.setLayoutParams(params);
        mContent.setLayoutParams(params);
        //  設定內容
        Bitmap contentBitmap = Bitmap.createBitmap(width,height, Bitmap.Config.ARGB_8888);
        contentBitmap.eraseColor(getResources().getColor(R.color.read_theme_yellow));
        mContent.setImageBitmap(contentBitmap);
        // 設定封面
        Bitmap coverBitmap = BitmapFactory.decodeResource(getResources(),values.get(pos));
        mFirst.setImageBitmap(coverBitmap);
        // 設定封面
        initAnimation(view);
        Log.i(TAG,"left:"+mFirst.getLeft()+"top:"+mFirst.getTop());

        mContent.clearAnimation();
        mContent.startAnimation(scaleAnimation);
        mFirst.clearAnimation();
        mFirst.startAnimation(threeDAnimation);
    }

    // 初始化動畫
    private void initAnimation(View view) {
        float viewWidth = view.getWidth();
        float viewHeight = view.getHeight();

        DisplayMetrics displayMetrics = new DisplayMetrics();
        getWindow().getWindowManager().getDefaultDisplay().getMetrics(displayMetrics);
        float maxWidth = displayMetrics.widthPixels;
        float maxHeight = displayMetrics.heightPixels;
        float horScale = maxWidth / viewWidth;
        float verScale = maxHeight / viewHeight;
        float scale = horScale > verScale ? horScale : verScale;

        scaleAnimation = new ContentScaleAnimation(location[0], location[1], scale, false);
        scaleAnimation.setInterpolator(new DecelerateInterpolator());  //設定插值器
        scaleAnimation.setDuration(1000);
        scaleAnimation.setFillAfter(true);  //動畫停留在最後一幀
        scaleAnimation.setAnimationListener(OpenBookActivity.this);

        threeDAnimation = new Rotate3DAnimation(OpenBookActivity.this, -180, 0
                , location[0], location[1], scale, true);
        threeDAnimation.setDuration(1000);                         //設定動畫時長
        threeDAnimation.setFillAfter(true);                        //保持旋轉後效果
        threeDAnimation.setInterpolator(new DecelerateInterpolator());
    }
}
第一個重點是複寫的OnBookClickListener中的onItemClick方法,在該方法中:
-
我們根據取得的view(實際上是子View中的ImageView),計算出當前介面的兩個ImageView的位置和大小。
-
計算縮放引數和播放動畫的順序,展開動畫,和處理動畫結束後的事件。
第二個重點是中心回到當前介面的時候,合上書的動畫,就是剛剛的動畫倒過來執行,在onRestart()方法中執行,執行完成之後隱藏兩個ImageVIew。
總結
總的來說就是Camera和Animation的簡單使用,本人水平有限,難免不足,歡迎提出。
專案地址:
