
作者 | Vivek Gite
譯者 | MjSeven ? ? ? 共計翻譯:16 篇 貢獻時間:58 天
Q:我是一個新 Debian Linux 使用者,我想為 Debian Linux 上執行的虛擬化環境(KVM)設定網橋。那麼我該如何在 Debian Linux 9.x 伺服器上的 /etc/network/interfaces中設定橋接網路呢?
如何你想為你的虛擬機器分配 IP 地址並使其可從你的區域網訪問,則需要設定網路橋接器。預設情況下,虛擬機器使用 KVM 建立的專用網橋。但你需要手動設定介面,避免與網路管理員發生衝突。
怎樣安裝 brctl
輸入以下 apt-get 命令[1]:
$ sudo apt install bridge-utils
怎樣在 Debian Linux 上設定網橋
你需要編輯 /etc/network/interface 檔案。不過,我建議在 /etc/network/interface.d/ 目錄下放置一個全新的配置。在 Debian Linux 配置網橋的過程如下:
步驟 1 – 找出你的物理介面
使用 ip 命令[2]:
$ ip -f inet a s
示例輸出如下:
2: eno1: <BROADCAST,MULTICAST,UP,LOWER_UP> mtu 1500 qdisc pfifo_fast state UP group default qlen 1000
inet 192.168.2.23/24 brd 192.168.2.255 scope global eno1
valid_lft forever preferred_lft forever
eno1 是我的物理網絡卡。
步驟 2 – 更新 /etc/network/interface 檔案
確保只有 lo(loopback 在 /etc/network/interface 中處於活動狀態)。(LCTT 譯註:loopback 指本地環回介面,也稱為回送地址)刪除與 eno1 相關的任何配置。這是我使用 cat 命令[3] 列印的配置檔案:
$ cat /etc/network/interface
# This file describes the network interfaces available on your system
# and how to activate them. For more information, see interfaces(5).
source /etc/network/interfaces.d/*
# The loopback network interface
auto lo
iface lo inet loopback
步驟 3 – 在 /etc/network/interfaces.d/br0 中配置網橋(br0)
使用文字編輯器建立一個文字檔案,比如 vi 命令:
$ sudo vi /etc/network/interfaces.d/br0
在其中新增配置:
## static ip config file for br0 ##
auto br0
iface br0 inet static
address 192.168.2.23
broadcast 192.168.2.255
netmask 255.255.255.0
gateway 192.168.2.254
# If the resolvconf package is installed, you should not edit
# the resolv.conf configuration file manually. Set name server here
#dns-nameservers 192.168.2.254
# If you have muliple interfaces such as eth0 and eth1
# bridge_ports eth0 eth1
bridge_ports eno1
bridge_stp off # disable Spanning Tree Protocol
bridge_waitport 0 # no delay before a port becomes available
bridge_fd 0 # no forwarding delay
如果你想使用 DHCP 來獲得 IP 地址:
## DHCP ip config file for br0 ##
auto br0
# Bridge setup
iface br0 inet dhcp
bridge_ports eno1
在 vi/vim 中儲存並關閉檔案[4]。
步驟 4 – 重新啟動網路服務
在重新啟動網路服務之前,請確保防火牆已關閉。防火牆可能會取用較老的介面,例如 eno1。一旦服務重新啟動,你必須更新 br0 介面的防火牆規則。鍵入以下命令重新啟動防火牆:
$ sudo systemctl restart network-manager
確認服務已經重新啟動:
$ systemctl status network-manager
藉助 ip 命令[2]尋找新的 br0 介面和路由表:
$ ip a s $ ip r $ ping -c 2 cyberciti.biz
示例輸出:

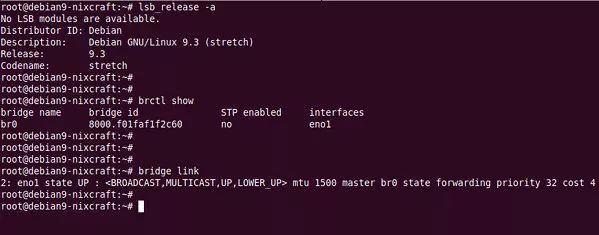
你可以使用 brctl 命令檢視網橋有關資訊:
$ brctl show
顯示當前網橋:
$ bridge link
關於作者
作者是 nixCraft 的建立者,也是經驗豐富的系統管理員,DevOps 工程師以及 Linux 作業系統/ Unix shell 指令碼的培訓師。透過訂閱 RSS/XML 流[5] 或者 每週郵件推送[6]獲得關於 SysAdmin, Linux/Unix 和開源主題的最新教程。
via: https://www.cyberciti.biz/faq/how-to-configuring-bridging-in-debian-linux/
作者:Vivek GIte[8] 譯者:MjSeven 校對:wxy
本文由 LCTT 原創編譯,Linux中國 榮譽推出
