1、概述
帝都幾日降溫,終於被撂倒了。but 只要一息尚存就得不斷進步!於是,寫出 《PopupWindow 使用詳解》的第二篇 筆記,先奉上 第一篇連結: 《PopupWindow 使用詳解(一) 中文API 檔案 贈送 ListPopupWindow 中文 API》 。https://www.jianshu.com/p/3a8dd7a4b41a
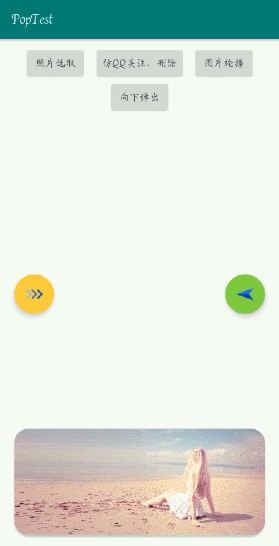
下麵給大家展示一下製作的效果gif。
下麵進行一個樣式一個樣式的肢解哈,對了,所有效果筆者都沒有製作載入動畫和退出動畫。有需要的小夥伴可以透過 這個方法 public void setAnimationStyle(int animationStyle) 進行設定,也是很簡單、很常用的。
2、效果一、圖片選取功能(帶陰影)
1、佈局設定
<LinearLayout xmlns:android="http://schemas.android.com/apk/res/android"

android:id="@+id/ll_pic"

android:layout_width="match_parent"

android:layout_height="match_parent"

android:background="@drawable/shape_pic_select"

android:gravity="bottom"

android:orientation="vertical"><LinearLayout
android:layout_width="match_parent"
android:layout_height="wrap_content"
android:layout_marginStart="5dp"
android:layout_marginEnd="5dp"
android:orientation="vertical"><Button
android:id="@+id/btn_pic_photo"
android:layout_width="match_parent"
android:layout_height="wrap_content"
android:layout_marginBottom="1dp"
android:background="#ffffff"
android:text="相 冊"
android:textColor="#3c3c3c"
android:textSize="16sp" /><Button
android:id="@+id/btn_pic_camera"
android:layout_width="match_parent"
android:layout_height="wrap_content"
android:layout_marginBottom="1dp"
android:background="#ffffff"
android:text="拍 照"
android:textColor="#3c3c3c"
android:textSize="16sp" /><Button
android:id="@+id/btn_pic_cancel"
android:layout_width="match_parent"
android:layout_height="wrap_content"
android:layout_marginBottom="1dp"
android:background="#ffffff"
android:text="取 消"
android:textColor="#3c3c3c"
android:textSize="16sp" />
LinearLayout>
LinearLayout>
2、Java 邏輯程式碼
/**
* 照片選擇器
*/
("InflateParams")
private void showPicSelect() {
view = LayoutInflater.from(this).inflate(R.layout.item_pic_select, null, false);
LinearLayout llPop = view.findViewById(R.id.ll_pic);
Button btnCamera = view.findViewById(R.id.btn_pic_camera);
Button btnPhoto = view.findViewById(R.id.btn_pic_photo);
Button btnCancel = view.findViewById(R.id.btn_pic_cancel);btnCamera.setOnClickListener(this);
btnPhoto.setOnClickListener(this);
btnCancel.setOnClickListener(this);
llPop.setOnClickListener(this);myPop = new PopupWindow(view, ViewGroup.LayoutParams.MATCH_PARENT, ViewGroup.LayoutParams.MATCH_PARENT);
myPop.setBackgroundDrawable(new ColorDrawable());
myPop.showAtLocation(rlMain, Gravity.BOTTOM, 0, 0);
}
public void onBackPressed() {
if (myPop.isShowing()) {
myPop.dismiss();
} else {
super.onBackPressed();
}
}
3、實現思路
之前筆者看了看網上百度來的答案,實現陰影效果的思路大概是,當 PopupWindow 彈出時將 Activity 設定為半透明,但是這種思路的弊端是 Activity 透明瞭,你懂得,你可以在 A Activity 介面直接看到了 桌面或者是 B Activity 介面的東西,很蛋疼。
筆者的思路是:為 PopupWindow 設定一個半透明的背景色,然後監聽這不背景 layout 的點選事件,和物理鍵的傳回事件。否則會出現點選無效果的現象。具體邏輯如上。
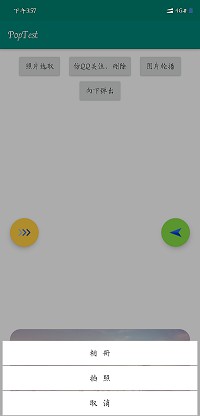
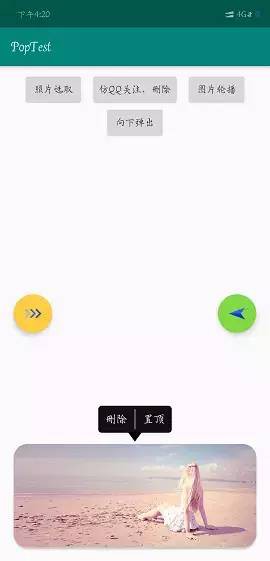
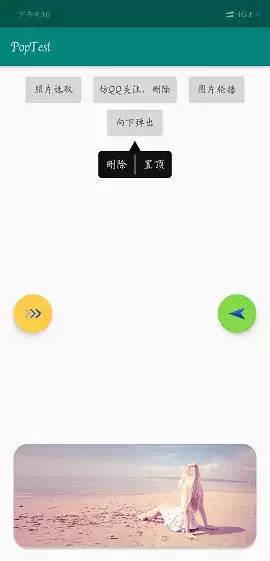
3、仿qq和微信的長按置頂刪除功能
1、佈局
<RelativeLayout xmlns:android="http://schemas.android.com/apk/res/android"

xmlns:tools="http://schemas.android.com/tools"

android:layout_width="match_parent"

android:layout_height="match_parent"><LinearLayout
android:id="@+id/ll_qq"
android:layout_width="wrap_content"
android:layout_height="wrap_content"
android:layout_centerHorizontal="true"
android:background="@drawable/shape_qq"
android:orientation="horizontal"
tools:ignore="UselessParent"><TextView
android:id="@+id/tv_delete"
android:layout_width="wrap_content"
android:layout_height="wrap_content"
android:padding="10dp"
android:text="刪除"
android:textColor="#ffffff"
android:textSize="16sp" /><View
android:layout_width="2dp"
android:layout_height="match_parent"
android:layout_marginTop="5dp"
android:layout_marginBottom="5dp"
android:background="#666666" /><TextView
android:id="@+id/tv_be_top"
android:layout_width="wrap_content"
android:layout_height="wrap_content"
android:padding="10dp"
android:text="置頂"
android:textColor="#ffffff"
android:textSize="16sp" />LinearLayout>
<ImageView
android:id=“@+id/iv_three”
android:layout_width=“wrap_content”
android:layout_height=“wrap_content”
android:layout_below=“@+id/ll_qq”
android:layout_centerHorizontal=“true”
android:background=“@null”
android:layout_marginTop=“-5dp”
android:contentDescription=“@string/app_name”
android:src=“@mipmap/ic_three” />
RelativeLayout>
2、Java 邏輯
/**

* 仿qq 產生水滴按鈕

*/

@SuppressLint("InflateParams")

private void showQq() {

view = LayoutInflater.from(this).inflate(R.layout.item_qq, null, false);

TextView tvTop = view.findViewById(R.id.tv_be_top);

TextView tvDelete = view.findViewById(R.id.tv_delete);

tvDelete.setOnClickListener(this);

tvTop.setOnClickListener(this);
myPop = new PopupWindow(view, ViewGroup.LayoutParams.WRAP_CONTENT, ViewGroup.LayoutParams.WRAP_CONTENT);
myPop.setBackgroundDrawable(new ColorDrawable());
myPop.setOutsideTouchable(true);
myPop.getContentView().measure(0, 0);
myPop.showAsDropDown(cvMain, (cvMain.getWidth() - myPop.getContentView().getMeasuredWidth()) / 2,
-(cvMain.getHeight() + myPop.getContentView().getMeasuredHeight()));
}
3、實現思路
這個其實沒什麼好說的,但是需要註意的兩點是:
(1)、ui 一定要有的或者是自己會個ps 也行,仔細看筆者佈局,有一個地方,設定 margin 屬性居然用了 負值 否則無法保證 下麵的shape 背景與三角標進行無縫銜接;
(2)、註意這個方法一定要設定即便是不設定值 public void setBackgroundDrawable(Drawable background) 否則會導致 public void setOutsideTouchable(boolean touchable) 這個方法不起作用,即出現點選 PopupWindow 外部區域無法隱藏 PopupWindow 的尷尬局面.
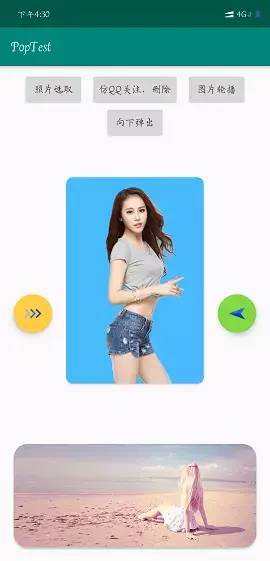
4、實現懸浮圖片輪播
1、佈局程式碼
<android.support.v7.widget.CardView xmlns:android="http://schemas.android.com/apk/res/android"

xmlns:app="http://schemas.android.com/apk/res-auto"

android:layout_width="wrap_content"

android:layout_height="wrap_content"

android:background="#00000000"

app:cardCornerRadius="10dp"><android.support.v4.view.ViewPager
android:id="@+id/vp_pop"
android:layout_width="200dp"
android:layout_height="300dp"
android:background="#48BAFF" />android.support.v7.widget.CardView>
<LinearLayout xmlns:android=“http://schemas.android.com/apk/res/android”
android:layout_width=“match_parent”
android:layout_height=“match_parent”
android:gravity=“center”
android:orientation=“vertical”>
<ImageView
android:layout_width=“200dp”
android:layout_height=“300dp”
android:contentDescription=“@string/app_name”
android:src=“@mipmap/pic_1” />
LinearLayout>
2、Java 邏輯程式碼
/**

* 輪播效果

*/

@SuppressLint("InflateParams")

private void showPager() {

views = new ArrayList<>();

view = LayoutInflater.from(this).inflate(R.layout.item_pager, null, false);

ViewPager vpPop = view.findViewById(R.id.vp_pop);

picView01 = LayoutInflater.from(this).inflate(R.layout.item_pop_vp_01, null, false);

picView02 = LayoutInflater.from(this).inflate(R.layout.item_pop_vp_02, null, false);

picView03 = LayoutInflater.from(this).inflate(R.layout.item_pop_vp_03, null, false);

picView04 = LayoutInflater.from(this).inflate(R.layout.item_pop_vp_04, null, false);views.add(picView01);
views.add(picView02);
views.add(picView03);
views.add(picView04);
vpPop.setAdapter(new MyPopAdapter());myPop = new PopupWindow(view, ViewGroup.LayoutParams.WRAP_CONTENT, ViewGroup.LayoutParams.WRAP_CONTENT);
myPop.setOutsideTouchable(true);
//懸浮效果
myPop.setElevation(5);
myPop.setBackgroundDrawable(new ColorDrawable(0x00ffffff));
myPop.showAtLocation(rlMain, Gravity.CENTER, 0, 0);
}/**
* 配置 adapter
*/
class MyPopAdapter extends PagerAdapter {@Override
public int getCount() {
return views.size();
}@Override
public boolean isViewFromObject(@NonNull View view, @NonNull Object o) {
return view == o;
}@NonNull
@Override
public Object instantiateItem(@NonNull ViewGroup container, int position) {
container.addView(views.get(position));
return views.get(position);
}@Override
public void destroyItem(@NonNull ViewGroup container, int position, @NonNull Object object) {
container.removeView(views.get(position));
}
}@Override
protected void onDestroy() {
super.onDestroy();
if (views != null) {
views.remove(picView01);
views.remove(picView02);
views.remove(picView03);
views.remove(picView04);
}
if (myPop.isShowing()) {
myPop.dismiss();
}
}
3、實現思路及註意事項
首先,載入圖片需要進行相關處理,比如說用過Picasso 或者是 Glide 等框架,當然了也可將進行自己壓縮;
其次,由於為了突出美觀,筆者用了一個 CardView 可以設定圓角,但是 CardView 的陰影屬性失效了,為了凸顯層次感可以設定 PopupWindow 的這個方法public void setElevation(float elevation) 該方法可以是你感覺出一種懸浮的效果;
最後,沒用的 view 需要進行清理,否則會留在記憶體哦。
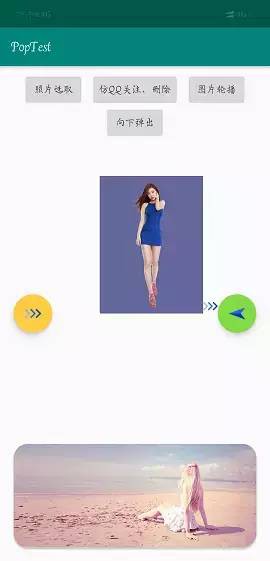
5、向下彈出水滴效果
1、佈局原始碼
<RelativeLayout xmlns:android="http://schemas.android.com/apk/res/android"

android:layout_width="wrap_content"

android:layout_height="wrap_content"><ImageView
android:layout_width="wrap_content"
android:layout_height="wrap_content"
android:layout_alignBottom="@+id/iv_beauty"
android:layout_toEndOf="@+id/iv_beauty"
android:src="@mipmap/ic_right" /><ImageView
android:id="@+id/iv_beauty"
android:layout_width="150dp"
android:layout_height="200dp"
android:background="#669"
android:src="@mipmap/pic_5" />
RelativeLayout>
2、Java 邏輯
/**

* 向下彈出

*/

@SuppressLint("InflateParams")

private void showDown() {

view = LayoutInflater.from(this).inflate(R.layout.item_anywhere, null, false);
myPop = new PopupWindow(view, ViewGroup.LayoutParams.WRAP_CONTENT, ViewGroup.LayoutParams.WRAP_CONTENT);
myPop.setBackgroundDrawable(new ColorDrawable());
myPop.setOutsideTouchable(true);
myPop.getContentView().measure(0, 0);
myPop.showAsDropDown(btnPopDown, -((myPop.getContentView().getMeasuredWidth() - btnPopDown.getWidth()) / 2), 0);
}
3、註意事項
這個沒什麼可說的了,和 上面 小標題二 相同 ,具體檢視上方即可。
6、實現螢幕右側向左彈出
1、佈局程式碼
<RelativeLayout xmlns:android="http://schemas.android.com/apk/res/android"

android:layout_width="wrap_content"

android:layout_height="wrap_content"><ImageView
android:layout_width="wrap_content"
android:layout_height="wrap_content"
android:layout_alignBottom="@+id/iv_beauty"
android:layout_toEndOf="@+id/iv_beauty"
android:src="@mipmap/ic_right" /><ImageView
android:id="@+id/iv_beauty"
android:layout_width="150dp"
android:layout_height="200dp"
android:background="#669"
android:src="@mipmap/pic_5" />
RelativeLayout>
2、Java 邏輯程式碼
/**

* 向左彈出

*/

@SuppressLint("InflateParams")

private void showStart() {

view = LayoutInflater.from(this).inflate(R.layout.item_pop_start, null, false);
myPop = new PopupWindow(view, ViewGroup.LayoutParams.WRAP_CONTENT, ViewGroup.LayoutParams.WRAP_CONTENT);
myPop.setBackgroundDrawable(new ColorDrawable());
myPop.setOutsideTouchable(true);
myPop.getContentView().measure(0, 0);
myPop.showAsDropDown(fabStart, -(myPop.getContentView().getMeasuredWidth()), -(fabStart.getHeight() / 2 + myPop.getContentView().getMeasuredHeight()));
}
3、註意事項
這裡比較複雜的 就是 PopupWindow 的錨點位置 為 其寄生的 控制元件的 左下角,而 Popwindow 的起始點為 左上角,但是 PopupWindow 預設不超出介面。這就導致了 PopupWindow 明明在 控制元件則左側,但是卻無法到達自己的想要位置。
所以 對於該現象,我們只能 在計算偏移量的時候 需要向左 移動 (控制元件長度+PopupWindow的長度 +其他長度)
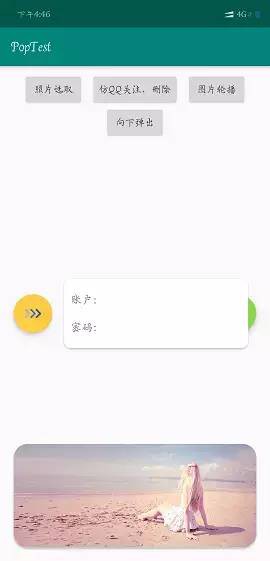
7、實現需要獲取焦點的控制元件使用
1、佈局程式碼
<android.support.v7.widget.CardView xmlns:android="http://schemas.android.com/apk/res/android"

xmlns:app="http://schemas.android.com/apk/res-auto"

xmlns:tools="http://schemas.android.com/tools"

android:layout_width="wrap_content"

android:layout_height="wrap_content"

android:background="#00000000"

app:cardCornerRadius="10dp"><RelativeLayout
android:layout_width="wrap_content"
android:layout_height="wrap_content"
android:background="#00000000"
android:padding="10dp"><TextView
android:id="@+id/tv_name_p"
android:layout_width="wrap_content"
android:layout_height="40dp"
android:gravity="center_vertical"
android:text="賬戶:"
android:textSize="16sp" /><EditText
android:layout_width="200dp"
android:layout_height="40dp"
android:layout_toEndOf="@+id/tv_name_p"
android:background="@null"
android:gravity="center_vertical"
android:inputType="number"
android:paddingStart="10dp"
android:paddingEnd="10dp"
android:singleLine="true"
android:textSize="16sp"
tools:text="123" /><TextView
android:id="@+id/tv_password_p"
android:layout_width="wrap_content"
android:layout_height="40dp"
android:layout_below="@+id/tv_name_p"
android:gravity="center_vertical"
android:text="密碼:"
android:textSize="16sp" /><EditText
android:layout_width="200dp"
android:layout_height="40dp"
android:layout_below="@+id/tv_name_p"
android:layout_toEndOf="@+id/tv_password_p"
android:background="@null"
android:gravity="center_vertical"
android:inputType="numberPassword"
android:paddingStart="10dp"
android:paddingEnd="10dp"
android:singleLine="true"
android:textSize="16sp"
tools:text="123" />
RelativeLayout>
android.support.v7.widget.CardView>
2、邏輯程式碼
@SuppressLint("InflateParams")

private void showEnd() {

view = LayoutInflater.from(this).inflate(R.layout.item_end_input, null, false);
myPop = new PopupWindow(view, ViewGroup.LayoutParams.WRAP_CONTENT, ViewGroup.LayoutParams.WRAP_CONTENT);
myPop.setBackgroundDrawable(new ColorDrawable(0x00ffffff));
myPop.setElevation(10);
myPop.setOutsideTouchable(true);
myPop.setFocusable(true);
myPop.getContentView().measure(0, 0);
myPop.showAsDropDown(fadEnd, (int) (fadEnd.getWidth() * 1.3), -((fadEnd.getHeight() + myPop.getContentView().getMeasuredHeight()) / 2));
}
3、註意事項
這裡一定要 設定該方法 public void setFocusable(boolean focusable)否則 在切換EditText 的時候只是游標進行了移動,但是 無法召喚軟鍵盤。
8、總結
1、筆者認為,上面的大概可以滿足比較簡單的開發需求了,筆者很菜,這些已經足可以滿足筆者了目前;
2、關於偏移量這個會涉及導到一些小小的計算和一點點邏輯想法,所以不要只是做 cv 戰士,作為文雅的程式員,我們還是需要有點自己的想法的哈;
3、程式碼上傳 github 地址為:PopupWindow
https://github.com/xiangshiweiyu/PopupWindow
4、希望可以幫到你,批評和建議儘管提出來。