
作者 | Patrick Triest
譯者 | qhwdw ? ? ? ? ? 共計翻譯:105 篇 貢獻時間:177 天
如何在超過 500 萬篇文章的 Wikipedia 上找到與你研究相關的文章?
如何在超過 20 億使用者的 Facebook 中找到你的朋友(並且還拼錯了名字)?
谷歌如何在整個因特網上搜索你的模糊的、充滿拼寫錯誤的查詢?
在本教程中,我們將帶你探索如何配置我們自己的全文搜尋應用程式(與上述問題中的系統相比,它的複雜度要小很多)。我們的示例應用程式將提供一個 UI 和 API 去從 100 部經典文學(比如,《彼得·潘》 、 《弗蘭肯斯坦》 和 《金銀島》)中搜索完整的文字。
你可以在這裡(https://search.patricktriest.com)預覽該教程應用的完整版本。

preview webapp
這個應用程式的原始碼是 100% 開源的,可以在 GitHub 倉庫上找到它們 —— https://github.com/triestpa/guttenberg-search 。
在應用程式中新增一個快速靈活的全文搜尋可能是個挑戰。大多數的主流資料庫,比如,PostgreSQL[3] 和 MongoDB[4],由於受其查詢和索引結構的限制只能提供一個非常基礎的文字搜尋功能。為實現高質量的全文搜尋,通常的最佳選擇是單獨的資料儲存。Elasticsearch[5] 是一個開源資料儲存的領導者,它專門為執行靈活而快速的全文搜尋進行了最佳化。
我們將使用 Docker[6] 去配置我們自己的專案環境和依賴。Docker 是一個容器化引擎,它被 Uber[7]、Spotify[8]、ADP[9] 以及 Paypal[10] 使用。構建容器化應用的一個主要優勢是,專案的設定在 Windows、macOS、以及 Linux 上都是相同的 —— 這使我寫這個教程快速又簡單。如果你還沒有使用過 Docker,不用擔心,我們接下來將經歷完整的專案配置。
我也會使用 Node.js[11] (使用 Koa[12] 框架)和 Vue.js[13],用它們分別去構建我們自己的搜尋 API 和前端 Web 應用程式。
1 – Elasticsearch 是什麼?
全文搜尋在現代應用程式中是一個有大量需求的特性。搜尋也可能是最難的一項特性 —— 許多流行的網站的搜尋功能都不合格,要麼傳回結果太慢,要麼找不到精確的結果。通常,這種情況是被底層的資料庫所侷限:大多數標準的關係型資料庫侷限於基本的 CONTAINS 或 LIKESQL 查詢上,它僅提供最基本的字串匹配功能。
我們的搜尋應用程式將具備:

Elastic Search Logo
為了構建一個功能強大的搜尋功能,通常最理想的方法是使用一個為全文搜尋任務最佳化過的資料儲存。在這裡我們使用 Elasticsearch[5],Elasticsearch 是一個開源的記憶體中的資料儲存,它是用 Java 寫的,最初是在 Apache Lucene[14] 庫上構建的。
這裡有一些來自 Elastic 官方網站[15] 上的 Elasticsearch 真實使用案例。
與 “普通的” 資料庫相比,Elasticsearch 有什麼不一樣的地方?
Elasticsearch 之所以能夠提供快速靈活的全文搜尋,秘密在於它使用反轉索引 。
“索引” 是資料庫中的一種資料結構,它能夠以超快的速度進行資料查詢和檢索操作。資料庫透過儲存與表中行相關聯的欄位來生成索引。在一種可搜尋的資料結構(一般是 B 樹[16])中排序索引,在最佳化過的查詢中,資料庫能夠達到接近線性的時間(比如,“使用 ID=5 查詢行”)。

Relational Index
我們可以將資料庫索引想像成一個圖書館中老式的卡片式目錄 —— 只要你知道書的作者和書名,它就會告訴你書的準確位置。為加速特定欄位上的查詢速度,資料庫表一般有多個索引(比如,在 name 列上的索引可以加速指定名字的查詢)。
反轉索引本質上是不一樣的。每行(或檔案)的內容是分開的,並且每個獨立的條目(在本案例中是單詞)反向指向到包含它的任何檔案上。
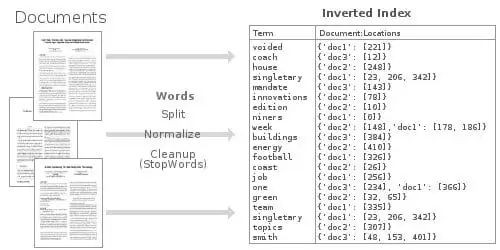
Inverted Index
這種反轉索引資料結構可以使我們非常快地查詢到,所有出現 “football” 的檔案。透過使用大量最佳化過的記憶體中的反轉索引,Elasticsearch 可以讓我們在儲存的資料上,執行一些非常強大的和自定義的全文搜尋。
2 – 專案設定
2.0 – Docker
我們在這個專案上使用 Docker[6] 管理環境和依賴。Docker 是個容器引擎,它允許應用程式執行在一個獨立的環境中,不會受到來自主機作業系統和本地開發環境的影響。現在,許多公司將它們的大規模 Web 應用程式主要執行在容器架構上。這樣將提升靈活性和容器化應用程式元件的可組構性。
Docker Logo
對我來說,使用 Docker 的優勢是,它對本教程的作者非常方便,它的本地環境設定量最小,並且跨 Windows、macOS 和 Linux 系統的一致性很好。我們只需要在 Docker 配置檔案中定義這些依賴關係,而不是按安裝說明分別去安裝 Node.js、Elasticsearch 和 Nginx,然後,就可以使用這個配置檔案在任何其它地方執行我們的應用程式。而且,因為每個應用程式元件都執行在它自己的獨立容器中,它們受本地機器上的其它 “垃圾” 幹擾的可能性非常小,因此,在除錯問題時,像“它在我這裡可以工作!”這類的問題將非常少。
2.1 – 安裝 Docker & Docker-Compose
這個專案只依賴 Docker[6] 和 docker-compose[17],docker-compose 是 Docker 官方支援的一個工具,它用來將定義的多個容器配置 組裝 成單一的應用程式棧。
2.2 – 設定專案主目錄
為專案建立一個主目錄(名為 guttenberg_search)。我們的專案將工作在主目錄的以下兩個子目錄中。
/public – 儲存前端 Vue.js Web 應用程式。/server – 伺服器端 Node.js 原始碼。2.3 – 新增 Docker-Compose 配置
接下來,我們將建立一個 docker-compose.yml 檔案來定義我們的應用程式棧中的每個容器。
gs-api – 後端應用程式邏輯使用的 Node.js 容器gs-frontend – 前端 Web 應用程式使用的 Ngnix 容器。gs-search – 儲存和搜尋資料的 Elasticsearch 容器。
version: '3'
services:
api: # Node.js App
container_name: gs-api
build: .
ports:
- "3000:3000" # Expose API port
- "9229:9229" # Expose Node process debug port (disable in production)
environment: # Set ENV vars
- NODE_ENV=local
- ES_HOST=elasticsearch
- PORT=3000
volumes: # Attach local book data directory
- ./books:/usr/src/app/books
frontend: # Nginx Server For Frontend App
container_name: gs-frontend
image: nginx
volumes: # Serve local "public" dir
- ./public:/usr/share/nginx/html
ports:
- "8080:80" # Forward site to localhost:8080
elasticsearch: # Elasticsearch Instance
container_name: gs-search
image: docker.elastic.co/elasticsearch/elasticsearch:6.1.1
volumes: # Persist ES data in seperate "esdata" volume
- esdata:/usr/share/elasticsearch/data
environment:
- bootstrap.memory_lock=true
- "ES_JAVA_OPTS=-Xms512m -Xmx512m"
- discovery.type=single-node
ports: # Expose Elasticsearch ports
- "9300:9300"
- "9200:9200"
volumes: # Define seperate volume for Elasticsearch data
esdata:
這個檔案定義了我們全部的應用程式棧 —— 不需要在你的本地系統上安裝 Elasticsearch、Node 和 Nginx。每個容器都將埠轉發到宿主機系統(localhost)上,以便於我們在宿主機上去訪問和除錯 Node API、Elasticsearch 實體和前端 Web 應用程式。
2.4 - 新增 Dockerfile
對於 Nginx 和 Elasticsearch,我們使用了官方預構建的映象,而 Node.js 應用程式需要我們自己去構建。
在應用程式的根目錄下定義一個簡單的 Dockerfile 配置檔案。
# Use Node v8.9.0 LTS
FROM node:carbon
# Setup app working directory
WORKDIR /usr/src/app
# Copy package.json and package-lock.json
COPY package*.json ./
# Install app dependencies
RUN npm install
# Copy sourcecode
COPY . .
# Start app
CMD [ "npm", "start" ]
這個 Docker 配置擴充套件了官方的 Node.js 映象、複製我們的應用程式原始碼、以及在容器內安裝 NPM 依賴。
我們也增加了一個 .dockerignore 檔案,以防止我們不需要的檔案複製到容器中。
node_modules/
npm-debug.log
books/
public/
請註意:我們之所以不複製
node_modules目錄到我們的容器中 —— 是因為我們要在容器構建過程裡面執行npm install。從宿主機系統複製node_modules到容器裡面可能會引起錯誤,因為一些包需要為某些作業系統專門構建。比如說,在 macOS 上安裝bcrypt包,然後嘗試將這個模組直接複製到一個 Ubuntu 容器上將不能工作,因為bcyrpt需要為每個作業系統構建一個特定的二進位制檔案。
2.5 - 新增基本檔案
為了測試我們的配置,我們需要新增一些佔位符檔案到應用程式目錄中。
在 public/index.html 檔案中新增如下內容。
Hello World From The Frontend Container
接下來,在 server/app.js 中新增 Node.js 佔位符檔案。
const Koa = require('koa')
const app = new Koa()
app.use(async (ctx, next) => {
ctx.body = 'Hello World From the Backend Container'
})
const port = process.env.PORT || 3000
app.listen(port, err => {
if (err) console.error(err)
console.log(`App Listening on Port ${port}`)
})
最後,新增我們的 package.json Node 應用配置。
{
"name": "guttenberg-search",
"version": "0.0.1",
"description": "Source code for Elasticsearch tutorial using 100 classic open source books.",
"scripts": {
"start": "node --inspect=0.0.0.0:9229 server/app.js"
},
"repository": {
"type": "git",
"url": "git+https://github.com/triestpa/guttenberg-search.git"
},
"author": "patrick.triest@gmail.com",
"license": "MIT",
"bugs": {
"url": "https://github.com/triestpa/guttenberg-search/issues"
},
"homepage": "https://github.com/triestpa/guttenberg-search#readme",
"dependencies": {
"elasticsearch": "13.3.1",
"joi": "13.0.1",
"koa": "2.4.1",
"koa-joi-validate": "0.5.1",
"koa-router": "7.2.1"
}
}
這個檔案定義了應用程式啟動命令和 Node.js 包依賴。
註意:不要執行
npm install—— 當它構建時,依賴會在容器內安裝。
2.6 - 測試它的輸出
現在一切新緒,我們來測試應用程式的每個元件的輸出。從應用程式的主目錄執行 docker-compose build,它將構建我們的 Node.js 應用程式容器。

docker build output
接下來,執行 docker-compose up 去啟動整個應用程式棧。

docker compose output
這一步可能需要幾分鐘時間,因為 Docker 要為每個容器去下載基礎映象。以後再次執行,啟動應用程式會非常快,因為所需要的映象已經下載完成了。
在你的瀏覽器中嘗試訪問 localhost:8080 —— 你將看到簡單的 “Hello World” Web 頁面。
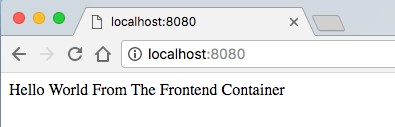
frontend sample output
訪問 localhost:3000 去驗證我們的 Node 伺服器,它將傳回 “Hello World” 資訊。

backend sample output
最後,訪問 localhost:9200 去檢查 Elasticsearch 執行狀態。它將傳回類似如下的內容。
{
"name" : "SLTcfpI",
"cluster_name" : "docker-cluster",
"cluster_uuid" : "iId8e0ZeS_mgh9ALlWQ7-w",
"version" : {
"number" : "6.1.1",
"build_hash" : "bd92e7f",
"build_date" : "2017-12-17T20:23:25.338Z",
"build_snapshot" : false,
"lucene_version" : "7.1.0",
"minimum_wire_compatibility_version" : "5.6.0",
"minimum_index_compatibility_version" : "5.0.0"
},
"tagline" : "You Know, for Search"
}
如果三個 URL 都顯示成功,祝賀你!整個容器棧已經正常運行了,接下來我們進入最有趣的部分。
3 - 連線到 Elasticsearch
我們要做的第一件事情是,讓我們的應用程式連線到我們本地的 Elasticsearch 實體上。
3.0 - 新增 ES 連線模組
在新檔案 server/connection.js 中新增如下的 Elasticsearch 初始化程式碼。
const elasticsearch = require('elasticsearch')
// Core ES variables for this project
const index = 'library'
const type = 'novel'
const port = 9200
const host = process.env.ES_HOST || 'localhost'
const client = new elasticsearch.Client({ host: { host, port } })
/** Check the ES connection status */
async function checkConnection () {
let isConnected = false
while (!isConnected) {
console.log('Connecting to ES')
try {
const health = await client.cluster.health({})
console.log(health)
isConnected = true
} catch (err) {
console.log('Connection Failed, Retrying...', err)
}
}
}
checkConnection()
現在,我們重新構建我們的 Node 應用程式,我們將使用 docker-compose build 來做一些改變。接下來,執行 docker-compose up -d 去啟動應用程式棧,它將以守護行程的方式在後臺執行。
應用程式啟動之後,在命令列中執行 docker exec gs-api "node" "server/connection.js",以便於在容器內執行我們的指令碼。你將看到類似如下的系統輸出資訊。
{ cluster_name: 'docker-cluster',
status: 'yellow',
timed_out: false,
number_of_nodes: 1,
number_of_data_nodes: 1,
active_primary_shards: 1,
active_shards: 1,
relocating_shards: 0,
initializing_shards: 0,
unassigned_shards: 1,
delayed_unassigned_shards: 0,
number_of_pending_tasks: 0,
number_of_in_flight_fetch: 0,
task_max_waiting_in_queue_millis: 0,
active_shards_percent_as_number: 50 }
繼續之前,我們先刪除最下麵的 checkConnection() 呼叫,因為,我們最終的應用程式將呼叫外部的連線模組。
3.1 - 新增函式去重置索引
在 server/connection.js 中的 checkConnection 下麵新增如下的函式,以便於重置 Elasticsearch 索引。
/** Clear the index, recreate it, and add mappings */
async function resetIndex (index) {
if (await client.indices.exists({ index })) {
await client.indices.delete({ index })
}
await client.indices.create({ index })
await putBookMapping()
}
3.2 - 新增圖書樣式
接下來,我們將為圖書的資料樣式新增一個 “對映”。在 server/connection.js 中的 resetIndex 函式下麵新增如下的函式。
/** Add book section schema mapping to ES */
async function putBookMapping () {
const schema = {
title: { type: 'keyword' },
author: { type: 'keyword' },
location: { type: 'integer' },
text: { type: 'text' }
}
return client.indices.putMapping({ index, type, body: { properties: schema } })
}
這是為 book 索引定義了一個對映。Elasticsearch 中的 index 大概類似於 SQL 的 table 或者 MongoDB 的 collection。我們透過新增對映來為儲存的檔案指定每個欄位和它的資料型別。Elasticsearch 是無樣式的,因此,從技術角度來看,我們是不需要新增對映的,但是,這樣做,我們可以更好地控制如何處理資料。
比如,我們給 title 和 author 欄位分配 keyword 型別,給 text 欄位分配 text 型別。之所以這樣做的原因是,搜尋引擎可以區別處理這些字串欄位 —— 在搜尋的時候,搜尋引擎將在 text 欄位中搜索可能的匹配項,而對於 keyword 型別欄位,將對它們進行全文匹配。這看上去差別很小,但是它們對在不同的搜尋上的速度和行為的影響非常大。
在檔案的底部,匯出對外釋出的屬性和函式,這樣我們的應用程式中的其它模組就可以訪問它們了。
module.exports = {
client, index, type, checkConnection, resetIndex
}
4 - 載入原始資料
我們將使用來自 古登堡專案[20] 的資料 —— 它致力於為公共提供免費的線上電子書。在這個專案中,我們將使用 100 本經典圖書來充實我們的圖書館,包括《福爾摩斯探案集》、《金銀島》、《基督山復仇記》、《環遊世界八十天》、《羅密歐與朱麗葉》 和《奧德賽》。

Book Covers
4.1 - 下載圖書檔案
我將這 100 本書打包成一個檔案,你可以從這裡下載它 —— https://cdn.patricktriest.com/data/books.zip
將這個檔案解壓到你的專案的 books/ 目錄中。
你可以使用以下的命令來完成(需要在命令列下使用 wget[22] 和 The Unarchiver[23])。
wget https://cdn.patricktriest.com/data/books.zip
unar books.zip
4.2 - 預覽一本書
嘗試開啟其中的一本書的檔案,假設開啟的是 219-0.txt。你將註意到它開頭是一個公開訪問的協議,接下來是一些標識這本書的書名、作者、發行日期、語言和字元編碼的行。
Title: Heart of Darkness
Author: Joseph Conrad
Release Date: February 1995 [EBook #219]
Last Updated: September 7, 2016
Language: English
Character set encoding: UTF-8
在 *** START OF THIS PROJECT GUTENBERG EBOOK HEART OF DARKNESS *** 這些行後面,是這本書的正式內容。
如果你滾動到本書的底部,你將看到類似 *** END OF THIS PROJECT GUTENBERG EBOOK HEART OF DARKNESS *** 資訊,接下來是本書更詳細的協議版本。
下一步,我們將使用程式從檔案頭部來解析書的元資料,提取 *** START OF 和 ***END OF 之間的內容。
4.3 - 讀取資料目錄
我們將寫一個指令碼來讀取每本書的內容,並將這些資料新增到 Elasticsearch。我們將定義一個新的 Javascript 檔案 server/load_data.js 來執行這些操作。
首先,我們將從 books/ 目錄中獲取每個檔案的串列。
在 server/load_data.js 中新增下列內容。
const fs = require('fs')
const path = require('path')
const esConnection = require('./connection')
/** Clear ES index, parse and index all files from the books directory */
async function readAndInsertBooks () {
try {
// Clear previous ES index
await esConnection.resetIndex()
// Read books directory
let files = fs.readdirSync('./books').filter(file => file.slice(-4) === '.txt')
console.log(`Found ${files.length} Files`)
// Read each book file, and index each paragraph in elasticsearch
for (let file of files) {
console.log(`Reading File - ${file}`)
const filePath = path.join('./books', file)
const { title, author, paragraphs } = parseBookFile(filePath)
await insertBookData(title, author, paragraphs)
}
} catch (err) {
console.error(err)
}
}
readAndInsertBooks()
我們將使用一個快捷命令來重構我們的 Node.js 應用程式,並更新執行的容器。
執行 docker-compose up -d --build 去更新應用程式。這是執行 docker-compose build 和 docker-compose up -d 的快捷命令。

docker build output
為了在容器中執行我們的 load_data 指令碼,我們執行 docker exec gs-api "node" "server/load_data.js" 。你將看到 Elasticsearch 的狀態輸出 Found 100 Books。
這之後,指令碼發生了錯誤退出,原因是我們呼叫了一個沒有定義的輔助函式(parseBookFile)。

docker exec output
4.4 - 讀取資料檔案
接下來,我們讀取元資料和每本書的內容。
在 server/load_data.js 中定義新函式。
/** Read an individual book text file, and extract the title, author, and paragraphs */
function parseBookFile (filePath) {
// Read text file
const book = fs.readFileSync(filePath, 'utf8')
// Find book title and author
const title = book.match(/^Title:\s(.+)$/m)[1]
const authorMatch = book.match(/^Author:\s(.+)$/m)
const author = (!authorMatch || authorMatch[1].trim() === '') ? 'Unknown Author' : authorMatch[1]
console.log(`Reading Book - ${title} By ${author}`)
// Find Guttenberg metadata essay-header and footer
const startOfBookMatch = book.match(/^\*{3}\s*START OF (THIS|THE) PROJECT GUTENBERG EBOOK.+\*{3}$/m)
const startOfBookIndex = startOfBookMatch.index + startOfBookMatch[0].length
const endOfBookIndex = book.match(/^\*{3}\s*END OF (THIS|THE) PROJECT GUTENBERG EBOOK.+\*{3}$/m).index
// Clean book text and split into array of paragraphs
const paragraphs = book
.slice(startOfBookIndex, endOfBookIndex) // Remove Guttenberg essay-header and footer
.split(/\n\s+\n/g) // Split each paragraph into it's own array entry
.map(line => line.replace(/\r\n/g, ' ').trim()) // Remove paragraph line breaks and whitespace
.map(line => line.replace(/_/g, '')) // Guttenberg uses "_" to signify italics. We'll remove it, since it makes the raw text look messy.
.filter((line) => (line && line.length !== '')) // Remove empty lines
console.log(`Parsed ${paragraphs.length} Paragraphs\n`)
return { title, author, paragraphs }
}
這個函式執行幾個重要的任務。
它的傳回值,我們將構建一個物件,這個物件包含書名、作者、以及書中各段落的陣列。
再次執行 docker-compose up -d --build 和 docker exec gs-api "node" "server/load_data.js",你將看到輸出同之前一樣,在輸出的末尾有三個額外的行。

docker exec output
成功!我們的指令碼從文字檔案中成功解析出了書名和作者。指令碼再次以錯誤結束,因為到現在為止,我們還沒有定義輔助函式。
4.5 - 在 ES 中索引資料檔案
最後一步,我們將批次上傳每個段落的陣列到 Elasticsearch 索引中。
在 load_data.js 中新增新的 insertBookData 函式。
/** Bulk index the book data in Elasticsearch */
async function insertBookData (title, author, paragraphs) {
let bulkOps = [] // Array to store bulk operations
// Add an index operation for each section in the book
for (let i = 0; i < paragraphs.length; i++) {
// Describe action
bulkOps.push({ index: { _index: esConnection.index, _type: esConnection.type } })
// Add document
bulkOps.push({
author,
title,
location: i,
text: paragraphs[i]
})
if (i > 0 && i % 500 === 0) { // Do bulk insert in 500 paragraph batches
await esConnection.client.bulk({ body: bulkOps })
bulkOps = []
console.log(`Indexed Paragraphs ${i - 499} - ${i}`)
}
}
// Insert remainder of bulk ops array
await esConnection.client.bulk({ body: bulkOps })
console.log(`Indexed Paragraphs ${paragraphs.length - (bulkOps.length / 2)} - ${paragraphs.length}\n\n\n`)
}
這個函式將使用書名、作者和附加元資料的段落位置來索引書中的每個段落。我們透過批次操作來插入段落,它比逐個段落插入要快的多。
我們分批索引段落,而不是一次性插入全部,是為執行這個應用程式的記憶體稍有點小(1.7 GB)的伺服器
search.patricktriest.com上做的一個重要最佳化。如果你的機器記憶體還行(4 GB 以上),你或許不用分批上傳。
執行 docker-compose up -d --build 和 docker exec gs-api "node" "server/load_data.js" 一次或多次 —— 現在你將看到前面解析的 100 本書的完整輸出,並插入到了 Elasticsearch。這可能需要幾分鐘時間,甚至更長。

data loading output
5 - 搜尋
現在,Elasticsearch 中已經有了 100 本書了(大約有 230000 個段落),現在我們嘗試搜尋查詢。
5.0 - 簡單的 HTTP 查詢
首先,我們使用 Elasticsearch 的 HTTP API 對它進行直接查詢。
在你的瀏覽器上訪問這個 URL - http://localhost:9200/library/_search?q=text:Java&pretty;
在這裡,我們將執行一個極簡的全文搜尋,在我們的圖書館的書中查詢 “Java” 這個詞。
你將看到類似於下麵的一個 JSON 格式的響應。
{
"took" : 11,
"timed_out" : false,
"_shards" : {
"total" : 5,
"successful" : 5,
"skipped" : 0,
"failed" : 0
},
"hits" : {
"total" : 13,
"max_score" : 14.259304,
"hits" : [
{
"_index" : "library",
"_type" : "novel",
"_id" : "p_GwFWEBaZvLlaAUdQgV",
"_score" : 14.259304,
"_source" : {
"author" : "Charles Darwin",
"title" : "On the Origin of Species",
"location" : 1080,
"text" : "Java, plants of, 375."
}
},
{
"_index" : "library",
"_type" : "novel",
"_id" : "wfKwFWEBaZvLlaAUkjfk",
"_score" : 10.186235,
"_source" : {
"author" : "Edgar Allan Poe",
"title" : "The Works of Edgar Allan Poe",
"location" : 827,
"text" : "After many years spent in foreign travel, I sailed in the year 18-- , from the port of Batavia, in the rich and populous island of Java, on a voyage to the Archipelago of the Sunda islands. I went as passenger--having no other inducement than a kind of nervous restlessness which haunted me as a fiend."
}
},
...
]
}
}
用 Elasticseach 的 HTTP 介面可以測試我們插入的資料是否成功,但是如果直接將這個 API 暴露給 Web 應用程式將有極大的風險。這個 API 將會暴露管理功能(比如直接新增和刪除檔案),最理想的情況是完全不要對外暴露它。而是寫一個簡單的 Node.js API 去接收來自客戶端的請求,然後(在我們的本地網路中)生成一個正確的查詢傳送給 Elasticsearch。
5.1 - 查詢指令碼
我們現在嘗試從我們寫的 Node.js 指令碼中查詢 Elasticsearch。
建立一個新檔案,server/search.js。
const { client, index, type } = require('./connection')
module.exports = {
/** Query ES index for the provided term */
queryTerm (term, offset = 0) {
const body = {
from: offset,
query: { match: {
text: {
query: term,
operator: 'and',
fuzziness: 'auto'
} } },
highlight: { fields: { text: {} } }
}
return client.search({ index, type, body })
}
}
我們的搜尋模組定義一個簡單的 search 函式,它將使用輸入的詞 match 查詢。
這是查詢的欄位分解 -
from - 允許我們分頁查詢結果。預設每個查詢傳回 10 個結果,因此,指定 from: 10 將允許我們取回 10-20 的結果。query - 這裡我們指定要查詢的詞。operator - 我們可以修改搜尋行為;在本案例中,我們使用 and 操作去對查詢中包含所有字元(要查詢的詞)的結果來確定優先順序。fuzziness - 對拼寫錯誤的容錯調整,auto 的預設為 fuzziness: 2。模糊值越高,結果越需要更多校正。比如,fuzziness: 1 將允許以 Patricc 為關鍵字的查詢中傳回與 Patrick 匹配的結果。highlights - 為結果傳回一個額外的欄位,這個欄位包含 HTML,以顯示精確的文字字集和查詢中匹配的關鍵詞。你可以去瀏覽 Elastic Full-Text Query DSL[25],學習如何隨意調整這些引數,以進一步自定義搜尋查詢。
6 - API
為了能夠從前端應用程式中訪問我們的搜尋功能,我們來寫一個快速的 HTTP API。
6.0 - API 伺服器
用以下的內容替換現有的 server/app.js 檔案。
const Koa = require('koa')
const Router = require('koa-router')
const joi = require('joi')
const validate = require('koa-joi-validate')
const search = require('./search')
const app = new Koa()
const router = new Router()
// Log each request to the console
app.use(async (ctx, next) => {
const start = Date.now()
await next()
const ms = Date.now() - start
console.log(`${ctx.method} ${ctx.url} - ${ms}`)
})
// Log percolated errors to the console
app.on('error', err => {
console.error('Server Error', err)
})
// Set permissive CORS essay-header
app.use(async (ctx, next) => {
ctx.set('Access-Control-Allow-Origin', '*')
return next()
})
// ADD ENDPOINTS HERE
const port = process.env.PORT || 3000
app
.use(router.routes())
.use(router.allowedMethods())
.listen(port, err => {
if (err) throw err
console.log(`App Listening on Port ${port}`)
})
這些程式碼將為 Koa.js[12] Node API 伺服器匯入伺服器依賴,設定簡單的日誌,以及錯誤處理。
6.1 - 使用查詢連線端點
接下來,我們將在伺服器上新增一個端點,以便於釋出我們的 Elasticsearch 查詢功能。
在 server/app.js 檔案的 // ADD ENDPOINTS HERE 下麵插入下列的程式碼。
/**
* GET /search
* Search for a term in the library
*/
router.get('/search', async (ctx, next) => {
const { term, offset } = ctx.request.query
ctx.body = await search.queryTerm(term, offset)
}
)
使用 docker-compose up -d --build 重啟動應用程式。之後在你的瀏覽器中嘗試呼叫這個搜尋端點。比如,http://localhost:3000/search?term=java 這個請求將搜尋整個圖書館中提到 “Java” 的內容。
結果與前面直接呼叫 Elasticsearch HTTP 介面的結果非常類似。
{
"took": 242,
"timed_out": false,
"_shards": {
"total": 5,
"successful": 5,
"skipped": 0,
"failed": 0
},
"hits": {
"total": 93,
"max_score": 13.356944,
"hits": [{
"_index": "library",
"_type": "novel",
"_id": "eHYHJmEBpQg9B4622421",
"_score": 13.356944,
"_source": {
"author": "Charles Darwin",
"title": "On the Origin of Species",
"location": 1080,
"text": "Java, plants of, 375."
},
"highlight": {
"text": ["Java, plants of, 375."]
}
}, {
"_index": "library",
"_type": "novel",
"_id": "2HUHJmEBpQg9B462xdNg",
"_score": 9.030668,
"_source": {
"author": "Unknown Author",
"title": "The King James Bible",
"location": 186,
"text": "10:4 And the sons of Javan; Elishah, and Tarshish, Kittim, and Dodanim."
},
"highlight": {
"text": ["10:4 And the sons of Javan; Elishah, and Tarshish, Kittim, and Dodanim."]
}
}
...
]
}
}
6.2 - 輸入校驗
這個端點現在還很脆弱 —— 我們沒有對請求引數做任何的校驗,因此,如果是無效的或者錯誤的值將使伺服器出錯。
我們將新增一些使用 Joi[26] 和 Koa-Joi-Validate[27] 庫的中介軟體,以對輸入做校驗。
/**
* GET /search
* Search for a term in the library
* Query Params -
* term: string under 60 characters
* offset: positive integer
*/
router.get('/search',
validate({
query: {
term: joi.string().max(60).required(),
offset: joi.number().integer().min(0).default(0)
}
}),
async (ctx, next) => {
const { term, offset } = ctx.request.query
ctx.body = await search.queryTerm(term, offset)
}
)
現在,重啟伺服器,如果你使用一個沒有搜尋關鍵字的請求(http://localhost:3000/search),你將傳回一個帶相關訊息的 HTTP 400 錯誤,比如像 Invalid URL Query - child "term" fails because ["term" is required]。
如果想從 Node 應用程式中檢視實時日誌,你可以執行 docker-compose logs -f api。
7 - 前端應用程式
現在我們的 /search 端點已經就緒,我們來連線到一個簡單的 Web 應用程式來測試這個 API。
7.0 - Vue.js 應用程式
我們將使用 Vue.js 去協調我們的前端。
新增一個新檔案 /public/app.js,去控制我們的 Vue.js 應用程式程式碼。
const vm = new Vue ({
el: '#vue-instance',
data () {
return {
baseUrl: 'http://localhost:3000', // API url
searchTerm: 'Hello World', // Default search term
searchDebounce: null, // Timeout for search bar debounce
searchResults: [], // Displayed search results
numHits: null, // Total search results found
searchOffset: 0, // Search result pagination offset
selectedParagraph: null, // Selected paragraph object
bookOffset: 0, // Offset for book paragraphs being displayed
paragraphs: [] // Paragraphs being displayed in book preview window
}
},
async created () {
this.searchResults = await this.search() // Search for default term
},
methods: {
/** Debounce search input by 100 ms */
onSearchInput () {
clearTimeout(this.searchDebounce)
this.searchDebounce = setTimeout(async () => {
this.searchOffset = 0
this.searchResults = await this.search()
}, 100)
},
/** Call API to search for inputted term */
async search () {
const response = await axios.get(`${this.baseUrl}/search`, { params: { term: this.searchTerm, offset: this.searchOffset } })
this.numHits = response.data.hits.total
return response.data.hits.hits
},
/** Get next page of search results */
async nextResultsPage () {
if (this.numHits > 10) {
this.searchOffset += 10
if (this.searchOffset + 10 > this.numHits) { this.searchOffset = this.numHits - 10}
this.searchResults = await this.search()
document.documentElement.scrollTop = 0
}
},
/** Get previous page of search results */
async prevResultsPage () {
this.searchOffset -= 10
if (this.searchOffset < 0) { this.searchOffset = 0 }
this.searchResults = await this.search()
document.documentElement.scrollTop = 0
}
}
})
這個應用程式非常簡單 —— 我們只定義了一些共享的資料屬性,以及添加了檢索和分頁搜尋結果的方法。為防止每次按鍵一次都呼叫 API,搜尋輸入有一個 100 毫秒的除顫功能。
解釋 Vue.js 是如何工作的已經超出了本教程的範圍,如果你使用過 Angular 或者 React,其實一些也不可怕。如果你完全不熟悉 Vue,想快速瞭解它的功能,我建議你從官方的快速指南入手 —— https://vuejs.org/v2/guide/
7.1 - HTML
使用以下的內容替換 /public/index.html 檔案中的佔位符,以便於載入我們的 Vue.js 應用程式和設計一個基本的搜尋介面。
lang="en">
charset="utf-8">
Elastic Library
name="description" content="Literary Classic Search Engine.">
name="viewport" content="width=device-width, initial-scale=1, maximum-scale=1, user-scalable=no">
href