作者:Alex@W
連結:https://blog.csdn.net/Alexwll/article/details/85466069
以Arouter為例談談學習開源框架的最佳姿勢。
概述
得益於眾多專案和第三方庫的開源,開發中使用幾行程式碼即可實現複雜的功能,但使用只是原始碼庫的搬運工,原始碼中真正牛逼的技術並不屬於我們,所以對原始碼和開源庫的學習成了Android開發者提升技能的必經之路,筆者也曾經認真學習了常用開源框架的原理和實現。
足以在開發和麵試中的問題,就此以為掌握了原始碼(有沒有同道?),直到有一天自己去編寫庫,當面對框架設計、任務排程、任務併發、執行緒切換、快取、檔案等系列問題時,才發現自己的不足,也在反思自己的學習深度;
其實框架中很多知識和程式碼都是經過時間的驗證和最佳化過的,如:Glide的快取、okhttp攔截實現、Retrofit的註解等,其細節完全可以幫助解決開發中的類似問題,原始碼的思想固然重要,但細節優秀的實現同樣不容忽視,這裡給出筆者總結的開源框架的學習方法:
1、瞭解開源框架的作用
2、掌握框架的使用方法
3、分析框架的工作原理
4、分析框架原始碼的架構和實現
5、深入框架細節分析功能模組的實現
6、總結收穫
1、ARouter 作用
談起Arouter便不得不說元件化,隨著專案的發展,開發的功能模組增多,專案和團隊都會逐漸增大,即使分包和版本管理做的再好,還是無法避免在開發過程中所面臨的問題:
-
開發過程中編譯和修改的過程中會變得更加複雜,編譯事件明顯變長
-
整個專案為一個整體,程式碼牽一發而動全身,專案的維護難度將會增大;
-
伴隨開發團隊也會增加,嚴重耦合的程式碼和業務造成衝突不斷,極大降低開發效率
為瞭解決這些問題元件化應運而生,相信元件化的使用和優勢開發者深有體會,它很針對性的解決了以上問題:
-
元件可以獨立開發、編譯除錯,縮短編譯時間提高開發效率
-
元件間的解耦和程式碼的隔離,使功能模組和開發團隊之間互不影響
但世界上沒有絕對完美的事,它帶來方便的同時也帶來了一個問題:
-
元件解耦、程式碼隔離的同時也阻斷了彼此的通訊
那麼實現元件間通訊變成了首要要解決的問題,Android原生雖然可以實現脫離介面實現導航的目的,但真實使用時發現程式碼嚴重耦合,違背了我們元件化的目的,那麼有沒有一種簡單易管理的通訊方案呢?ARouter就是為此誕生,這裡借用官方關於原生和路由的對比圖:

關於ARouter的介紹這裡提供一個官方的演講內容:
Android平臺頁面路由框架ARouter
https://yq.aliyun.com/articles/71687
2、ARouter的使用簡介
知道了框架的作用,下麵自然就是看看如何去使用,本文側重於框架的原始碼和執行流程,不詳細介紹框架的使用,因為下麵分析原始碼的需要,這裡只給出界面跳轉使用,詳細使用方法可以閱讀Arouter的專案介紹:
ARouter專案地址
https://github.com/alibaba/ARouter
1、實現介面跳轉:根據跳轉的功能需求,ARouter提供以下介面跳轉方法
普通介面跳轉
ARouter.getInstance()
.build("/login/activity")
.navigation()
攜帶Key—Value引數傳遞
//ARouter提供withString()方法,引數傳入對應的Key、Value
 ARouter.getInstance().build("/login/activity")
                 .withString("Name", "USer")
                 .withInt("Age", 10)
                 .navigation()

//使用Autowired註解自動轉換,引數name為傳遞引數的Key(當變數名和Key相同時可不設定name)
@Autowired(name = "Name")
@JvmField var name : String? = null
@Autowired(name = "Age")
@JvmField var age = 0
3、ARouter工作原理
ARouter的工作流程圖
一行程式碼就搞定了元件間的通訊,是不是充滿了疑惑和期待?
下麵看看這一行程式碼究竟如何路由起來的?本文的分析基於編寫的元件化Demo中的ARouter的使用,這裡不對它的編寫和使用做介紹,只分析它編譯生成的檔案和執行流程進行分析,本篇以Activity執行為例分析原始碼,先看一下專案的結構和編譯生成的檔案:
專案結構:包含base、app、login、share、componenbase元件
編譯檔案:編譯生成routes和modularization包

Android元件化Demo
https://github.com/AlexTiti/Modularization
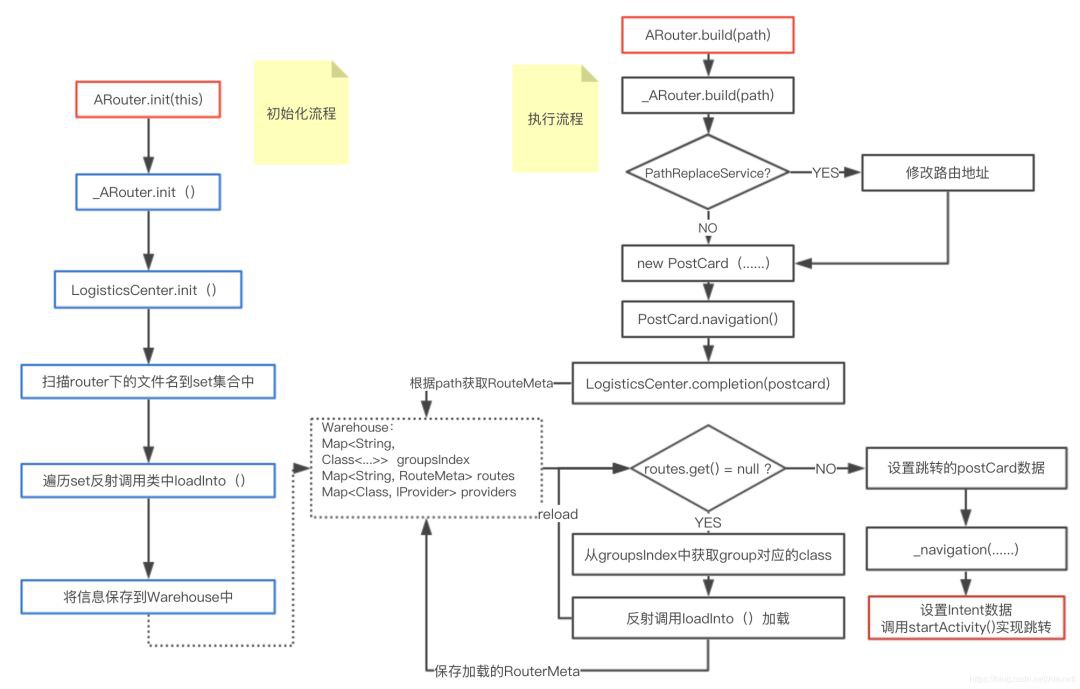
3.1、ARouter執行流程
由上面使用知道,介面的路由跳轉有一行程式碼完成,那流程的分析也就從這行神奇的程式碼開始:
ARouter.getInstance()
.build("/login/activity")
.navigation()
build(String path)
ARouter.getInstance()單利獲取ARouter實體,在ARouter.build()方法中使橋接樣式將任務交給_ARouter的build()方法,方法中重點的就是最後一句話,直接呼叫build()建立PostCard實體:
//_ARouter.build()
protected Postcard build(String path, String group) {
    if (TextUtils.isEmpty(path) || TextUtils.isEmpty(group)) {
        throw new HandlerException(Consts.TAG + "Parameter is invalid!");
    } else { ......}
        return new Postcard(path, group);//建立PostCard儲存路徑和group
    }
}
PostCard.navigation():build()方法只建立了一個PostCard實體,貌似所有的任務都留給了navigation:
protected Object navigation(final Context context, final Postcard postcard, final int requestCode, final NavigationCallback callback) {
    try {
        LogisticsCenter.completion(postcard);//執行複雜的解析和配置
    } catch (NoRouteFoundException ex) {......}
        if (null != callback) {
            callback.onLost(postcard);//如果回呼Callback不為null,回呼onLast()
        }
    ......
    if (!postcard.isGreenChannel()) { //如果沒有設定綠色通道,要回呼事件攔截
    ......
    } else {
        return _navigation(context, postcard, requestCode, callback);
    }
    return null;
}
整個流程執行到這裡,好像就做了三件事,但這三件事卻完成了整個的導航過程:
1、在build()中建立PostCard實體儲存路徑
2、呼叫complete()方法解析postCard
3、呼叫_navigation()執行介面的跳轉
LogisticsCenter.completion(postcard)
在看詳細的程式碼之前,先介紹下原始碼中出現的RouteMeta和Warehouse兩個類,很容易看出這兩個類都是儲存資料的類:
1、RouteMeta:儲存每個跳轉資訊,如:路徑、group、RouteType、優先順序、引數等資訊
2、Warehouse:主要在初始化時快取註解的Activity、IProvider、IInterceptor,主要用於快取所有的路由資訊
class Warehouse {
    //儲存group對應的IRouteGroup檔案類
    static Map<String, Class extends
IRouteGroup>> groupsIndex = new HashMap<>();
//儲存路徑path對應的RouteMeta資訊
static Map<String, RouteMeta> routes = new HashMap<>();
//儲存IProvider資訊
static Map providers = new HashMap<>();
static Map<String, RouteMeta> providersIndex = new HashMap<>();
//儲存攔截器IInterceptor資訊
static Mapextends IInterceptor>> interceptorsIndex = new UniqueKeyTreeMap<>(“More than one interceptors use same priority [%s]”);
static List interceptors = new ArrayList<>();
}
下麵檢視completion(Postcard postcard)解析的程式碼:
public synchronized static void completion(Postcard postcard) {
    RouteMeta routeMeta = Warehouse.routes.get(postcard.getPath()); // 根據路徑從Warehouse.routes中獲取RouteMeta
    if (null == routeMeta) { //若未獲取實體,根據設定的group組獲取groupMeta
        Class extends IRouteGroup> groupMeta = Warehouse.groupsIndex.get(postcard.getGroup());
        if (null == groupMeta) { //若沒有獲取到分組則跑出異常
            throw new NoRouteFoundException(TAG + "There is no route match the path [" + postcard.getPath() + "], in group [" + postcard.getGroup() + "]");
        } else {
            try {
                IRouteGroup iGroupInstance = groupMeta.getConstructor().newInstance();//反射建立實體
                iGroupInstance.loadInto(Warehouse.routes); //呼叫lodaInfo()將資訊載入到Warehouse.groupsIndex中
                Warehouse.groupsIndex.remove(postcard.getGroup());
            } catch (Exception e) {
                throw new HandlerException(TAG + "Fatal exception when loading group meta. [" + e.getMessage() + "]");
            }
            completion(postcard);   // 在第一次根據path獲取為空後會根據group新增,新增之後會再次獲取
        }
    } else {
        postcard.setDestination(routeMeta.getDestination()); //設定postcard資料
        postcard.setType(routeMeta.getType());
        postcard.setPriority(routeMeta.getPriority());
        postcard.setExtra(routeMeta.getExtra());
    }
}
上面程式碼註釋很清楚,completion()方法主要是根據初始化時載入的group組,去載入要導航的RouteMeta資訊,這裡採用按需載入的方式,先只初始化快取每個group對應的類檔案,然後在第一次執行跳轉時才初始化每個group中所有路徑的資訊並快取在Warehouse中,避免了在開始時初始化太多的問題,簡單來說就是執行三步:
1、根據路徑path獲取標的註解的RouteMeta,如果未獲取則根據group去查詢當前組編譯生成的類檔案
2、反射呼叫類檔案的loadInto()載入所有註解資訊到Warehouse.routes中
3、初始化Warehouse.routes後,再次載入查詢RouteMeta資訊並設定跳轉的PostCard
到這裡我們先提出第一個疑問:
Warehouse.groupsIndex中的資料是在什麼時候載入的?從哪載入的?
_navigation(context, postcard, requestCode, callback):最終完成Activity的啟動
private Object _navigation(final Context context, final Postcard postcard, final int requestCode, final NavigationCallback callback) {
    final Context currentContext = null == context ? mContext : context;

    switch (postcard.getType()) {
        case ACTIVITY: //如果PostCard的目的是Activity,使用Intent啟動Activity
            final Intent intent = new Intent(currentContext, postcard.getDestination());
            intent.putExtras(postcard.getExtras());
            int flags = postcard.getFlags();
            if (-1 != flags) {
                intent.setFlags(flags);
            } else if (!(currentContext instanceof Activity)) {    // Non activity, need less one flag.
                intent.setFlags(Intent.FLAG_ACTIVITY_NEW_TASK);
            }
            String action = postcard.getAction();
            if (!TextUtils.isEmpty(action)) {
                intent.setAction(action);
            }
            runInMainThread(new Runnable() {
                @Override
                public void run() {
                    startActivity(requestCode, currentContext, intent, postcard, callback);
                }
            });
            break;
    }
    return null;
}
從_navogation()執行中看出,Activity的啟動過程和平時使用的一樣,最終也是建立Intent,執行startActivity()完成的,到這裡整個執行的流程就結束了,所執行的步驟和邏輯也很容易理解;
3.2、ARouter的初始化
在上面分析的過程中,我們提出了一個疑問就是Warehouse.groupsIndex的初始化問題,上面檢視Warehouse類中知道Warehouse.groupsIndex儲存的是group對應的生成類,現在看看Arouter的初始化;
初始化使用
ARouter.init(this)
初始化流程
//呼叫init()方法初始化
public static void init(Application application) {
    if (!hasInit) {//設定標誌確保只會初始化一次
        hasInit = _ARouter.init(application);//橋接樣式呼叫_ARouter.init()
        if (hasInit) {
            _ARouter.afterInit();
        }
    }
}

//_ARouter.init()
protected static synchronized boolean init(Application application) {
    LogisticsCenter.init(mContext, executor);//真正執行初始化的地方
    hasInit = true;
    return true;
}
ARouter初始化和執行邏輯一樣,都是橋接樣式直接交給_ARouter處理,在ARouter方法中使用了LogisticsCenter.init()方法,所以初始化的所有過程都是在LogisticsCenter.init()中完成的;
LogisticsCenter.init(mContext, executor)
public static final String ROUTE_ROOT_PAKCAGE="com.alibaba.android.arouter.routes";

public synchronized static void init(Context context, ThreadPoolExecutor tpe) throws HandlerException {
try {Set routerMap;
 routerMap = ClassUtils.getFileNameByPackageName(mContext, ROUTE_ROOT_PAKCAGE);
//掃描指定包下麵的所有ClassName
            for (String className : routerMap) {//遍歷HashSet反射載入配置檔案
                if (className.startsWith(ROUTE_ROOT_PAKCAGE + DOT + SDK_NAME + SEPARATOR + SUFFIX_ROOT)) {
//如果是Root就呼叫loadInto,將IRouteGroup類載入到Warehouse.groupsIndex中,這裡採用按需載入先只加載到group
                    ((IRouteRoot) (Class.forName(className).getConstructor().newInstance())).loadInto(Warehouse.groupsIndex);
                } else if (className.startsWith(ROUTE_ROOT_PAKCAGE + DOT + SDK_NAME + SEPARATOR + SUFFIX_INTERCEPTORS)) {
//如果是Intercept,將IInterceptorGroup類新增到Warehouse.interceptorsIndex中
                    ((IInterceptorGroup) (Class.forName(className).getConstructor().newInstance())).loadInto(Warehouse.interceptorsIndex);
                } else if (className.startsWith(ROUTE_ROOT_PAKCAGE + DOT + SDK_NAME + SEPARATOR + SUFFIX_PROVIDERS)) {
//如果是Provider,將IInterceptorGroup類新增到Warehouse.providersIndex中
                    ((IProviderGroup) (Class.forName(className).getConstructor().newInstance())).loadInto(Warehouse.providersIndex);
            }
        }
    } catch (Exception e) {
        throw new HandlerException(TAG + "ARouter init logistics center exception! [" + e.getMessage() + "]");
    }
}
上面執行的程式碼註釋很清楚,執行方法如下:
1、首先掃面com.alibaba.android.arouter.routes包下的所有檔案,並將資訊儲存在routerMap中
2、遍歷routerMap()中所有儲存的所有類
3、根據className使用反射分別呼叫alibaba包下的loadInto()方法,將生成的IRouteRoot檔案中每個組對應的檔案儲存在Warehouse.groupsIndex中,IInterceptorGroup和IProviderGroup的載入方式也一樣
在(Class.forName(className).getConstructor().newInstance())).loadInto(Warehouse.groupsIndex)的引數中看到了Warehouse.groupsIndex,點選類中方法檢視:
//rootApp 儲存app組對應的ARouter$$Group$$app類
public class ARouter$$Root$$app implements IRouteRoot {
  @Override
  public void loadInto(Map<String, Class extends
IRouteGroup>> routes) {
routes.put(“app”, ARouter$$Group$$app.class);
}
}
loadInto()是把方法中的資料儲存到傳入的引數中,到這裡上面提的第一個疑問也解釋清楚了,Warehouse.groupsIndex的載入過程是在初始化的時候執行的,現在我們在回頭總結一下真個ARouter的整個執行流程:
1、在ARouter初始化時,呼叫init()反射獲取alibaba包下的所有類,並呼叫類中的loadInto()將資訊儲存在Warehouse中
2、呼叫ARouter.getInstance().build(“/login/activity”)方法,傳入路徑path
3、呼叫_ARouter的build()根據傳入的path、group建立Postcard實體
4、呼叫_ARouter的navigation()方法傳送導航請求,根據path、group從Warehouse中獲取儲存資訊的RouteMeta
5、呼叫_navigation()方法,根據PostCard的標的Type建立或啟動標的
這裡提出兩個疑問:
1、ARouter$ $Root$ $app 是如何產生的?
2、IRouteRoot是什麼?為什麼實現它?(答案其實已經體現)
4、ARouter原始碼架構和實現
上面ARouter的初始化和工作過程都介紹完畢,知道了整個ARouter的工作流程,但卻有幾個疑問:
@Route、@Autowired、@Interceptor註解如何起作用?如何和Activity等系結在一起?
帶著這幾個問題,也帶著對編寫框架的期待,一起分析ARouter元件框架的編寫,原始碼分為arouter-annotation、arouter-api、arouter-compiler三部分,下麵依次看看每個部分的功能和實現:
4.1、annotation:宣告ARouter使用的Route、Autowired、Interceptor註解(本文分析以Route為例)
Route註解:標記專案中Activity、IProvider的路由路徑,在使用時按照路徑導航載入對應的介面
@Target({ElementType.TYPE})
@Retention(RetentionPolicy.CLASS)
public @interface Route {
    String path();  // 宣告路由地址
    String group() default “"; // 宣告路由組
    String name() default “”;  // 宣告名稱
    int extras() default Integer.MIN_VALUE;
    int priority() default -1;  // 宣告路由等級
}
4.2、arouter-compiler
implementation 'com.google.auto.service:auto-service:1.0-rc3'
implementation 'com.squareup:javapoet:1.8.0'
看到上面的引入就知道,ARouter框架使用APT和javapoet技術,根據註解自動生成程式碼,我們常用的框架中很多都有這個技術的身影,關於這兩點點選以下連線檢視:
Java反射、註解
https://blog.csdn.net/Alexwll/article/details/82842460
Java註解程式碼生成
https://blog.csdn.net/Alexwll/article/details/82852377
以Route註解生成為例,由上面的例子知道Route註解最後生成了RouterApp和GroupApp兩個類,具體程式碼如下:
//groupApp 儲存路徑path對應的RouteMeta資訊
public class ARouter$$Group$$app implements IRouteGroup {
  @Override
  public void loadInto(Map<String, RouteMeta> atlas) {
    atlas.put("/app/webActivity", RouteMeta.build(RouteType.ACTIVITY, WebActivity.class, "/app/webactivity", "app", new java.util.HashMap<String, Integer>(){{put("url", 8); }}, -1, -2147483648));
  }
}
這裡提出第四個疑問:
IRouteGroup是什麼?為什麼也實現它?
Route生成兩個類的過程
連線APT技術的都知道,框架編寫的主要內容就在process(Set extends TypeElement> annotations, RoundEnvironment roundEnv)中,它生成類檔案的所有程式碼,ARouter的process中直接呼叫了parseRoutes()進行程式碼編寫:
parseRoutes(Set extends Element> routeElements)
//建立Group類中方法的引數型別:Map
ParameterizedTypeName inputMapTypeOfGroup = ParameterizedTypeName.get(
        ClassName.get(Map.class),
        ClassName.get(String.class),
        ClassName.get(RouteMeta.class)
);

//建立loadInto方法中的引數名稱
ParameterSpec groupParamSpec = ParameterSpec.builder(inputMapTypeOfGroup, "atlas").build();

//建立loadInto方法
MethodSpec.Builder loadIntoMethodOfRootBuilder = MethodSpec.methodBuilder(METHOD_LOAD_INTO)
        .addAnnotation(Override.class)
        .addModifiers(PUBLIC)
        .addParameter(rootParamSpec);
上面程式碼在APT在編寫的框架中很常見,程式碼也只做了一件事:建立生成類檔案中的loadInto()方法;
迴圈解析所有的註解類:獲取每個註解的資訊儲存到Route實體中
//迴圈遍歷所有註解
for (Element element : routeElements) {
TypeMirror tm = element.asType();  //獲取註解型別
Route route = element.getAnnotation(Route.class); //獲取註解的Route.class
if (types.isSubtype(tm, type_Activity)) {  //根據註解型別分別處理,已Activity為例
  routeMeta = new RouteMeta(route, element, RouteType.ACTIVITY, paramsType);//建立 RouteMeta儲存屬性值和屬性資訊
   categories(routeMete) //解析儲存所有資訊的routeMeta
    }
}
categories(RouteMeta routeMete):將RouteMeta實體儲存到groupMap中
//1、將每個建立的RouteMeta儲存在 Set中,然後將Set以group為健儲存在groupMap中
private void categories(RouteMeta routeMete) {
    if (routeVerify(routeMete)) {
        Set routeMetas = groupMap.get(routeMete.getGroup());//判斷是否儲存過次Group組
        if (CollectionUtils.isEmpty(routeMetas)) {
            Set routeMetaSet = new TreeSet<>(new Comparator() {......});
            routeMetaSet.add(routeMete);   //將routeMete新增到結合routeMetaSet中
            groupMap.put(routeMete.getGroup(), routeMetaSet);//將routeMetaSet使用group為鍵儲存到groupMap中
        } else {
            routeMetas.add(routeMete);
        }
    } else {
    }
}
上面執行程式碼見註釋,簡單來說就是將相同group組註解的資訊儲存在Set中,然後以group為鍵將set集合儲存到groupMap中,現在所有的註解資訊都儲存在groupMap中,接下來你應該想到了就是遍歷groupMap,生成方法中對應的程式碼陳述句,那下麵接著看parseRoutes()原始碼:
//遍歷groupMap,將其中的每個group組新增初始化程式碼
for (Map.Entry<String, Set> entry : groupMap.entrySet()) {
    String groupName = entry.getKey();

//迴圈遍歷group對應的每個Set中儲存的元素,為每個元素新增一行載入的程式碼
Set groupData = entry.getValue();
for (RouteMeta routeMeta : groupData) {
。。。。。。
loadIntoMethodOfGroupBuilder.addStatement(
        "atlas.put($S, $T.build($T." + routeMeta.getType() + ", $T.class, $S, $S, " + (StringUtils.isEmpty(mapBody) ? null : ("new java.util.HashMap(){{" + mapBodyBuilder.toString() + "}}")) + ", " + routeMeta.getPriority() + ", " + routeMeta.getExtra() + "))",
        routeMeta.getPath(),
        routeMetaCn,
        routeTypeCn,
        className,
        routeMeta.getPath().toLowerCase(),
        routeMeta.getGroup().toLowerCase());
}

//儲存每個group和對應的檔案名
    String groupFileName = NAME_OF_GROUP + groupName;
    rootMap.put(groupName, groupFileName); //rootMap儲存每個組對應生成的檔案類名
}

//遍歷rootMap在root類中的loadInto()方法中新增每個組的執行陳述句
if (MapUtils.isNotEmpty(rootMap)) {
    for (Map.Entry<String, String> entry : rootMap.entrySet()) {
//新增每個group對應loadInto()方法中的程式碼  routes.put("app", ARouter$$Group$$app.class);
        loadIntoMethodOfRootBuilder.addStatement("routes.put($S, $T.class)", entry.getKey(), ClassName.get(PACKAGE_OF_GENERATE_FILE, entry.getValue()));//儲存每個Group組類
    }
}
上面的程式碼是從原始碼中抽取出來的部分主要程式碼,短短的程式碼中出現了三個for迴圈,這裡每個迴圈就是在新增程式碼陳述句:
1、第一個迴圈從groupMap中獲取每個group組對應的Set集合
2、從Set集合中遍歷每個RouteMeta,並建立loadInto()方法中的陳述句,並將每個group生成的類儲存在rootMap中
3、遍歷root Map中的元素,新增Root類的loadInto()方法中的陳述句
到這裡我們按照瞭解一個框架的順序,分析了整個框架的編寫和執行過程,上面所提出的第二個問題也找到了答案,這裡總結一下:
1、在使用時為標的的Activity新增@Route註解
2、編譯時使用APT根據註解資訊生成Root和Group類及其中的方法體
3、在初始化時反射將root類中的所有group資訊,載入到Warehouse中
4、在使用navigation中導航時,從Warehouse中載入並獲取註解資訊
5、從註解資訊中獲取標的Activity,從而呼叫startActivity實現介面跳轉
5、深入框架細節
上面從整體的角度瞭解了框架的原始碼和執行,這個過程對於你瞭解、使用和學習框架來說至關重要,相信走到這一步的人很多,但相信停在這一步的更多;到此已經可以說你熟悉或掌握了這個框架的原理,但學習去沒有結束,如果想真正成為開發框架的人,可能更重要的兩步是:細節和總結;
5.1、攔截器
攔截器原始碼生成
for (Element element : elements) {
    if (verify(element)) {
        Interceptor interceptor = element.getAnnotation(Interceptor.class);
        Element lastInterceptor = interceptors.get(interceptor.priority());
        if (null != lastInterceptor) {
            throw new IllegalArgumentException( //這裡當兩個攔截起設定相同的優先順序時回觸發異常(在哪理按照優先順序運算?)
                    String.format(Locale.getDefault(), "More than one interceptors use same priority [%d], They are [%s] and [%s].",
                            interceptor.priority(),
                            lastInterceptor.getSimpleName(),
                            element.getSimpleName())
            );
        }
        interceptors.put(interceptor.priority(), element); //儲存資料
    }
}
攔截起原始碼的生成和上面Root、Group的流程一樣,儲存每個攔截器的註解,然後編譯生成類檔案,值得註意的是攔截器的優先順序不能相同否則丟擲異常,因為儲存註解的鍵就是設定的優先順序;
攔截器的初始化:在ARouter初始化時將所有的資訊儲存在Warehouse.interceptorsIndex中,然後遍歷初始化所有的攔截器並快取在Warehouse.interceptors中
IInterceptor iInterceptor = interceptorClass.getConstructor().newInstance();
iInterceptor.init(context); //初始化每個IInterceptor
Warehouse.interceptors.add(iInterceptor);
攔截器執行
CancelableCountDownLatch interceptorCounter = new CancelableCountDownLatch(Warehouse.interceptors.size());
interceptorCounter.await(postcard.getTimeout(), TimeUnit.SECONDS);//呼叫鎖鎖住當前執行緒

if (index             IInterceptor iInterceptor = Warehouse.interceptors.get(index);
            iInterceptor.process(postcard, new InterceptorCallback() {//執行每個執行緒的process()
                @Override
                public void onContinue(Postcard postcard) {
                    counter.countDown(); //呼叫鎖 -1
                    _excute(index + 1, counter, postcard);  //迴圈遞迴呼叫
                }
                @Override
                public void onInterrupt(Throwable exception) {
                    postcard.setTag(null == exception ? new HandlerException("No message.") : exception.getMessage());
                    counter.cancel();//攔截事件
                }
            });
        }
使用CountDownLatch鎖住當前執行緒,然後使用執行緒池遞迴執行所有攔截器的process()方法,當所有攔截器執行完畢後繼續執行呼叫執行緒;
5.2、Autowired引數解析
在使用使用方法提到ARouter攜帶引數跳轉時,只需要在標的Activity的屬性中新增@Autowired註解,即可實現屬性的自動賦值,在原始碼中關於@Autowired的註解編譯過程和@Route一樣,具體細節在原始碼中檢視,這裡直接給出生成的類:
public class WebActivity$$ARouter$$Autowired implements ISyringe {
  private SerializationService serializationService;

  @Override
  public void inject(Object target) {
    serializationService = ARouter.getInstance().navigation(SerializationService.class);
    WebActivity substitute = (WebActivity)target;
    substitute.url = substitute.getIntent().getStringExtra("url”);  //呼叫getIntent()為屬性負值
  }
}
從類中的inject()直接看出資料的賦值也是使用getIntent()實現的,那麼此方法在何時被呼叫的呢?其實在使用指南中介紹,使用引數註解時要在onCreate中新增:ARouter.getInstance().inject(this);正是這個初始化了資料的複製;在_ARouter.inject()中直接呼叫了AutowiredService的實現類:
static void inject(Object thiz) {
    AutowiredService autowiredService = ((AutowiredService) ARouter.getInstance().build("/arouter/service/autowired").navigation());
    if (null != autowiredService) {
        autowiredService.autowire(thiz);//呼叫autowire方法
    }
}
看到這是不是感覺有點意思,在框架中就使用框架!作者的設計巧妙啊!下麵根據路徑找到實現類的autowire方法:
String className = instance.getClass().getName();  //獲取當前類名
ISyringe autowiredHelper = classCache.get(className); //判斷快取是否含有
if (null == autowiredHelper) {
 autowiredHelper = (ISyringe) Class.forName(instance.getClass().getName() + SUFFIX_AUTOWIRED).getConstructor().newInstance();//按照規則生成編譯檔案名,並反射建立實體}
autowiredHelper.inject(instance); //呼叫inject()傳入Activity實體
classCache.put(className, autowiredHelper);  //快取反射的實體
autowire方法根據傳入的Activity,獲取生成的檔案類,反射呼叫其中的inject()進行資料的賦值,這個有沒有給你點啟發呢?有沒有想到ButterKnife呢?
5.3、PathReplaceService
PathReplaceService用於在程式執行過程中動態的修改路由或實現重定向功能,它的使用也很簡單直接實現PathReplaceService介面重寫其中方法即可,其實在_ARouter.build()方法有幾句程式碼上面沒有貼出,首先會使用路由獲取實現介面的子類,呼叫其中方法修改傳遞的path,後面所有的過程都是在新的路徑上執行:
PathReplaceService pService = ARouter.getInstance().navigation(PathReplaceService.class);
if (null != pService) {
    path = pService.forString(path);
}
5.4、DegradeService
在路由執行過程中,可能會因為路由地址錯誤而找不到標的,從而引起整個跳轉的失敗,如果我們想所有的失敗都顯示固定的介面,此時就可以使用DegradeService實現頁面的降級問題,其實也是一種完全意義的重定向:
try {
    LogisticsCenter.completion(postcard);
} catch (NoRouteFoundException ex) {

    if (null != callback) {
        callback.onLost(postcard);  //如果設定回呼呼叫回呼方法
    } else {
        DegradeService degradeService = ARouter.getInstance().navigation(DegradeService.class); //獲取設定的重定向實體
        if (null != degradeService) {
            degradeService.onLost(context, postcard); // 呼叫重定向的方法
        }
    }
    return null;
}
在呼叫navigation()時,如果沒有找到Route註解對應的類,則會丟擲異常,捕獲到異常後執行兩個選擇:
1、如果設定跳轉監聽,則會掉callback.onLost()
2、如果未設定回呼,使用路由獲取DegradeService的實現並呼叫onLost()重新執行跳轉
6、總結收穫
分析完整個原始碼執行和編寫後,有沒有自己的收穫和心得呢?
如果讓你來寫或者以後會遇到同樣的需求是否能實現同樣的功能呢?
哪些細節實現值得我們借鑒呢?
下麵我們就總結一下本篇原始碼的收穫與思考,細節都在原始碼當中這裡只列出幾點:
如何使用APT和javapoet技術編寫原始碼
相信很多人都已經掌握此項技術,上面的連線也提供學習內容
如何掃描指定包下的檔案
生成的類屬於不同的包和類,如何集中管理他們?如何初始化?(本條也是回答上面的問題)
1、答案就是分別實現了IRouteGroup或IRouteRoot介面,這樣所有的生成類就都是介面的實現類
2、初始化時只需根據類名反射獲取介面實體,反射呼叫方法即可
如何避免初始化問題?
1、採用按需載入的方式,避免初始化過於繁重;ARouter執行如下:
2、這裡將每個group組的所有路由資訊儲存在一個類中,比如類A、B、C分別對應3個組
3、將group生成的類A、B、C,分別以鍵值對形式儲存在Map中
4、當第一次使用某個group時,找到Map中儲存的類,呼叫類中方法快取同組的資料
攔截器處理
1、使用CountDownLatch阻塞呼叫執行緒,然後遞迴呼叫所有的攔截器方法,最後喚醒執行緒
2、此處有沒有想到okhttp的攔截器呢?它是如何讓實現呢?
重定向和降級
這裡使用實現介面的方式,透過路由獲取實體,在程式執行時統一管理,是不是有點類似AOP?如果使用AOP如何實現呢?
相信每一篇原始碼中都會有很多優秀的細節,如果我們能一點點積累起來,相信一定能更快的提升自己,這是筆者重新審視原始碼學習的第一篇,後面有時間會針對過去學過的開源框架,從不同的角度對比分析細節的實現,希望可以提高自己開發框架的能力!
