(給ImportNew加星標,提高Java技能)
來自:唐尤華
https://dzone.com/articles/a-birds-eye-view-on-java-concurrency-frameworks-1
1. 為什麼要寫這篇文章
幾年前 NoSQL 開始流行的時候,像其他團隊一樣,我們的團隊也熱衷於令人興奮的新東西,並且計劃替換一個應用程式的資料庫。 但是,當深入實現細節時,我們想起了一位智者曾經說過的話:“細節決定成敗”。最終我們意識到 NoSQL 不是解決所有問題的銀彈,而 NoSQL vs RDMS 的答案是:“視情況而定”。 類似地,去年RxJava 和 Spring Reactor 這樣的併發庫加入了讓人充滿激情的陳述句,如非同步非阻塞方法等。為了避免再犯同樣的錯誤,我們嘗試評估諸如 ExecutorService、 RxJava、Disruptor 和 Akka 這些併發框架彼此之間的差異,以及如何確定各自框架的正確用法。
本文中用到的術語在這裡有更詳細的描述。
2. 分析併發框架的示例用例

3. 快速更新執行緒配置
在開始比較併發框架的之前,讓我們快速複習一下如何配置最佳執行緒數以提高並行任務的效能。 這個理論適用於所有框架,並且在所有框架中使用相同的執行緒配置來度量效能。
- 對於記憶體任務,執行緒的數量大約等於具有最佳效能的內核的數量,儘管它可以根據各自處理器中的超執行緒特性進行一些更改。
- 例如,在8核機器中,如果對應用程式的每個請求都必須在記憶體中並行執行4個任務,那麼這臺機器上的負載應該保持為 @2 req/sec,在 ThreadPool 中保持8個執行緒。
- 對於 I/O 任務,ExecutorService 中配置的執行緒數應該取決於外部服務的延遲。
- 與記憶體中的任務不同,I/O 任務中涉及的執行緒將被阻塞,並處於等待狀態,直到外部服務響應或超時。 因此,當涉及 I/O 任務執行緒被阻塞時,應該增加執行緒的數量,以處理來自併發請求的額外負載。
- I/O 任務的執行緒數應該以保守的方式增加,因為處於活動狀態的許多執行緒帶來了背景關係切換的成本,這將影響應用程式的效能。 為了避免這種情況,應該根據 I/O 任務中涉及的執行緒的等待時間按比例增加此機器的執行緒的確切數量以及負載。
參考: http://baddotrobot.com/blog/2013/06/01/optimum-number-of-threads/
4. 效能測試結果
效能測試配置 GCP -> 處理器:Intel(R) Xeon(R) CPU @ 2.30GHz;架構:x86_64;CPU 核心:8個(註意: 這些結果僅對該配置有意義,並不表示一個框架比另一個框架更好)。

5. 使用執行器服務並行化 IO 任務
5.1 何時使用?
如果一個應用程式部署在多個節點上,並且每個節點的 req/sec 小於可用的核心數量,那麼 ExecutorService 可用於並行化任務,更快地執行程式碼。
5.2 什麼時候適用?
如果一個應用程式部署在多個節點上,並且每個節點的 req/sec 遠遠高於可用的核心數量,那麼使用 ExecutorService 進一步並行化只會使情況變得更糟。
當外部服務延遲增加到 400ms 時,效能測試結果如下(請求速率 @50 req/sec,8核)。

5.3 所有任務按順序執行示例
// I/O 任務:呼叫外部服務
String posts = JsonService.getPosts();
String comments = JsonService.getComments();
String albums = JsonService.getAlbums();
String photos = JsonService.getPhotos();

// 合併來自外部服務的響應
// (記憶體中的任務將作為此操作的一部分執行)
int userId = new Random().nextInt(10) + 1;
String postsAndCommentsOfRandomUser = ResponseUtil.getPostsAndCommentsOfRandomUser(userId, posts, comments);
String albumsAndPhotosOfRandomUser = ResponseUtil.getAlbumsAndPhotosOfRandomUser(userId, albums, photos);

// 構建最終響應並將其發送回客戶端
String response = postsAndCommentsOfRandomUser + albumsAndPhotosOfRandomUser;
return response;
5.4 I/O 任務與 ExecutorService 並行執行程式碼示例
// 新增 I/O 任務
List> ioCallableTasks = new ArrayList<>();
ioCallableTasks.add(JsonService::getPosts);
ioCallableTasks.add(JsonService::getComments);
ioCallableTasks.add(JsonService::getAlbums);
ioCallableTasks.add(JsonService::getPhotos);

// 呼叫所有並行任務
ExecutorService ioExecutorService = CustomThreads.getExecutorService(ioPoolSize);
List> futuresOfIOTasks = ioExecutorService.invokeAll(ioCallableTasks);

// 獲取 I/O  操作(阻塞呼叫)結果
String posts = futuresOfIOTasks.get(0).get();
String comments = futuresOfIOTasks.get(1).get();
String albums = futuresOfIOTasks.get(2).get();
String photos = futuresOfIOTasks.get(3).get();

// 合併響應(記憶體中的任務是此操作的一部分)
String postsAndCommentsOfRandomUser = ResponseUtil.getPostsAndCommentsOfRandomUser(userId, posts, comments);
String albumsAndPhotosOfRandomUser = ResponseUtil.getAlbumsAndPhotosOfRandomUser(userId, albums, photos);

// 構建最終響應並將其發送回客戶端
return postsAndCommentsOfRandomUser + albumsAndPhotosOfRandomUser;
6. 使用執行器服務並行化 IO 任務(CompletableFuture)
與上述情況類似:處理傳入請求的 HTTP 執行緒被阻塞,而 CompletableFuture 用於處理並行任務
6.1 何時使用?
如果沒有 AsyncResponse,效能與 ExecutorService 相同。 如果多個 API 呼叫必須非同步並且連結起來,那麼這種方法更好(類似 Node 中的 Promises)。
ExecutorService ioExecutorService = CustomThreads.getExecutorService(ioPoolSize);

// I/O 任務
CompletableFuture postsFuture = CompletableFuture.supplyAsync(JsonService::getPosts, ioExecutorService);
CompletableFuture commentsFuture = CompletableFuture.supplyAsync(JsonService::getComments,
    ioExecutorService);
CompletableFuture albumsFuture = CompletableFuture.supplyAsync(JsonService::getAlbums,
    ioExecutorService);
CompletableFuture photosFuture = CompletableFuture.supplyAsync(JsonService::getPhotos,
    ioExecutorService);
CompletableFuture.allOf(postsFuture, commentsFuture, albumsFuture, photosFuture).get();

// 從 I/O 任務(阻塞呼叫)獲得響應
String posts = postsFuture.get();
String comments = commentsFuture.get();
String albums = albumsFuture.get();
String photos = photosFuture.get();

// 合併響應(記憶體中的任務將是此操作的一部分)
String postsAndCommentsOfRandomUser = ResponseUtil.getPostsAndCommentsOfRandomUser(userId, posts, comments);
String albumsAndPhotosOfRandomUser = ResponseUtil.getAlbumsAndPhotosOfRandomUser(userId, albums, photos);

// 構建最終響應並將其發送回客戶端
return postsAndCommentsOfRandomUser + albumsAndPhotosOfRandomUser;
7. 使用 ExecutorService 並行處理所有任務
使用 ExecutorService 並行處理所有任務,並使用 @suspended AsyncResponse response 以非阻塞方式傳送響應。

圖片來自 http://tutorials.jenkov.com/java-nio/nio-vs-io.html
- HTTP 執行緒處理傳入請求的連線,並將處理傳遞給 Executor Pool,當所有任務完成後,另一個 HTTP 執行緒將把響應發送回客戶端(非同步非阻塞)。
- 效能下降原因:
- 在同步通訊中,儘管 I/O 任務中涉及的執行緒被阻塞,但是隻要行程有額外的執行緒來承擔併發請求負載,它仍然處於執行狀態。
- 因此,以非阻塞方式保持執行緒所帶來的好處非常少,而且在此樣式中處理請求所涉及的成本似乎很高。
- 通常,對這裡討論採用的例子使用非同步非阻塞方法會降低應用程式的效能。
7.1 何時使用?
如果用例類似於伺服器端聊天應用程式,在客戶端響應之前,執行緒不需要保持連線,那麼非同步、非阻塞方法比同步通訊更受歡迎。在這些用例中,系統資源可以透過非同步、非阻塞方法得到更好的利用,而不僅僅是等待。
// 為非同步執行提交並行任務
ExecutorService ioExecutorService = CustomThreads.getExecutorService(ioPoolSize);
CompletableFuture postsFuture = CompletableFuture.supplyAsync(JsonService::getPosts, ioExecutorService);
CompletableFuture commentsFuture = CompletableFuture.supplyAsync(JsonService::getComments,
ioExecutorService);
CompletableFuture albumsFuture = CompletableFuture.supplyAsync(JsonService::getAlbums,
ioExecutorService);
CompletableFuture photosFuture = CompletableFuture.supplyAsync(JsonService::getPhotos,
ioExecutorService);

// 當 /posts API 傳迴響應時,它將與來自 /comments API 的響應結合在一起
// 作為這個操作的一部分,將執行記憶體中的一些任務
CompletableFuture postsAndCommentsFuture = postsFuture.thenCombineAsync(commentsFuture,
(posts, comments) -> ResponseUtil.getPostsAndCommentsOfRandomUser(userId, posts, comments),
ioExecutorService);

// 當 /albums API 傳迴響應時,它將與來自 /photos API 的響應結合在一起
// 作為這個操作的一部分,將執行記憶體中的一些任務
CompletableFuture albumsAndPhotosFuture = albumsFuture.thenCombineAsync(photosFuture,
(albums, photos) -> ResponseUtil.getAlbumsAndPhotosOfRandomUser(userId, albums, photos),
ioExecutorService);

// 構建最終響應並恢復 http 連線,把響應發送回客戶端
postsAndCommentsFuture.thenAcceptBothAsync(albumsAndPhotosFuture, (s1, s2) -> {
LOG.info("Building Async Response in Thread " + Thread.currentThread().getName());
String response = s1 + s2;
asyncHttpResponse.resume(response);
}, ioExecutorService);
8. RxJava
- 這與上面的情況類似,唯一的區別是 RxJava 提供了更好的 DSL 可以進行流式程式設計,下麵的例子中沒有體現這一點。
- 效能優於 CompletableFuture 處理並行任務。
8.1 何時使用?
如果編碼的場景適合非同步非阻塞方式,那麼可以首選 RxJava 或任何響應式開發庫。 還具有諸如 back-pressure 之類的附加功能,可以在生產者和消費者之間平衡負載。
int userId = new Random().nextInt(10) + 1;
ExecutorService executor = CustomThreads.getExecutorService(8);

// I/O 任務
Observable postsObservable = Observable.just(userId).map(o -> JsonService.getPosts())
.subscribeOn(Schedulers.from(executor));
Observable commentsObservable = Observable.just(userId).map(o -> JsonService.getComments())
.subscribeOn(Schedulers.from(executor));
Observable albumsObservable = Observable.just(userId).map(o -> JsonService.getAlbums())
.subscribeOn(Schedulers.from(executor));
Observable photosObservable = Observable.just(userId).map(o -> JsonService.getPhotos())
.subscribeOn(Schedulers.from(executor));

// 合併來自 /posts 和 /comments API 的響應
// 作為這個操作的一部分,將執行記憶體中的一些任務
Observable postsAndCommentsObservable = Observable
.zip(postsObservable, commentsObservable,
(posts, comments) -> ResponseUtil.getPostsAndCommentsOfRandomUser(userId, posts, comments))
.subscribeOn(Schedulers.from(executor));

// 合併來自 /albums 和 /photos API 的響應
// 作為這個操作的一部分,將執行記憶體中的一些任務
Observable albumsAndPhotosObservable = Observable
.zip(albumsObservable, photosObservable,
(albums, photos) -> ResponseUtil.getAlbumsAndPhotosOfRandomUser(userId, albums, photos))
.subscribeOn(Schedulers.from(executor));

// 構建最終響應
Observable.zip(postsAndCommentsObservable, albumsAndPhotosObservable, (r1, r2) -> r1 + r2)
.subscribeOn(Schedulers.from(executor))
.subscribe((response) -> asyncResponse.resume(response), e -> asyncResponse.resume("error"));
9. Disruptor
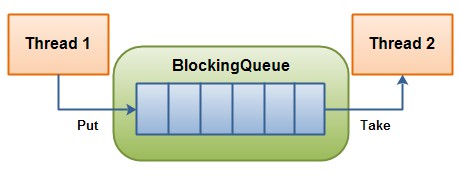
[Queue vs RingBuffer]

圖片1: http://tutorials.jenkov.com/java-concurrency/blocking-queues.html
圖片2: https://www.baeldung.com/lmax-disruptor-concurrency
- 在本例中,HTTP 執行緒將被阻塞,直到 disruptor 完成任務,並且使用 countdowlatch 將 HTTP 執行緒與 ExecutorService 中的執行緒同步。
- 這個框架的主要特點是在沒有任何鎖的情況下處理執行緒間通訊。在 ExecutorService 中,生產者和消費者之間的資料將透過 Queue傳遞,在生產者和消費者之間的資料傳輸過程中涉及到一個鎖。 Disruptor 框架透過一個名為 Ring Buffer 的資料結構(它是迴圈陣列佇列的擴充套件版本)來處理這種生產者-消費者通訊,並且不需要任何鎖。
- 這個庫不適用於我們在這裡討論的這種用例。僅出於好奇而新增。
9.1 何時使用?
Disruptor 框架在下列場合效能更好:與事件驅動的體系結構一起使用,或主要關註記憶體任務的單個生產者和多個消費者。
static {
    int userId = new Random().nextInt(10) + 1;

    // 示例 Event-Handler; count down latch 用於使執行緒與 http 執行緒同步
    EventHandler postsApiHandler = (event, sequence, endOfBatch) -> {
        event.posts = JsonService.getPosts();
        event.countDownLatch.countDown();
    };

    // 配置 Disputor 用於處理事件
    DISRUPTOR.handleEventsWith(postsApiHandler, commentsApiHandler, albumsApiHandler)
    .handleEventsWithWorkerPool(photosApiHandler1, photosApiHandler2)
    .thenHandleEventsWithWorkerPool(postsAndCommentsResponseHandler1, postsAndCommentsResponseHandler2)
    .handleEventsWithWorkerPool(albumsAndPhotosResponseHandler1, albumsAndPhotosResponseHandler2);
    DISRUPTOR.start();
}

// 對於每個請求,在 RingBuffer 中釋出一個事件:
Event event = null;
RingBuffer ringBuffer = DISRUPTOR.getRingBuffer();
long sequence = ringBuffer.next();
CountDownLatch countDownLatch = new CountDownLatch(6);
try {
    event = ringBuffer.get(sequence);
    event.countDownLatch = countDownLatch;
    event.startTime = System.currentTimeMillis();
} finally {
    ringBuffer.publish(sequence);
}
try {
    event.countDownLatch.await();
} catch (InterruptedException e) {
    e.printStackTrace();
}
10. Akka
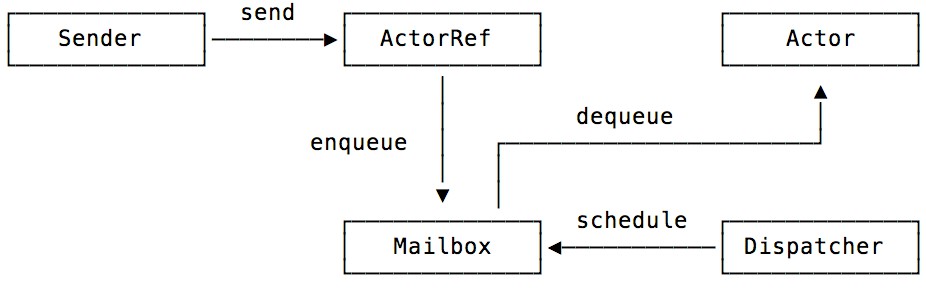
圖片來自: https://blog.codecentric.de/en/2015/08/introduction-to-akka-actors/
- Akka 庫的主要優勢在於它擁有構建分散式系統的本地支援。
- 它執行在一個叫做 Actor System 的系統上。這個系統抽象了執行緒的概念,Actor System 中的 Actor 透過非同步訊息進行通訊,這類似於生產者和消費者之間的通訊。
- 這種額外的抽象級別有助於 Actor System 提供諸如容錯、位置透明等特性。
- 使用正確的 Actor-to-Thread 策略,可以對該框架進行最佳化,使其效能優於上表所示的結果。 雖然它不能在單個節點上與傳統方法的效能匹敵,但是由於其構建分散式和彈性系統的能力,仍然是首選。
10.1 示例程式碼
// 來自 controller :
Actors.masterActor.tell(new Master.Request("Get Response", event, Actors.workerActor), ActorRef.noSender());

// handler :
public Receive createReceive() {
    return receiveBuilder().match(Request.class, request -> {
    Event event = request.event; // Ideally, immutable data structures should be used here.
    request.worker.tell(new JsonServiceWorker.Request("posts", event), getSelf());
    request.worker.tell(new JsonServiceWorker.Request("comments", event), getSelf());
    request.worker.tell(new JsonServiceWorker.Request("albums", event), getSelf());
    request.worker.tell(new JsonServiceWorker.Request("photos", event), getSelf());
    }).match(Event.class, e -> {
    if (e.posts != null && e.comments != null & e.albums != null & e.photos != null) {
    int userId = new Random().nextInt(10) + 1;
    String postsAndCommentsOfRandomUser = ResponseUtil.getPostsAndCommentsOfRandomUser(userId, e.posts,
    e.comments);
    String albumsAndPhotosOfRandomUser = ResponseUtil.getAlbumsAndPhotosOfRandomUser(userId, e.albums,
    e.photos);
    String response = postsAndCommentsOfRandomUser + albumsAndPhotosOfRandomUser;
    e.response = response;
    e.countDownLatch.countDown();
    }
    }).build();
}
11. 總結
- 根據機器的負載決定 Executor 框架的配置,並檢查是否可以根據應用程式中並行任務的數量進行負載平衡。
- 對於大多數傳統應用程式來說,使用響應式開發庫或任何非同步庫都會降低效能。只有當用例類似於伺服器端聊天應用程式時,這個樣式才有用,其中執行緒在客戶機響應之前不需要保留連線。
- Disruptor 框架在與事件驅動的架構樣式一起使用時效能很好; 但是當 Disruptor 樣式與傳統架構混合使用時,就我們在這裡討論的用例而言,它並不符合標準。 這裡需要註意的是,Akka 和 Disruptor 庫值得單獨寫一篇文章,介紹如何使用它們來實現事件驅動的架構樣式。
- 這篇文章的原始碼可以在 GitHub 上找到。
看完本文有收穫?請轉發分享給更多人
關註「ImportNew」,提升Java技能
喜歡就點「好看」唄~

