-
第一章|理論基礎+實戰控制檯程式實現AutoFac註入
-
第二章|AutoFac的常見使用套路
-
第三章|實戰Asp.Net Framework Web程式實現AutoFac註入
-
第四章|實戰Asp.Net Core自帶DI實現依賴註入
-
第五章|實戰Asp.Net Core引入AutoFac的兩種方式
簡介
該系列共5篇文章,旨在以實戰樣式,在.net下的
-
控制檯程式
-
Framework Mvc程式
-
Framework WebApi程式
-
Core Api程式
分別實現依賴註入。
其中.Net Framework框架主要以如何引入AutoFac作為容器以及如何運用AuotoFac為主,.Net Core框架除了研究引入AutoFac的兩種方式,同時也運用反射技巧對其自帶的DI框架進行了初步封裝,實現了相同的依賴註入效果。
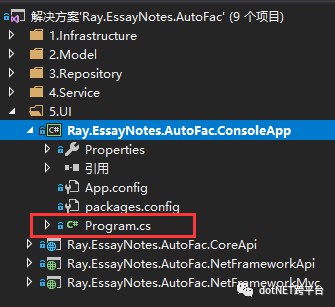
專案架構如下圖:
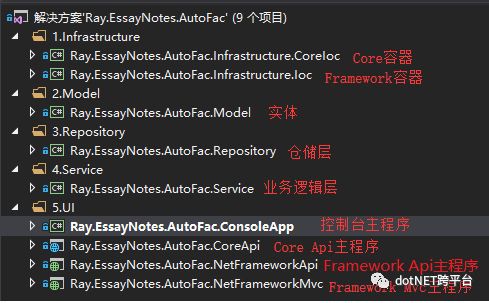
| Ray.EssayNotes.AutoFac.Infrastructure.CoreIoc | Core容器 | 類庫 | .NET Core 2.2 |
| Ray.EssayNotes.AutoFac.Infrastructure.Ioc | Framework容器 | 類庫 | .NET Framework 4.5 |
| Ray.EssayNotes.AutoFac.Model | 物體層 | 類庫 | .NET Framework 4.5 |
| Ray.EssayNotes.AutoFac.Repository | 倉儲層 | 類庫 | .NET Framework 4.5 |
| Ray.EssayNotes.AutoFac.Service | 業務邏輯層 | 類庫 | .NET Framework 4.5 |
| Ray.EssayNotes.AutoFac.ConsoleApp | 控制檯主程式 | 控制檯專案 | .NET Framework 4.5 |
| Ray.EssayNotes.AutoFac.CoreApi | Core WebApi主程式 | Core Api專案 | .NET Core 2.2 |
| Ray.EssayNotes.AutoFac.NetFrameworkApi | Framework WebApi主程式 | Framework WebApi專案 | .NET Framework 4.5 |
| Ray.EssayNotes.AutoFac.NetFrameworkMvc | Framework MVC主程式 | Framework MVC專案 | .NET Framework 4.5 |
GitHub原始碼地址:https://github.com/WangRui321/Ray.EssayNotes.AutoFac
Welcome to fork me~(歡迎來叉我~)
適用物件
該專案主要實戰為主,理論部分我會結合例子和程式碼,深入淺出地闡述,如果你是:
- 從來沒聽過IoC、DI這些勞什子
- 瞭解一些依賴註入的理論知識但是缺乏實戰
- 在.Net Framework下已熟練運用依賴註入,但在.Net Core還比較陌生
只要你花上半個小時認真讀完每一句話,我有信心這篇文章一定會對你有所幫助。
如果你是:
那麼也歡迎閱讀,雖然可能對你幫助並不大,但是歡迎提供寶貴的意見,有寫的不好的地方可以互相交流~
下麵開始第一章《理論知識+實戰控制檯程式實現AutoFac註入》
依賴
依賴,簡單說就是,當一個類需要另一個類協作來完成工作的時候就產生了依賴。這也是耦合的一種形式。
舉個例子,比如標準的三層架構樣式
| 介面層(UI) | 負責展示資料 | StudentController |
| 業務邏輯層(BLL) | 負責業務邏輯運算 | StudentService |
| 資料訪問層(DAL) | 負責提供資料 | StudentRepository |
資料訪問層(DAL)程式碼:
public class StudentRepository
{
public string GetName(long id)
{
return “學生張三”;
}
}
業務層(BLL)程式碼:
public class StudentService
{
private readonly StudentRepository _studentRepository;
public StudentService()
{
_studentRepository = new StudentRepository();
}
public string GetStuName(long id)
{
var stu = _studentRepository.Get(id);
return stu.Name;
}
}
其中,StudentService的實現,就必須要依賴於StudentRepository。而且這是一種緊耦合,一旦StudentRepository有任何更改,必然導致StudentService的程式碼同樣也需要更改,這種情況是程式員們不願意看到的。

介面驅動
介面驅動是為了實現一個設計原則:要依賴於抽象,而不是具體的實現。
還拿上面的例子說明,現在我新增一個DAL的介面層,IStudentRepository,抽象出所需方法:
public interface IStudentRepository
{
string GetName(long id);
}
然後讓StudentRepository去實現這個介面:
public class StudentRepository : IStudentRepository
{
public string GetName(long id)
{
return “學生張三”;
}
}
然後在StudentService裡只依賴於IStudentRepository,以後的增刪改查都透過IStudentRepository這個抽象來做:
public class StudentService
{
private readonly IStudentRepository _studentRepository;
public StudentService()
{
_studentRepository = new StudentRepository();
}
public string GetStuName(long id)
{
var stu = _studentRepository.Get(id);
return stu.Name;
}
}
這樣做的好處有兩個,一個是低耦合,一個是職責清晰。如果對此還有懷疑的話,我們可以想象一個情景,就是負責寫StudentService的是程式員A,負責寫StudentRepository的是另一個程式員B,那麼:
- 針對程式員A
我(程式員A)只需要關註業務邏輯層面,如果我需要從倉儲層拿資料庫的資料,比如我需要根據Id獲取學生物體,那麼我只需要去IStudentRepository找Get(long id)函式就可以了,至於實現它的倉儲怎麼實現這個方法我完全不用管,你怎麼從資料庫拿資料不是我該關心的事情。
- 針對程式員B
我(程式員B)的工作就是實現IStudentRepository介面的所有方法就行了,簡單而明確,至於誰來呼叫我,我不用管。IStudentRepository裡有根據Id獲取學生姓名的方法,我實現了就行,至於業務邏輯層拿這個名字乾啥,那不是我要關心的事情。
這樣看的話是不是彼此的職責就清晰多了,更進一步再舉個極端的例子:
比如程式員B是個實習生,整天划水摸魚,技術停留在上個世紀,結果他寫的倉儲層讀取資料庫全部用的手寫sql陳述句的方式,極難維護,後來被領導發現領了盒飯,公司安排了另一個程式員C來重寫倉儲層,C這時不需要動其他程式碼,只需要新建一個倉儲StudentNewRepository,然後實現之前的IStudentRepository,C使用Dapper或者EF,寫完新的倉儲層之後,剩下的只需要在StudentService裡改一個地方就行了:
        public StudentService()

{

_studentRepository = new StudentNewRepository();

}
是不是很清晰,耦合不會像以前那麼重。
其實對於這個小例子來說,介面驅動的優勢還不太明顯,但是在系統層面優勢就會被放大。比如上面換倉儲的例子,雖然職責是清晰了,但是專案裡有幾個Service就需要改幾個地方,還是很麻煩。原因就是上面講的,這是一種依賴關係,Service要依賴Repository,有沒有一種方法可以讓這種控制關係反轉過來呢?當Service需要使用Repository,有沒有辦法讓我需要的Repository自己註入到我這裡來?
當然有,這就是我們將要實現的依賴註入。使用依賴註入後你會發現,當C寫完新的倉儲後,業務邏輯層(StudentService)是不需要改任何程式碼的,所有的Service都不需要一個一個去改,直接在註入的時候修改規則,不要註入以前老的直接註入新的倉儲就可以了。
面向介面後的架構:
| 介面層(UI) | 負責展示資料 | StudentController |
| 業務邏輯抽象層(InterfaceBLL) | 業務邏輯運算抽象介面 | IStudentService |
| 業務邏輯層(BLL) | 負責業務邏輯運算 | StudentService |
| 資料訪問抽象層(InterfaceDAL) | 資料訪問抽象介面 | IStudentRepository |
| 資料訪問層(DAL) | 負責提供資料 | StudentRepository |
什麼是IoC
IoC,全稱Inversion of Control,即“控制反轉”,是一種設計原則,最早由Martin Fowler提出,因為其理論提出時間和成熟時間相對較晚,所以並沒有被包含在GoF的《設計樣式》中。
什麼是DI
DI,全稱Dependency Injection,即依賴註入,是實現IoC的其中一種設計方法。
其特徵是透過一些技巧,將依賴的物件註入到呼叫者當中。(比如把Repository註入到Service當中)
這裡說的技巧目前主要指的就是引入容器,先把所有會產生依賴的物件統一新增到容器當中,比如StudentRepository和StudentService,把分配許可權交給容器,當StudentService內部需要使用StudentRepository時,這時不應該讓它自己new出來一個,而是透過容器,把StudentRepository註入到StudentService當中。
這就是名稱“依賴註入”的由來。
DI和IoC有什麼區別
這是個老生常談的問題了,而且這兩個名字經常在各種大牛和偽大牛的吹逼現場頻繁出現 ,聽的新手雲裡霧裡,莫名感到神聖不可侵犯。那麼DI和IoC是同一個東西嗎?如果不是,它們又有什麼區別呢?
回答很簡單:不是一個東西。
區別也很簡單,一句話概括就是:IoC是一種很寬泛的理念,DI是實現了IoC的其中一種方法。
說到這裡我已經感覺到螢幕後的你性感地添了一下嘴唇,囤積好口水,準備開始噴我了。
先別慌,我有證據,我們先來看下微軟怎麼說:
ASP.NET Core supports the dependency injection (DI) software design pattern, which is a technique for achieving Inversion of Control (IoC) between classes and their dependencies.
地址:https://docs.microsoft.com/en-us/aspnet/core/fundamentals/dependency-injection?view=aspnetcore-2.2
翻譯過來就是“ASP.NET Core支援依賴註入(DI)的軟體設計樣式,該樣式是一種在類和它依賴的物件之間實現了控制反轉(IoC)的技術”。
如果有人覺得辣雞微軟不夠權威,那我們去看下IoC以及DI這兩個概念的發明人——Martin Fowler怎麼說:
幾位輕量級容器的作者曾驕傲地對我說:這些容器非常有用,因為它們實現了控制反轉。這樣的說辭讓我深感迷惑:控制反轉是框架所共有的特徵,如果僅僅因為使用了控制反轉就認為這些輕量級容器與眾不同,就好象在說我的轎車是與眾不同的,因為它有四個輪子。
因此,我想我們需要給這個樣式起一個更能說明其特點的名字——”控制反轉”這個名字太泛了,常常讓人有些迷惑。經與多位IoC 愛好者討論之後,我們決定將這個樣式叫做”依賴註入”(Dependency Injection)。
地址:http://insights.thoughtworkers.org/injection/
Martin Fowler說的比較委婉,其實說白了就是建議我們,不要亂用IoC裝逼,IoC是一種設計理念,很寬泛,你把程式裡的一個寫死的變數改成從配置檔案裡讀取也是一種控制反轉(由程式控制反轉為由框架控制),你把這個配置改成使用者UI介面的一個輸入文字框由使用者輸入也是一種控制反轉(由框架控制反轉為由使用者自己控制)。
所以,如果確定討論的樣式是DI,那麼就表述為DI,還是儘量少用IoC這種寬泛的表達。
AutoFac
AutoFac是一個開源的輕量級的DI容器,也是.net下最受大家歡迎的實現依賴註入的工具之一,透過AutoFac我們可以很方便的實現一些DI的騷操作。
標的很簡單,就是控制檯程式啟動後,將學生姓名打印出來。
程式啟動流程是,控制檯主程式呼叫Service層,Service層呼叫Repository層獲取資料(示例專案的倉儲層沒有連線資料庫,只是直接造個假資料傳回)。
沒有依賴註入的情況下,肯定是主程式會new一個StudentService,StudentService裡會new一個StudentRepository,現在引入依賴註入後,就不應該這麼new出來了,而是透過容器註入,也就是容器會把StudentRepository自動註入到StudentService當中。
架構
物體層
學生物體類StudentEntity:
namespace Ray.EssayNotes.AutoFac.Model

{
public class StudentEntity
{
public long Id { get; set; }
public string Name { get; set; }
public int Grade { get; set; }
}
}
倉儲層
IStudentRepository介面:
using Ray.EssayNotes.AutoFac.Model;
namespace Ray.EssayNotes.AutoFac.Repository.IRepository
{
public interface IStudentRepository
{
string GetName(long id);
}
}
StudentRepository倉儲類:
using Ray.EssayNotes.AutoFac.Model;

using Ray.EssayNotes.AutoFac.Repository.IRepository;
namespace Ray.EssayNotes.AutoFac.Repository.Repository
{
public class StudentRepository : IStudentRepository
{
public string GetName(long id)
{
return “學生張三”;
}
}
}
Service層
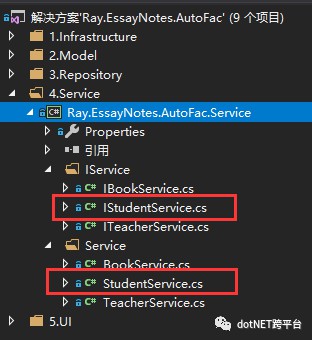
IStudentService介面
namespace Ray.EssayNotes.AutoFac.Service.IService

{
public interface IStudentService
{
string GetStuName(long id);
}
}
StudentService類:
using Ray.EssayNotes.AutoFac.Repository.IRepository;

using Ray.EssayNotes.AutoFac.Repository.Repository;

using Ray.EssayNotes.AutoFac.Service.IService;
namespace Ray.EssayNotes.AutoFac.Service.Service
{
public class StudentService : IStudentService
{
private readonly IStudentRepository _studentRepository;
public StudentService(IStudentRepository studentRepository)
{
_studentRepository = studentRepository;
}
public string GetStuName(long id)
{
var stu = _studentRepository.Get(id);
return stu.Name;
}
}
}
其中建構式是一個有參的函式,引數是學生倉儲,這個後面依賴註入時會用。
AutoFac容器
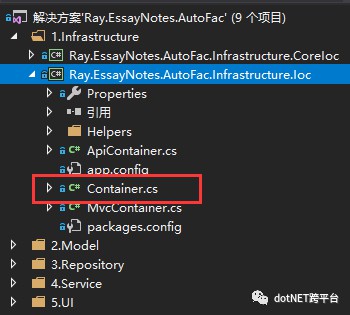
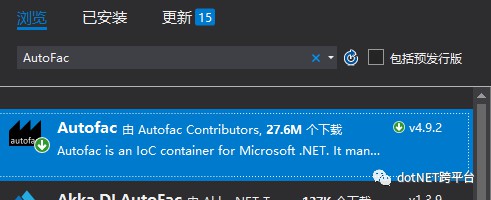
需要先透過Nuget匯入Autofac包:
using System;

using System.Reflection;
using Autofac;
using Autofac.Core;
using Ray.EssayNotes.AutoFac.Repository.IRepository;
using Ray.EssayNotes.AutoFac.Repository.Repository;
using Ray.EssayNotes.AutoFac.Service.IService;
using Ray.EssayNotes.AutoFac.Service.Service;
namespace Ray.EssayNotes.AutoFac.Infrastructure.Ioc
{
public static class Container
{
public static IContainer Instance;
public static void Init()
{
var builder = new ContainerBuilder();
MyBuild(builder);
Instance = builder.Build();
}
public static void MyBuild(ContainerBuilder builder)
{
builder.RegisterType().As();
builder.RegisterType().As();
}
}
}
其中:
- public static IContainer Instance
為單例容器 - Init()方法
用於初始化容器,即往容器中新增物件,我們把這個新增的過程稱為註冊(Register)。
ContainerBuilder為AutoFac定義的容器建構式,我們透過使用它往容器內註冊物件。 -
MyBuild(ContainerBuilder builder)方法
我們具體註冊的實現函式。RegisterType是AutoFac封裝的一種最基本的註冊方法,傳入的泛型(StudentService)就是我們欲新增到容器的物件;As函式負責系結註冊物件的暴露型別,一般是以其實現的介面型別暴露,這個暴露型別是我們後面去容器內查詢物件時使用的搜尋標識,我們從容器外部只有透過暴露型別才能找到容器內的物件。主程式
需要先Nuget匯入AutoFac程式包:
using System;
using Autofac;
using Ray.EssayNotes.AutoFac.Infrastructure.Ioc;
using Ray.EssayNotes.AutoFac.Service.IService;
namespace Ray.EssayNotes.AutoFac.ConsoleApp
{
class Program
{
static void Main(string[] args)
{
Container.Init();
PrintStudentName(10001);
Console.ReadKey();
}
public static void PrintStudentName(long id)
{
IStudentService stuService = Container.Instance.Resolve();
string name = stuService.GetStuName(id);
Console.WriteLine(name);
}
}
}
進入Main函式,先呼叫容器的初始化函式,該函式執行成功後,StudentRepository和StudentService就被註冊到容器中了。
然後呼叫列印學生姓名的函式,其中Resolve()方法是AutoFac封裝的容器的解析方法,傳入的泛型就是之前註冊時的暴露型別,下麵可以詳細看下這一步到底發生了哪些事情:
- 容器根據暴露型別解析物件
也就是容器會根據暴露型別IStudentService去容器內部找到其對應類(即StudentService),找到後會試圖實體化一個物件出來。
- 實體化StudentService
AutoFac容器在解析StudentService的時候,會呼叫StudentService的建構式進行實體化。
- 構造註入
AutoFac容器發現StudentService的建構式需要一個IStudnetRepository型別的引數,於是會自動去容器內尋找,根據這個暴露型別找到對應的StudnetRepository後,自動將其註入到了StudentService當中
經過這幾步,一個簡單的基於依賴註入的程式就完成了。
結果
我們將控制檯程式設定為啟動專案,點選執行,如圖呼叫成功:
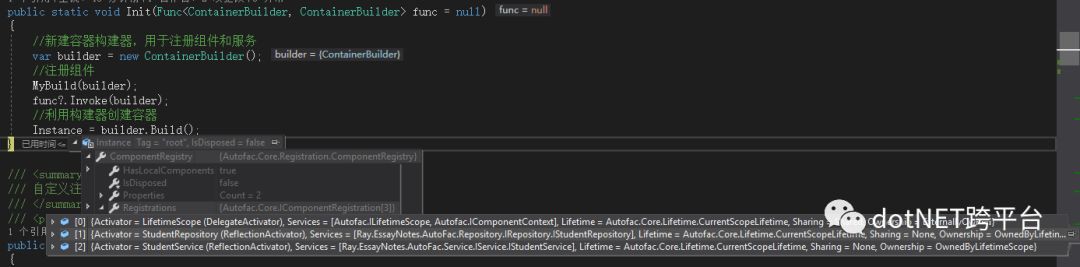
如果把除錯斷點加在容器初始化函式裡,可以很清晰的看到哪些物件被註冊到了容器裡:
使用控制檯程式本來是為了突出容器的概念,但是容易造成一些誤解,DI的最終形態可以參考原始碼裡的Api專案和MVC專案,本來想循序漸進,先第一章控制檯引入容器的概念,然後第二章講批次註冊、註入泛型、生命週期域管理,第三章講Api和MVC專案,最後兩章講下.net core的DI,但是這裡還是先說下吧:
- 誤解1:每次新增Service和Repository都要去註冊,不是更麻煩?
其實是不需要一個一個註冊的,運用批次註冊後容器內部的程式碼是這樣的,可以直接批次註冊所有的:
public static class MvcContainer
{
public static IContainer Instance;
public static void Init(Func func = null)
{
var builder = new ContainerBuilder();
MyBuild(builder);
func?.Invoke(builder);
Instance = builder.Build();
System.Web.Mvc.DependencyResolver.SetResolver(new AutofacDependencyResolver(Instance));
}
public static void MyBuild(ContainerBuilder builder)
{
Assembly[] assemblies = Helpers.ReflectionHelper.GetAllAssembliesWeb();
builder.RegisterAssemblyTypes(assemblies)
.Where(cc => cc.Name.EndsWith(“Repository”) |
cc.Name.EndsWith(“Service”))
.PublicOnly()
.Where(cc => cc.IsClass)
.AsImplementedInterfaces();
builder.RegisterGeneric(typeof(BaseRepository<>)).As(typeof(IBaseRepository<>));
Assembly mvcAssembly = assemblies.FirstOrDefault(x => x.FullName.Contains(“.NetFrameworkMvc”));
builder.RegisterControllers(mvcAssembly);
}
}
誤解2:每次使用都要解析下,還不如直接new
好吧,其實也是不需要自己去解析的,最終形態的Controller入口是這樣的,直接在建構式裡寫就行了:
    public class StudentController : Controller

{

private readonly IStudentService _studentService;

public StudentController(IStudentService studentService)

{

_studentService = studentService;

}
public string GetStuNameById(long id)
{
return _studentService.GetStuName(id);
}
}
就是直接在建構式裡註入就可以了。
- 誤解3:依賴註入是不是過度設計?
首先DI是一個設計樣式(design pattern),其本身完全不存在過不過度的問題,這完全取決於用的人和怎麼用。
另外,在.NET Core中,DI被提到了一個很重要的地位,如果想要瞭解.NET Core,理解DI是必不可少的。
原文地址:https://www.cnblogs.com/RayWang/p/11128554.html
朋友會在“發現-看一看”看到你“在看”的內容