前面的部分,我們關註了Spring Security是如何完成認證工作的,但是另外一部分核心的內容:過濾器,一直沒有提到,我們已經知道Spring Security使用了springSecurityFillterChian作為了安全過濾的入口,這一節主要分析一下這個過濾器鏈都包含了哪些關鍵的過濾器,並且各自的使命是什麼。
作者:老徐
原文地址:https://www.cnkirito.moe/2017/09/30/spring-security-4/
友情提示:歡迎關註公眾號【芋道原始碼】。?關註後,拉你進【原始碼圈】微信群和【老徐】搞基嗨皮。
友情提示:歡迎關註公眾號【芋道原始碼】。?關註後,拉你進【原始碼圈】微信群和【老徐】搞基嗨皮。
友情提示:歡迎關註公眾號【芋道原始碼】。?關註後,拉你進【原始碼圈】微信群和【老徐】搞基嗨皮。
4 過濾器詳解
4.1 核心過濾器概述
由於過濾器鏈路中的過濾較多,即使是Spring Security的官方檔案中也並未對所有的過濾器進行介紹,在之前,《Spring Security(二)–Guides》入門指南中我們配置了一個表單登入的demo,以此為例,來看看這過程中Spring Security都幫我們自動配置了哪些過濾器。
Creating filter chain: o.s.s.web.util.matcher.AnyRequestMatcher@1,
[o.s.s.web.context.SecurityContextPersistenceFilter@8851ce1,
o.s.s.web.essay-header.HeaderWriterFilter@6a472566, o.s.s.web.csrf.CsrfFilter@61cd1c71,
o.s.s.web.authentication.logout.LogoutFilter@5e1d03d7,
o.s.s.web.authentication.UsernamePasswordAuthenticationFilter@122d6c22,
o.s.s.web.savedrequest.RequestCacheAwareFilter@5ef6fd7f,
o.s.s.web.servletapi.SecurityContextHolderAwareRequestFilter@4beaf6bd,
o.s.s.web.authentication.AnonymousAuthenticationFilter@6edcad64,
o.s.s.web.session.SessionManagementFilter@5e65afb6,
o.s.s.web.access.ExceptionTranslationFilter@5b9396d3,
o.s.s.web.access.intercept.FilterSecurityInterceptor@3c5dbdf8
]
上述的log資訊是我從springboot啟動的日誌中CV所得,spring security的過濾器日誌有一個特點:log列印順序與實際配置順序符合,也就意味著 SecurityContextPersistenceFilter是整個過濾器鏈的第一個過濾器,而 FilterSecurityInterceptor則是末置的過濾器。另外透過觀察過濾器的名稱,和所在的包名,可以大致地分析出他們各自的作用,如 UsernamePasswordAuthenticationFilter明顯便是與使用使用者名稱和密碼登入相關的過濾器,而 FilterSecurityInterceptor我們似乎看不出它的作用,但是其位於 web.access包下,大致可以分析出他與訪問限制相關。第四篇文章主要就是介紹這些常用的過濾器,對其中關鍵的過濾器進行一些原始碼分析。先大致介紹下每個過濾器的作用:
-
SecurityContextPersistenceFilter 兩個主要職責:請求來臨時,建立
SecurityContext安全背景關係資訊,請求結束時清空SecurityContextHolder。 -
HeaderWriterFilter (檔案中並未介紹,非核心過濾器) 用來給http響應新增一些Header,比如X-Frame-Options, X-XSS-Protection*,X-Content-Type-Options.
-
CsrfFilter 在spring4這個版本中被預設開啟的一個過濾器,用於防止csrf攻擊,瞭解前後端分離的人一定不會對這個攻擊方式感到陌生,前後端使用json互動需要註意的一個問題。
-
LogoutFilter 顧名思義,處理登出的過濾器
-
UsernamePasswordAuthenticationFilter 這個會重點分析,表單提交了username和password,被封裝成token進行一系列的認證,便是主要透過這個過濾器完成的,在表單認證的方法中,這是最最關鍵的過濾器。
-
RequestCacheAwareFilter (檔案中並未介紹,非核心過濾器) 內部維護了一個RequestCache,用於快取request請求
-
SecurityContextHolderAwareRequestFilter 此過濾器對ServletRequest進行了一次包裝,使得request具有更加豐富的API
-
AnonymousAuthenticationFilter 匿名身份過濾器,這個過濾器個人認為很重要,需要將它與UsernamePasswordAuthenticationFilter 放在一起比較理解,spring security為了相容未登入的訪問,也走了一套認證流程,只不過是一個匿名的身份。
-
SessionManagementFilter 和session相關的過濾器,內部維護了一個SessionAuthenticationStrategy,兩者組合使用,常用來防止
session-fixation protection attack,以及限制同一使用者開啟多個會話的數量 -
ExceptionTranslationFilter 直譯成異常翻譯過濾器,還是比較形象的,這個過濾器本身不處理異常,而是將認證過程中出現的異常交給內部維護的一些類去處理,具體是那些類下麵詳細介紹
-
FilterSecurityInterceptor 這個過濾器決定了訪問特定路徑應該具備的許可權,訪問的使用者的角色,許可權是什麼?訪問的路徑需要什麼樣的角色和許可權?這些判斷和處理都是由該類進行的。
其中加粗的過濾器可以被認為是Spring Security的核心過濾器,將在下麵,一個過濾器對應一個小節來講解。
4.2 SecurityContextPersistenceFilter
試想一下,如果我們不使用Spring Security,如果儲存使用者資訊呢,大多數情況下會考慮使用Session對吧?在Spring Security中也是如此,使用者在登入過一次之後,後續的訪問便是透過sessionId來識別,從而認為使用者已經被認證。具體在何處存放使用者資訊,便是第一篇文章中提到的SecurityContextHolder;認證相關的資訊是如何被存放到其中的,便是透過SecurityContextPersistenceFilter。在4.1概述中也提到了,SecurityContextPersistenceFilter的兩個主要作用便是請求來臨時,建立 SecurityContext安全背景關係資訊和請求結束時清空 SecurityContextHolder。順帶提一下:微服務的一個設計理念需要實現服務通訊的無狀態,而http協議中的無狀態意味著不允許存在session,這可以透過 setAllowSessionCreation(false) 實現,這並不意味著SecurityContextPersistenceFilter變得無用,因為它還需要負責清除使用者資訊。在Spring Security中,雖然安全背景關係資訊被儲存於Session中,但我們在實際使用中不應該直接操作Session,而應當使用SecurityContextHolder。
原始碼分析
org.springframework.security.web.context.SecurityContextPersistenceFilter
public class SecurityContextPersistenceFilter extends GenericFilterBean {
static final String FILTER_APPLIED = "__spring_security_scpf_applied";
//安全背景關係儲存的倉庫
private SecurityContextRepository repo;
public SecurityContextPersistenceFilter() {
//HttpSessionSecurityContextRepository是SecurityContextRepository介面的一個實現類
//使用HttpSession來儲存SecurityContext
this(new HttpSessionSecurityContextRepository());
}
public void doFilter(ServletRequest req, ServletResponse res, FilterChain chain)
throws IOException, ServletException {
HttpServletRequest request = (HttpServletRequest) req;
HttpServletResponse response = (HttpServletResponse) res;
if (request.getAttribute(FILTER_APPLIED) != null) {
// ensure that filter is only applied once per request
chain.doFilter(request, response);
return;
}
request.setAttribute(FILTER_APPLIED, Boolean.TRUE);
//包裝request,response
HttpRequestResponseHolder holder = new HttpRequestResponseHolder(request,
response);
//從Session中獲取安全背景關係資訊
SecurityContext contextBeforeChainExecution = repo.loadContext(holder);
try {
//請求開始時,設定安全背景關係資訊,這樣就避免了使用者直接從Session中獲取安全背景關係資訊
SecurityContextHolder.setContext(contextBeforeChainExecution);
chain.doFilter(holder.getRequest(), holder.getResponse());
}
finally {
//請求結束後,清空安全背景關係資訊
SecurityContext contextAfterChainExecution = SecurityContextHolder
.getContext();
SecurityContextHolder.clearContext();
repo.saveContext(contextAfterChainExecution, holder.getRequest(),
holder.getResponse());
request.removeAttribute(FILTER_APPLIED);
if (debug) {
logger.debug("SecurityContextHolder now cleared, as request processing completed");
}
}
}
}
過濾器一般負責核心的處理流程,而具體的業務實現,通常交給其中聚合的其他物體類,這在Filter的設計中很常見,同時也符合職責分離樣式。例如儲存安全背景關係和讀取安全背景關係的工作完全委託給了HttpSessionSecurityContextRepository去處理,而這個類中也有幾個方法可以稍微解讀下,方便我們理解內部的工作流程
org.springframework.security.web.context.HttpSessionSecurityContextRepository
public class HttpSessionSecurityContextRepository implements SecurityContextRepository {
// 'SPRING_SECURITY_CONTEXT'是安全背景關係預設儲存在Session中的鍵值
public static final String SPRING_SECURITY_CONTEXT_KEY = "SPRING_SECURITY_CONTEXT";
...
private final Object contextObject = SecurityContextHolder.createEmptyContext();
private boolean allowSessionCreation = true;
private boolean disableUrlRewriting = false;
private String springSecurityContextKey = SPRING_SECURITY_CONTEXT_KEY;
private AuthenticationTrustResolver trustResolver = new AuthenticationTrustResolverImpl();
//從當前request中取出安全背景關係,如果session為空,則會傳回一個新的安全背景關係
public SecurityContext loadContext(HttpRequestResponseHolder requestResponseHolder) {
HttpServletRequest request = requestResponseHolder.getRequest();
HttpServletResponse response = requestResponseHolder.getResponse();
HttpSession httpSession = request.getSession(false);
SecurityContext context = readSecurityContextFromSession(httpSession);
if (context == null) {
context = generateNewContext();
}
...
return context;
}
...
public boolean containsContext(HttpServletRequest request) {
HttpSession session = request.getSession(false);
if (session == null) {
return false;
}
return session.getAttribute(springSecurityContextKey) != null;
}
private SecurityContext readSecurityContextFromSession(HttpSession httpSession) {
if (httpSession == null) {
return null;
}
...
// Session存在的情況下,嘗試獲取其中的SecurityContext
Object contextFromSession = httpSession.getAttribute(springSecurityContextKey);
if (contextFromSession == null) {
return null;
}
...
return (SecurityContext) contextFromSession;
}
//初次請求時建立一個新的SecurityContext實體
protected SecurityContext generateNewContext() {
return SecurityContextHolder.createEmptyContext();
}
}
SecurityContextPersistenceFilter和HttpSessionSecurityContextRepository配合使用,構成了Spring Security整個呼叫鏈路的入口,為什麼將它放在最開始的地方也是顯而易見的,後續的過濾器中大機率會依賴Session資訊和安全背景關係資訊。
4.3 UsernamePasswordAuthenticationFilter
表單認證是最常用的一個認證方式,一個最直觀的業務場景便是允許使用者在表單中輸入使用者名稱和密碼進行登入,而這背後的UsernamePasswordAuthenticationFilter,在整個Spring Security的認證體系中則扮演著至關重要的角色。
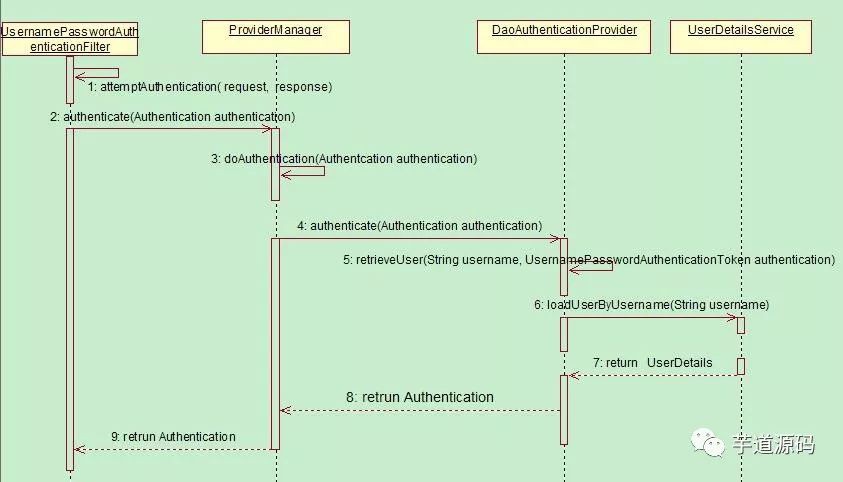
上述的時序圖,可以看出UsernamePasswordAuthenticationFilter主要肩負起了呼叫身份認證器,校驗身份的作用,至於認證的細節,在前面幾章花了很大篇幅進行了介紹,到這裡,其實Spring Security的基本流程就已經走通了。
原始碼分析
org.springframework.security.web.authentication.UsernamePasswordAuthenticationFilter#attemptAuthentication
public Authentication attemptAuthentication(HttpServletRequest request,
HttpServletResponse response) throws AuthenticationException {
//獲取表單中的使用者名稱和密碼
String username = obtainUsername(request);
String password = obtainPassword(request);
...
username = username.trim();
//組裝成username+password形式的token
UsernamePasswordAuthenticationToken authRequest = new UsernamePasswordAuthenticationToken(
username, password);
// Allow subclasses to set the "details" property
setDetails(request, authRequest);
//交給內部的AuthenticationManager去認證,並傳回認證資訊
return this.getAuthenticationManager().authenticate(authRequest);
}
UsernamePasswordAuthenticationFilter本身的程式碼只包含了上述這麼一個方法,非常簡略,而在其父類 AbstractAuthenticationProcessingFilter中包含了大量的細節,值得我們分析:
public abstract class AbstractAuthenticationProcessingFilter extends GenericFilterBean
implements ApplicationEventPublisherAware, MessageSourceAware {
//包含了一個身份認證器
private AuthenticationManager authenticationManager;
//用於實現remeberMe
private RememberMeServices rememberMeServices = new NullRememberMeServices();
private RequestMatcher requiresAuthenticationRequestMatcher;
//這兩個Handler很關鍵,分別代表了認證成功和失敗相應的處理器
private AuthenticationSuccessHandler successHandler = new SavedRequestAwareAuthenticationSuccessHandler();
private AuthenticationFailureHandler failureHandler = new SimpleUrlAuthenticationFailureHandler();
public void doFilter(ServletRequest req, ServletResponse res, FilterChain chain)
throws IOException, ServletException {
HttpServletRequest request = (HttpServletRequest) req;
HttpServletResponse response = (HttpServletResponse) res;
...
Authentication authResult;
try {
//此處實際上就是呼叫UsernamePasswordAuthenticationFilter的attemptAuthentication方法
authResult = attemptAuthentication(request, response);
if (authResult == null) {
//子類未完成認證,立刻傳回
return;
}
sessionStrategy.onAuthentication(authResult, request, response);
}
//在認證過程中可以直接丟擲異常,在過濾器中,就像此處一樣,進行捕獲
catch (InternalAuthenticationServiceException failed) {
//內部服務異常
unsuccessfulAuthentication(request, response, failed);
return;
}
catch (AuthenticationException failed) {
//認證失敗
unsuccessfulAuthentication(request, response, failed);
return;
}
//認證成功
if (continueChainBeforeSuccessfulAuthentication) {
chain.doFilter(request, response);
}
//註意,認證成功後過濾器把authResult結果也傳遞給了成功處理器
successfulAuthentication(request, response, chain, authResult);
}
}
整個流程理解起來也並不難,主要就是內部呼叫了authenticationManager完成認證,根據認證結果執行successfulAuthentication或者unsuccessfulAuthentication,無論成功失敗,一般的實現都是轉發或者重定向等處理,不再細究AuthenticationSuccessHandler和AuthenticationFailureHandler,有興趣的朋友,可以去看看兩者的實現類。
4.4 AnonymousAuthenticationFilter
匿名認證過濾器,可能有人會想:匿名了還有身份?我自己對於Anonymous匿名身份的理解是Spirng Security為了整體邏輯的統一性,即使是未透過認證的使用者,也給予了一個匿名身份。而 AnonymousAuthenticationFilter該過濾器的位置也是非常的科學的,它位於常用的身份認證過濾器(如 UsernamePasswordAuthenticationFilter、 BasicAuthenticationFilter、 RememberMeAuthenticationFilter)之後,意味著只有在上述身份過濾器執行完畢後,SecurityContext依舊沒有使用者資訊, AnonymousAuthenticationFilter該過濾器才會有意義----基於使用者一個匿名身份。
原始碼分析
org.springframework.security.web.authentication.AnonymousAuthenticationFilter
public class AnonymousAuthenticationFilter extends GenericFilterBean implements
InitializingBean {
private AuthenticationDetailsSource<HttpServletRequest, ?> authenticationDetailsSource = new WebAuthenticationDetailsSource();
private String key;
private Object principal;
private List<GrantedAuthority> authorities;
//自動建立一個"anonymousUser"的匿名使用者,其具有ANONYMOUS角色
public AnonymousAuthenticationFilter(String key) {
this(key, "anonymousUser", AuthorityUtils.createAuthorityList("ROLE_ANONYMOUS"));
}
/**
*
* @param key key用來識別該過濾器建立的身份
* @param principal principal代表匿名使用者的身份
* @param authorities authorities代表匿名使用者的許可權集合
*/
public AnonymousAuthenticationFilter(String key, Object principal,
List<GrantedAuthority> authorities) {
Assert.hasLength(key, "key cannot be null or empty");
Assert.notNull(principal, "Anonymous authentication principal must be set");
Assert.notNull(authorities, "Anonymous authorities must be set");
this.key = key;
this.principal = principal;
this.authorities = authorities;
}
...
public void doFilter(ServletRequest req, ServletResponse res, FilterChain chain)
throws IOException, ServletException {
//過濾器鏈都執行到匿名認證過濾器這兒了還沒有身份資訊,塞一個匿名身份進去
if (SecurityContextHolder.getContext().getAuthentication() == null) {
SecurityContextHolder.getContext().setAuthentication(
createAuthentication((HttpServletRequest) req));
}
chain.doFilter(req, res);
}
protected Authentication createAuthentication(HttpServletRequest request) {
//建立一個AnonymousAuthenticationToken
AnonymousAuthenticationToken auth = new AnonymousAuthenticationToken(key,
principal, authorities);
auth.setDetails(authenticationDetailsSource.buildDetails(request));
return auth;
}
...
}
其實對比AnonymousAuthenticationFilter和UsernamePasswordAuthenticationFilter就可以發現一些門道了,UsernamePasswordAuthenticationToken對應AnonymousAuthenticationToken,他們都是Authentication的實現類,而Authentication則是被SecurityContextHolder(SecurityContext)持有的,一切都被串聯在了一起。
4.5 ExceptionTranslationFilter
ExceptionTranslationFilter異常轉換過濾器位於整個springSecurityFilterChain的後方,用來轉換整個鏈路中出現的異常,將其轉化,顧名思義,轉化以意味本身並不處理。一般其只處理兩大類異常:AccessDeniedException訪問異常和AuthenticationException認證異常。
這個過濾器非常重要,因為它將Java中的異常和HTTP的響應連線在了一起,這樣在處理異常時,我們不用考慮密碼錯誤該跳到什麼頁面,賬號鎖定該如何,只需要關註自己的業務邏輯,丟擲相應的異常便可。如果該過濾器檢測到AuthenticationException,則將會交給內部的AuthenticationEntryPoint去處理,如果檢測到AccessDeniedException,需要先判斷當前使用者是不是匿名使用者,如果是匿名訪問,則和前面一樣執行AuthenticationEntryPoint,否則會委託給AccessDeniedHandler去處理,而AccessDeniedHandler的預設實現,是AccessDeniedHandlerImpl。所以ExceptionTranslationFilter內部的AuthenticationEntryPoint是至關重要的,顧名思義:認證的入口點。
原始碼分析
public class ExceptionTranslationFilter extends GenericFilterBean {
//處理異常轉換的核心方法
private void handleSpringSecurityException(HttpServletRequest request,
HttpServletResponse response, FilterChain chain, RuntimeException exception)
throws IOException, ServletException {
if (exception instanceof AuthenticationException) {
//重定向到登入端點
sendStartAuthentication(request, response, chain,
(AuthenticationException) exception);
}
else if (exception instanceof AccessDeniedException) {
Authentication authentication = SecurityContextHolder.getContext().getAuthentication();
if (authenticationTrustResolver.isAnonymous(authentication) || authenticationTrustResolver.isRememberMe(authentication)) {
//重定向到登入端點
sendStartAuthentication(
request,
response,
chain,
new InsufficientAuthenticationException(
"Full authentication is required to access this resource"));
}
else {
//交給accessDeniedHandler處理
accessDeniedHandler.handle(request, response,
(AccessDeniedException) exception);
}
}
}
}
剩下的便是要搞懂AuthenticationEntryPoint和AccessDeniedHandler就可以了。

選擇了幾個常用的登入端點,以其中第一個為例來介紹,看名字就能猜到是認證失敗之後,讓使用者跳轉到登入頁面。還記得我們一開始怎麼配置表單登入頁面的嗎?
@Configuration
@EnableWebSecurity
public class WebSecurityConfig extends WebSecurityConfigurerAdapter {
@Override
protected void configure(HttpSecurity http) throws Exception {
http
.authorizeRequests()
.antMatchers("/", "/home").permitAll()
.anyRequest().authenticated()
.and()
.formLogin()//FormLoginConfigurer
.loginPage("/login")
.permitAll()
.and()
.logout()
.permitAll();
}
}
我們順著formLogin傳回的FormLoginConfigurer往下找,看看能發現什麼,最終在FormLoginConfigurer的父類AbstractAuthenticationFilterConfigurer中有了不小的收穫:
public abstract class AbstractAuthenticationFilterConfigurer extends ...{
...
//formLogin不出所料配置了AuthenticationEntryPoint
private LoginUrlAuthenticationEntryPoint authenticationEntryPoint;
//認證失敗的處理器
private AuthenticationFailureHandler failureHandler;
...
}
具體如何配置的就不看了,我們得出了結論,formLogin()配置了之後最起碼做了兩件事,其一,為UsernamePasswordAuthenticationFilter設定了相關的配置,其二配置了AuthenticationEntryPoint。
登入端點還有Http401AuthenticationEntryPoint,Http403ForbiddenEntryPoint這些都是很簡單的實現,有時候我們訪問受限頁面,又沒有配置登入,就看到了一個空蕩盪的預設錯誤頁面,上面顯示著401,403,就是這兩個入口起了作用。
還剩下一個AccessDeniedHandler訪問決策器未被講解,簡單提一下:AccessDeniedHandlerImpl這個預設實現類會根據errorPage和狀態碼來判斷,最終決定跳轉的頁面
org.springframework.security.web.access.AccessDeniedHandlerImpl#handle
public void handle(HttpServletRequest request, HttpServletResponse response,
AccessDeniedException accessDeniedException) throws IOException,
ServletException {
if (!response.isCommitted()) {
if (errorPage != null) {
// Put exception into request scope (perhaps of use to a view)
request.setAttribute(WebAttributes.ACCESS_DENIED_403,
accessDeniedException);
// Set the 403 status code.
response.setStatus(HttpServletResponse.SC_FORBIDDEN);
// forward to error page.
RequestDispatcher dispatcher = request.getRequestDispatcher(errorPage);
dispatcher.forward(request, response);
}
else {
response.sendError(HttpServletResponse.SC_FORBIDDEN,
accessDeniedException.getMessage());
}
}
}
4.6 FilterSecurityInterceptor
想想整個認證安全控制流程還缺了什麼?我們已經有了認證,有了請求的封裝,有了Session的關聯...還缺一個:由什麼控制哪些資源是受限的,這些受限的資源需要什麼許可權,需要什麼角色...這一切和訪問控制相關的操作,都是由FilterSecurityInterceptor完成的。
FilterSecurityInterceptor的工作流程用筆者的理解可以理解如下:FilterSecurityInterceptor從SecurityContextHolder中獲取Authentication物件,然後比對使用者擁有的許可權和資源所需的許可權。前者可以透過Authentication物件直接獲得,而後者則需要引入我們之前一直未提到過的兩個類:SecurityMetadataSource,AccessDecisionManager。理解清楚決策管理器的整個建立流程和SecurityMetadataSource的作用需要花很大一筆功夫,這裡,暫時只介紹其大概的作用。
在JavaConfig的配置中,我們通常如下配置路徑的訪問控制:
@Override
protected void configure(HttpSecurity http) throws Exception {
http
.authorizeRequests()
.antMatchers("/resources/**", "/signup", "/about").permitAll()
.antMatchers("/admin/**").hasRole("ADMIN")
.antMatchers("/db/**").access("hasRole('ADMIN') and hasRole('DBA')")
.anyRequest().authenticated()
.withObjectPostProcessor(new ObjectPostProcessor<FilterSecurityInterceptor>() {
public <O extends FilterSecurityInterceptor> O postProcess(
O fsi) {
fsi.setPublishAuthorizationSuccess(true);
return fsi;
}
});
}
在ObjectPostProcessor的泛型中看到了FilterSecurityInterceptor,以筆者的經驗,目前並沒有太多機會需要修改FilterSecurityInterceptor的配置。
總結
本篇文章在介紹過濾器時,順便進行了一些原始碼的分析,目的是方便理解整個Spring Security的工作流。伴隨著整個過濾器鏈的介紹,安全框架的輪廓應該已經浮出水面了,下麵的章節,主要打算透過自定義一些需求,再次分析其他元件的原始碼,學習應該如何改造Spring Security,為我們所用。
