作者:花丶滿樓
連結:https://juejin.im/post/5c49a7d0518825254e4d46fc
一、iOS12(Xcode10)
1.1、升級Xcode10後專案報錯
不允許多個info.plist
Xcode10是預設選中的最新的New Build System(Default),在這個編譯系統的環境下,不允許多個info.plist
解決辦法一:(推薦)
把build system切換到 Legacy Build System,換言之就是切換成老的編譯系統,就OK了。
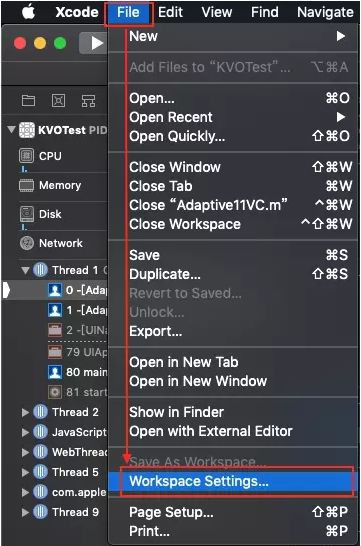
Xcode->File->Project Settings-> Build System -> Legacy Build System.
解決辦法二:
刪除其他info.plist檔案。
iOS 12移除了libstdc++, 用libc++替代
Xcode10中libstdc++相關的3個庫(libstdc++、libstdc++.6、libstdc++6.0.9)應該都是被徹底廢棄了,如果你使用的三方庫中有依賴,請儘快和提供方溝通,告知他們遷移吧。如果自己開發使用,也儘快考慮遷移的事宜吧。
1.2、iPhone XR不支援3D-Touch
OC檢測程式碼
if (self.traitCollection.forceTouchCapability == UIForceTouchCapabilityAvailable) {
}
swift檢測程式碼
self.traitCollection.forceTouchCapability == .availible二、iOS11(Xcode9)
2.1、安全區域(SafeArea)
iOS11為UIViewController和UIView增加了兩個新的屬性safeAreaInsets和safeAreaLayoutGuide
safeAreaInsets 適用於手動計算.
safeAreaLayoutGuide 適用於自動佈局.
UIViewController中新增:
- (void)viewSafeAreaInsetsDidChange;
UIView中新增:
- (void)viewSafeAreaInsetsDidChange;
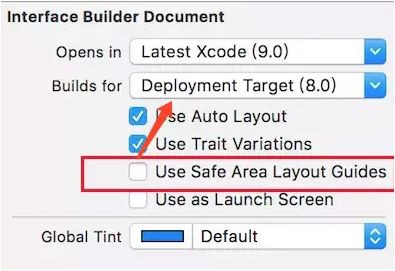
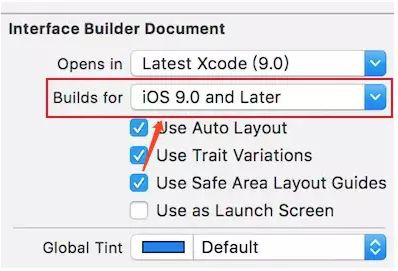
在Storyboard使用Safe Area最低只支援iOS9,iOS8的使用者就要放棄了
當UIViewController呼叫- (void)viewDidLoad時它的所有子檢視的safeAreaInsets屬性都等於UIEdgeInsetsZero。
viewSafeAreaInsetsDidChange的呼叫時機如下:
1、viewDidLoad
2、viewWillAppear
3、viewSafeAreaInsetsDidChange
4、viewWillLayoutSubviews
5、viewDidAppear
只有在呼叫viewSafeAreaInsetsDidChange後,才能獲得view以及viewController的SafeArea(UIEdgeInsets)。因此在viewDidload中根據SafeArea設定介面會有問題。
iPhone X:有導航欄的時候可以+44
豎屏 safeAreaInsets = (top = 44, left = 0, bottom = 34, right = 0)
橫屏 safeAreaInsets = (top = 0, left = 44, bottom = 21, right = 44)
#import "Adaptive11VC.h"
static inline UIEdgeInsets sgm_safeAreaInset(UIView *view) {
    if (@available(iOS 11.0, *)) {
        return view.safeAreaInsets;
    }
    return UIEdgeInsetsZero;
}

@interface Adaptive11VC ()
@end
@implementation Adaptive11VC
- (void)viewDidLoad {
    [super viewDidLoad];
}
- (void)testSafeArea {
    UIEdgeInsets safeAreaInsets = sgm_safeAreaInset(self.view);
    NSLog(@"safeAreaInsets = %@", NSStringFromUIEdgeInsets(safeAreaInsets));
}
- (void)viewSafeAreaInsetsDidChange {
    [super viewSafeAreaInsetsDidChange];
    [self testSafeArea];
}
@end
2.2、UIScrollView
iOS 11廢棄了UIViewController的automaticallyAdjustsScrollViewInsets屬性,新增了contentInsetAdjustmentBehavior屬性,所以當超出安全區域時系統自動調整了SafeAreaInsets,進而影響了adjustedContentInset,在iOS11中決定tableView內容與邊緣距離的是adjustedContentInset,所以需要設定UIScrollView的contentInsetAdjustmentBehavior屬性。
// 方式一:(不推薦)修改額外的安全區域
if (@available(iOS 11.0, *)) {
    self.additionalSafeAreaInsets = UIEdgeInsetsMake(-44, 0, 0, 0);
}
else {
    // Fallback on earlier versions
}
// 方式二:(推薦)設定為不自動調整
if (@available(iOS 11.0, *)) {
    // 作用於指定的UIScrollView
    self.tableView.contentInsetAdjustmentBehavior = UIScrollViewContentInsetAdjustmentNever;
    // 作用與所有的UIScrollView
    UIScrollView.appearance.contentInsetAdjustmentBehavior = UIScrollViewContentInsetAdjustmentNever;
}
else {
    self.automaticallyAdjustsScrollViewInsets = NO;
}
2.3、tableview問題
iOS11開始UITableView開啟了自動估算行高,estimatedRowHeight estimatedSectionHeaderHeight estimatedSectionFooterHeight三個高度估算屬性由預設的0變成了UITableViewAutomaticDimension,如果不實現-tableView: viewForFooterInSection: 和 -tableView: viewForHeaderInSection:,那麼estimatedRowHeight estimatedSectionHeaderHeight estimatedSectionFooterHeight三個高度估算屬性由預設的0變成了UITableViewAutomaticDimension,導致高度計算不對,會產生空白。解決方法是實現對應方法或吧這三個屬性設為0。
2.4、LocalAuthentication 本地認證
本地認證框架提供了從具有指定安全策略(密碼或生物學特徵)的使用者請求身份驗證的功能。例如,要求使用者僅使用Face ID或Touch ID進行身份驗證,可使用以下程式碼:
#import "">
/**
 檢測TouchID是否可用
 */
- (void)checkBiometrics {
    LAContext *context = [[LAContext alloc] init];
    BOOL success = [context canEvaluatePolicy:LAPolicyDeviceOwnerAuthenticationWithBiometrics
                                        error:nil];
    if ( success ) {
        NSLog(@"can use");
    }
    else {
        NSLog(@"can`t use ");
    }
}
/**
 在驗證TouchID可用的情況下使用
 */
- (void)excuteBiometrics {
    LAContext *context = [[LAContext alloc] init];
    context.localizedFallbackTitle = @"自定義標題";
    [context evaluatePolicy:LAPolicyDeviceOwnerAuthenticationWithBiometrics
            localizedReason:@"為什麼使用TouchID寫這裡"
                      reply:^(BOOL success, NSError * _Nullable error) {
        if ( success ) {
            // 指紋驗證成功
        }
        else {
            switch (error.code) {
                case LAErrorUserFallback:{
                    NSLog(@"使用者選擇輸入密碼");
                    break;
                }
                case LAErrorAuthenticationFailed:{
                    NSLog(@"驗證失敗");
                    break;
                }
                case LAErrorUserCancel:{
                    NSLog(@"使用者取消");
                    break;
                }
                case LAErrorSystemCancel:{
                    NSLog(@"系統取消");
                    break;
                }
                // 以下三種情況如果提前檢測TouchID是否可用就不會出現
                case LAErrorPasscodeNotSet:{
                    break;
                }
                case LAErrorTouchIDNotAvailable:{
                    break;
                }
                case LAErrorTouchIDNotEnrolled:{
                    break;
                }
                default:
                    break;
            }
        }
    }];
}
2.5、啟動圖的適配
方法一:透過LaunchScreen.storyboard方式啟動
方法二:使用Assets中的LaunchImage

-
給Brand Assets新增一張11252436大小的圖片
-
開啟Assets.xcassets檔案夾,找到Brand Assets
-
右鍵Show in Finder
-
新增一張11252436大小的圖片
-
修改Contents.json檔案,新增如下內容
{
"extent" : "full-screen",
"idiom" : "iphone",
"subtype" : "2436h",
"filename" : "1125_2436.png",
"minimum-system-version" : "11.0",
"orientation" : "portrait",
"scale" : "3x"
}
2.6、定位相關
在 iOS 11 中必須支援 When In Use 授權樣式(NSLocationWhenInUseUsageDescription),在 iOS 11 中,為了避免開發者只提供請求 Always 授權樣式這種情況,加入此限制,如果不提供When In Use 授權樣式,那麼 Always 相關授權樣式也無法正常使用。
如果要支援老版本,即 iOS 11 以下系統版本,那麼建議在 info.plist 中配置所有的 Key
NSLocationAlwaysUsageDescription 在 iOS 11及以上版本不再使用):
NSLocationWhenInUseUsageDescription
NSLocationAlwaysAndWhenInUseUsageDescription
NSLocationAlwaysUsageDescription
NSLocationAlwaysAndWhenInUseUsageDescription  // 為 iOS 11 中新引入的一個 Key。
三、iOS10(Xcode8)
3.1、(Why?Safe!)外掛取消
Xcode8取消了三方外掛(很多優秀的外掛,本來可以顯著提高效率)的功能,使用Extension代替
Xcode 8 Extension 推薦
3.2、證書問題
為了方便使用者來管理,提供Automatically manage signing。需要輸入開發者賬號!如果沒有賬號也沒關係,在下麵也可以選擇Debug、Realease、inHouse樣式下對應的證書也可以!
3.3、隱私資料訪問問題
iOS10,蘋果加強了對隱私資料的保護,要對隱私資料許可權做一個適配,iOS10呼叫相機,訪問通訊錄,訪問相簿等都要在info.plist中加入許可權訪問描述,不然之前你們的專案涉及到這些許可權的地方就會直接crash掉。
解決辦法:
只需要在info.plist新增NSContactsUsageDescription的key, value自己隨意填寫就可以,這裡列舉出對應的key(Source Code樣式下):
<key>NSPhotoLibraryUsageDescriptionkey><string>App需要您的同意,才能訪問相簿string><key>NSCameraUsageDescriptionkey><string>App需要您的同意,才能訪問相機string>
<key>NSMicrophoneUsageDescriptionkey><string>App需要您的同意,才能訪問麥克風string>
<key>NSLocationUsageDescriptionkey><string>App需要您的同意,才能訪問位置string>
<key>NSLocationWhenInUseUsageDescriptionkey><string>App需要您的同意,才能在使用期間訪問位置string>
<key>NSLocationAlwaysUsageDescriptionkey><string>App需要您的同意,才能始終訪問位置string>
<key>NSCalendarsUsageDescriptionkey><string>App需要您的同意,才能訪問日曆string>
<key>NSRemindersUsageDescriptionkey><string>App需要您的同意,才能訪問提醒事項string>
<key>NSMotionUsageDescriptionkey><string>App需要您的同意,才能訪問運動與健身string>
<key>NSHealthUpdateUsageDescriptionkey><string>App需要您的同意,才能訪問健康更新 string>
<key>NSHealthShareUsageDescriptionkey><string>App需要您的同意,才能訪問健康分享string>
<key>NSBluetoothPeripheralUsageDescriptionkey><string>App需要您的同意,才能訪問藍芽string>
<key>NSAppleMusicUsageDescriptionkey><string>App需要您的同意,才能訪問媒體資料庫string>

3.4、跳轉到app內的隱私資料設定頁面
iOS 10 幹掉了所有系統設定的 URL Scheme,這意味著你再也不可能直接跳轉到系統設定頁面(比如 WiFi、蜂窩資料、定位等)。
跳轉方式
方式一:prefs:root=某項服務 適用於 小於 iOS10的系統;
NSURL *url = [NSURL URLWithString:@”prefs:root=WIFI”];
方式二:prefs:root=bundleID 適用於 大於等於iOS8系統,小於iOS10的系統
NSURL *url = [NSURL URLWithString:@”prefs:root=bundleID”];
方式三:UIApplicationOpenSettingsURLString 適用於 大於等於iOS8的系統
NSURL *url = [NSURL URLWithString:UIApplicationOpenSettingsURLString];
// iOS系統版本 >= 10.0
{
    NSURL *url = [NSURL URLWithString:UIApplicationOpenSettingsURLString];
    if ([[UIApplication sharedApplication] canOpenURL:url]) {
        [[UIApplication sharedApplication] openURL:url];
    }
}
return;
// iOS系統版本 >= 10.0
// But! 不建議這樣做哦,官方檔案中說過:
// `URL is now considered a private API and use will result in app rejection`.
// 雖然是有可能躲過蘋果的檢測,但是蘋果如果發現你這樣用了,app上架是有被拒的風險的.
{
    NSURL *url = [NSURL URLWithString:@"APP-Prefs:root=WIFI"];
    if ([[UIApplication sharedApplication] canOpenURL:url]) {
        if (@available(iOS 10.0, *)) {
            [[UIApplication sharedApplication] openURL:url
              options:@{}
    completionHandler:nil];
        } else {
            // Fallback on earlier versions
        }
    }
}
// iOS系統版本
{
    NSURL *url = [NSURL URLWithString:@"prefs:root=WIFI"];
    if ([[UIApplication sharedApplication] canOpenURL:url]) {
        [[UIApplication sharedApplication] openURL:url];
    }
}
跳轉目的地
iOS系統版本 <= iOS7 , 只能跳轉到 系統設定頁面
iOS系統版本 >= iOS8 ,支援跳轉到第三方應用的設定介面中。使用prefs:root=bundleID ,bundleID是你第三方應用工程的唯一ID
iOS系統版本 >= iOS10,支援跳轉到自己應用設定,不支援跳轉到系統設定
3.5、字型變化
蘋果的預設字型會隨著iOS系統版本的不同而不同,iOS10中字型變大了。導致了原來的顯示有問題,會造成…的出現。暫時沒有好的解決辦法,需要自己在一個個適配一下!
3.6、UICollectionViewCell的的最佳化
在iOS 10 之前,cell只能從重用佇列裡面取出,再走一遍生命週期,並呼叫cellForItemAtIndexPath建立或者生成一個cell.
在iOS 10 中,系統會cell儲存一段時間,也就是說當使用者把cell滑出螢幕以後,如果又滑動回來,cell不用再走一遍生命週期了,只需要呼叫willDisplayCell方法就可以重新出現在螢幕中了.
iOS 10 中,系統是一個一個載入cell的,二以前是一行一行載入的,這樣就可以提升很多效能;
iOS 10 新增加的Pre-Fetching預載入
3.7、UIRefreshControl
在iOS 10 中, UIRefreshControl可以直接在UICollectionView和UITableView中使用,並且脫離了UITableViewController.現在RefreshControl是UIScrollView的一個屬性.
3.8、UserNotifications(使用者通知)
iOS 10所有相關通知被統一到了UserNotifications.framework框架中。增加了撤銷、更新、中途還可以修改通知的內容。通知不在是簡單的文字了,可以加入影片、圖片,自定義通知的展示等等。
iOS 10相對之前的通知來說更加好用易於管理,並且進行了大規模最佳化,對於開發者來說是一件好事。
iOS 10開始對於許可權問題進行了最佳化,申請許可權就比較簡單了(本地與遠端通知整合在一個方法中)。
四、iOS9(Xcode7)
4.1、Bitcode
Xcode7 預設啟用 Bitcode,但是如果我們用到的第三方庫編譯時還沒啟用 Bitcode,主工程就會編譯不過。Bitcode 是蘋果 App Thinning 的機制之一,可以減少安裝包的大小。App store 會將這個 Bitcode 編譯為可執行的64位或32位程式。
解決辦法一:
最簡單的解決辦法是先把 Bitcode 關掉:把 Build settings – Build Options – Enable Bitcode 改為 NO。image.png
解決辦法二:
移除不支援BitCode的平臺SDK,或者尋找支援BitCode的替代品,或者聯絡SDK方支援BitCode。
4.2、HTTP 請求失敗
iOS9 預設不支援 HTTP 請求,需要改用更安全的 HTTPS(預設用 TLS 1.2)。蘋果還提供了配置,使得所有安全性更低的網路請求也能使用,解決方案就是在 info.plist 裡面增加以下配置:
<key>NSAppTransportSecuritykey>
<dict>
<key>NSAllowsArbitraryLoadskey><true>
true>dict>
如果複雜一些,還可以指定白名單域名,宣告所支援 TLS 的最低版本。另外需要註意的是,即使寫了上述配置,在 HTTPS 頁面中,HTTP 的 javascript 或 css 不會被載入,因為蘋果認為這降低了頁面的安全性。
4.3、canOpenUrl 限制
canOpenUrl 可以用來判斷使用者是否安裝了某個 APP。也許是出於使用者隱私的考慮,iOS9 上對 canOpenUrl 做了限制,最多隻能對 50 個 scheme 做判斷。如果是用 Xcode7 編譯,需要在 plist 裡面宣告這些 scheme,沒有宣告的會直接傳回 NO:
<key>LSApplicationQueriesSchemeskey>
<array>
<string>weixinstring><string>wechatstring>
array>
4.4、UIStatusBar的問題
iOS9中廢棄的方法
// 修改狀態列的樣式為白色
// 'setStatusBarStyle(_:animated:)' was deprecated in iOS 9.0: Use -[UIViewController preferredStatusBarStyle]
UIApplication.shared.setStatusBarStyle(.lightContent, animated: true)
// 隱藏狀態列
// 'setStatusBarHidden(_:with:)' was deprecated in iOS 9.0: Use -[UIViewController prefersStatusBarHidden]
UIApplication.shared.setStatusBarHidden(true, with: .fade)
複製程式碼用下麵兩個方法替換
-[UIViewController preferredStatusBarstyle]
-[UIViewController preferredStatusBarHidden]
參考資料:
iOS12適配 https://www.jianshu.com/p/56d7f9cec66d
iOS12AdaptationTips https://github.com/ChenYilong/iOS12AdaptationTips
關於iPhone X 的適配 https://www.lee1994.com/guan-yu-iphone/
iOS11適配iPhoneX總結 https://www.jianshu.com/p/d8073367c274
iOS 10 適配知識點總結 https://www.jianshu.com/p/61b73ac8662a
聊聊iOS 10更新以後跳轉系統設定的幾種方式 https://segmentfault.com/a/1190000007097444
iOS 10 呼叫系統”設定”裡的功能(全) https://www.jianshu.com/p/d56ebc7b3646
iOS TouchID驗證和Keychain結合使用 https://blog.csdn.net/xinxisxx/article/details/77967184
iOS10AdaptationTips https://github.com/ChenYilong/iOS10AdaptationTips
適配iOS9 https://blog.csdn.net/Kerry_Deng/article/details/48790909
微信 iOS 9 適配總結 https://www.infoq.cn/article/wechat-ios9-adaptation
iOS9AdaptationTips https://github.com/ChenYilong/iOS9AdaptationTips
