(點選上方公眾號,可快速關註)
來源:袁鳴凱,
blog.csdn.net/lifetragedy/article/details/8251056
一、前言
在二十三天中我們介紹了使用maven來下載工程的依賴庫檔案,用ant來進行war包的建立。今天我們在這個基礎上將使用junit+dbunit來進行帶有單元測試報告的框架的架構。
標的:
-
每次打包之前自動進行單元測試並生成單元測試報告
-
生成要佈署的打包檔案即war包
-
單元測試的程式碼不能夠被打在正式的要佈署的war包內,單元測試僅用於unit test用
-
使用模擬資料對dao層進行測試,使得dao方法的測試結果可被預料
二、Junit+Ant生成的單元測試報告
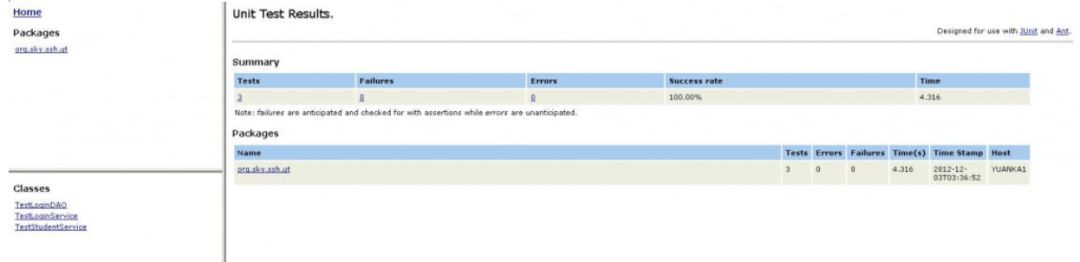
上面是一份junit生成的測試報告,它可以與ant任務一起執行然後自動生成這麼一份html的測試報告,要生成這樣的一份junit test report我們需要呼叫ant任務中的
———————————————————
One or more tests failed, check the report for detail…
———————————————————
在一般的產品級開發時或者是帶有daily building/nightly building的專案組中我們經常需要檢查最新check in的程式碼是否影響到了原有的工程的編譯,因為每天都有程式員往原始碼伺服器裡check in程式碼,而有時我們經常會碰到剛剛被check in的程式碼在該程式員本地跑的好好的,但是check in原始碼伺服器上後別人從原始碼伺服器“拉”下來的最新程式碼跑不起來,甚至編譯出錯,這就是regression bug,
因此我們每天的打包要乾的事情應該是:
-
程式員check in程式碼時必須把相關的unit test也check in原始碼伺服器
-
次日的零晨由持續整合構件如:cruisecontrol自動根據設好的schedule把所有的原始碼伺服器的程式碼進行編譯
-
執行單元測試
-
生成報告
-
打包佈署到QA伺服器上去
如果考究點的還會生成一份“單元測試改寫率”報告。
那麼有了這樣的單元測試報告,專案組組長每天早上一上班檢查一下單元測試報告就知道昨天程式碼check in的情況,有多少是成功多少是失敗,它們分別是哪些類,哪些方法,以找到相關的負責人。
同時,有了單元測試報告,如果測試報告上顯示的是有fail的地方,該版本就應被視之為fail,不能被送給QA進行進一步的測試,直到所有的單元測試成功才能被送交QA。
三、如何在Spring下書寫一個單元測試方法
3.1使用spring的註入特性書寫一個單元測試
Spring是一個好東西,一切依賴註入,連單元測試都變成了依賴註入了,這省去我們很多麻煩。
我們可以將web工程中的applicationContext、Datasource甚至iBatis或者是Hibernate的配署都可以註入給junit,這樣使得我們可以用IoC的方法來書寫我們的單元測試類。
此處,我們使用的junit為4.7, 而相關的spring-test庫檔案為3.1,我都已經在pom.xml檔案中註明瞭.
我們先在eclipse裡建立一個專門用來放單元測試類的src folder:test/main/java。
註意一下單元測試類的coding convention:
-
所有的測試類必須以Test開頭
-
所有的測試方法名必須為public型別並且以test開頭
-
所有的測試類全部放在test/main/java目錄下,不可和src/main/java混放
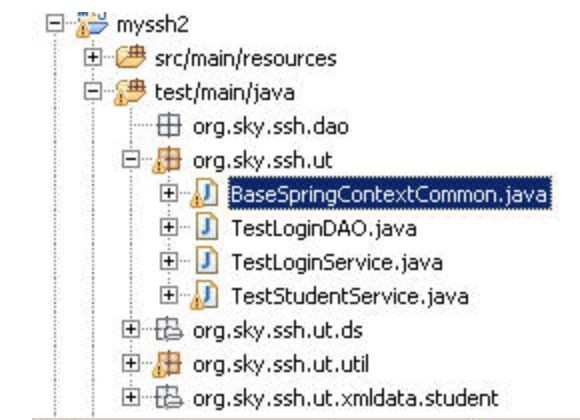

類 org.sky.ssh.ut.BaseSpringContextCommon
package org.sky.ssh.ut;
import org.junit.runner.RunWith;
import org.springframework.test.context.ContextConfiguration;
import org.springframework.test.context.junit4.SpringJUnit4ClassRunner;
import org.springframework.test.context.transaction.TransactionConfiguration;
import org.springframework.transaction.annotation.Transactional;
@RunWith(SpringJUnit4ClassRunner.class)
@ContextConfiguration({ “/spring/appconfig/applicationContext.xml”, “/org/sky/ssh/ut/ds/datasource.xml”,
“/spring/hibernate/hibernate.xml” })
public class BaseSpringContextCommon {
}
該類為一個基類,我們所有的單元測試類全部需要繼承自該類,大家可以把這個類認為一個spring的context載入器,註意這邊的datasource.xml。
因為我們在做測試方法時勢必會涉及到對一些資料進行操作,因此我們在資料庫裡除了平時開發和佈署用的資料庫外,還有一個專門用於執行“單元測試”的“單元測試資料庫”或者“單元測試資料庫實體”,因此我們在單元測試時會把我們當前的資料庫連線“硬”指向到“單元測試用資料庫”上去.
這個datasource.xml檔案位於/org/sky/ssh/ut/ds目錄下,見下圖(當然它也必須被放在test/main/java目錄裡哦:

該檔案內容如下:
org.sky.ssh.ut.ds.datasource.xml
xmlns:aop=”http://www.springframework.org/schema/aop” xmlns:tx=”http://www.springframework.org/schema/tx”
xmlns:context=”http://www.springframework.org/schema/context” xmlns=”http://www.springframework.org/schema/beans”
xsi:schemaLocation=”
http://www.springframework.org/schema/beans http://www.springframework.org/schema/beans/spring-beans-3.0.xsd
http://www.springframework.org/schema/tx http://www.springframework.org/schema/tx/spring-tx-3.0.xsd
http://www.springframework.org/schema/aop http://www.springframework.org/schema/aop/spring-aop-3.0.xsd
http://www.springframework.org/schema/context http://www.springframework.org/schema/context/spring-context-3.0.xsd”>
註意兩行:
可以得知我們測試時用的是同一個資料庫上的另一個實體,該實體是專門為我們的單元測試用的.
我們先來書寫一個單元測試類吧
org.sky.ssh.ut.TestLoginDAO
package org.sky.ssh.ut;
import static org.junit.Assert.assertEquals;
import javax.annotation.Resource;
import org.junit.Test;
import org.sky.ssh.dao.LoginDAO;
import org.springframework.test.annotation.Rollback;
public class TestLoginDAO extends BaseSpringContextCommon {
@Resource
private LoginDAO loginDAO;
@Test
@Rollback(false)
public void testLoginDAO() throws Exception {
String loginId = “alpha”;
String loginPwd = “aaaaaa”;
long answer = loginDAO.validLogin(loginId, loginPwd);
assertEquals(1, answer);
}
}
很簡單吧,把原來的LongDAO註入進我們的單元測試類中,然後在test方法前加入一個@Test程式碼該方法為“單元測試”方法即可被junit可識別,然後我們呼叫一下LoginDAO中的.validLogin方法,測試一下傳回值。
執行方法為:
在eclipse開啟該類的情況下右鍵->run as Junit Test

然後選junit4來執行,執行後直接出錯丟擲:
Class not found org.sky.ssh.ut.TestLoginDAO
java.lang.ClassNotFoundException: org.sky.ssh.ut.TestLoginDAO
at java.net.URLClassLoader$1.run(URLClassLoader.java:202)
at java.security.AccessController.doPrivileged(Native Method)
at java.net.URLClassLoader.findClass(URLClassLoader.java:190)
at java.lang.ClassLoader.loadClass(ClassLoader.java:306)
at sun.misc.Launcher$AppClassLoader.loadClass(Launcher.java:301)
at java.lang.ClassLoader.loadClass(ClassLoader.java:247)
at org.eclipse.jdt.internal.junit.runner.RemoteTestRunner.loadClass(RemoteTestRunner.java:693)
at org.eclipse.jdt.internal.junit.runner.RemoteTestRunner.loadClasses(RemoteTestRunner.java:429)
at org.eclipse.jdt.internal.junit.runner.RemoteTestRunner.runTests(RemoteTestRunner.java:452)
at org.eclipse.jdt.internal.junit.runner.RemoteTestRunner.runTests(RemoteTestRunner.java:683)
at org.eclipse.jdt.internal.junit.runner.RemoteTestRunner.run(RemoteTestRunner.java:390)
at org.eclipse.jdt.internal.junit.runner.RemoteTestRunner.main(RemoteTestRunner.java:197)
這樣一個錯誤,為什麼?
其原因在於我們的工程是在eclipse裡使用的m2 eclipse這個外掛生成的,因此在做單元測試時由於我們的unit test的類是放在test/main/java這個目錄下,而這個目錄是我們手工建的,因此eclipse不知道這個目錄的對應的編譯輸出的class的目錄了.
沒關係,按照下麵的方法:
右鍵->選擇run as->run configuration,開啟如下的設定
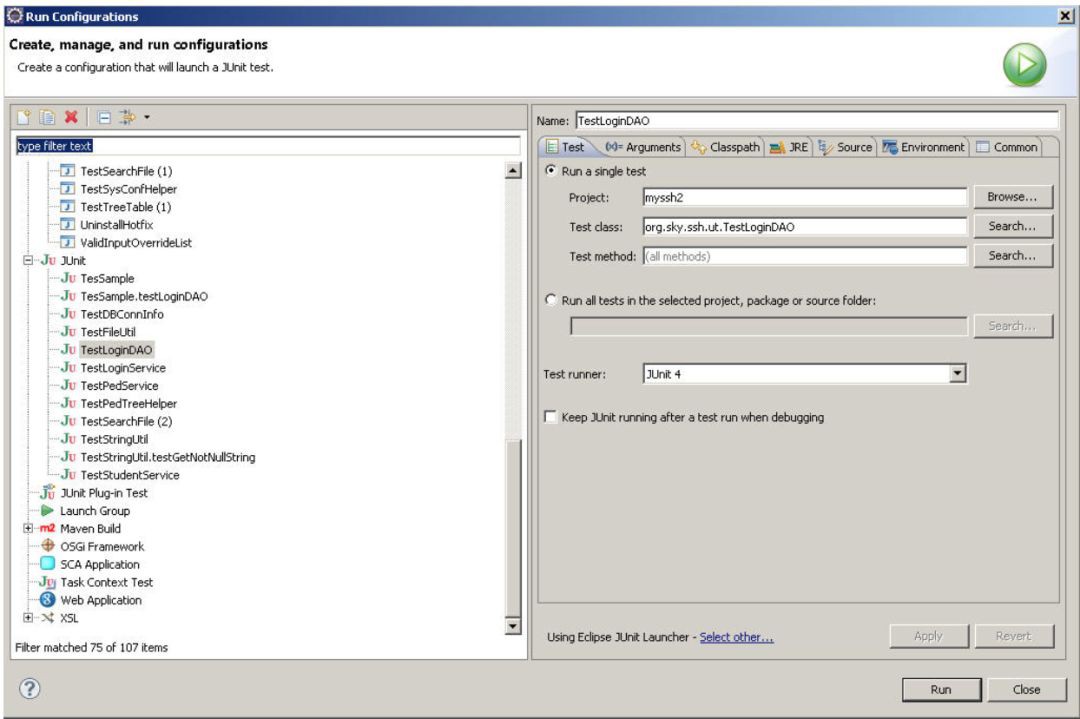
選擇classpath這個選項欄

-
單擊user Entries
-
單擊Advanced按鈕
-
在彈出框中選擇Add Folders
-
點ok按鈕
在下一個彈出框中選擇我們的junit test的原始碼在被編譯後輸出的目錄即myssh2工程的WebContent/WEB-INF/classes目錄,對吧。

點OK按鈕
點Apply按鈕
點Run按鈕,檢視執行效果

執行成功,說明該unit test書寫的是對的。
3.2 結合dbunit來做單元測試
我們有了junit為什麼還要引入一個dbunit呢?這不是多此一舉嗎?
試想一下下列場景:
我們開發時連的是開發用的資料庫,一張表裡有一堆的資料,有些資料不是自己的插的是其它的開發人員插的,那麼我想要測試一個dao或者是service方法,獲得一個List,然後判斷這個List裡的值是否為我想要的時候,有可能會碰到下屬這樣的情況:
執行我的service或者dao方法得到一個list,該list含有6個值,但正好在執行時另一個開發人員因為測試需要往資料庫裡又插了一些值,導致我的測試方法失敗,對不對,這種情況是有可能的。
怎麼辦呢?比較好的做法是我們需要準備一份自己的業務資料即prepare data,因為是我們自己準備的資料資料,因此它在經過這個方法執行後得到的值,這個得到的值是要經過一系列的業務邏輯的是吧?因此這個得到的值即:expected data是可以被精確預料的。
因此,我們拿著這個expected data與運行了我們的業務方法後得到的結果進行比對,如果比對結果一致,則一定是測試成功,否則失敗,對吧?
這就是我們常說的,測試用資料需要是一份乾凈的資料。
那麼為了保持我們的資料乾凈,我們在測試前清空我們的業務表,插入資料,執行測試地,比對結果,刪除資料(也可以不刪除,因為每次執行時都會清空相關的業務表),這也就是為什麼我們事先要專門搞一個資料庫或者是資料庫實體,在執行單元測試時我們的資料庫連線需要指向到這個單元測試專用的資料庫的原因了,見下麵的測試流程表:

有了DbUnit,它就可以幫助我們封裝:
-
準備測試用資料
-
清空相關業務表
-
插入測試資料
-
比對結果
-
清除先前插入的業務資料
這一系列底層的操作。
現在我們可以開始搭建我們的單元測試框架了,下麵是這個單元測試框架的”邏輯表達圖“(一個架構設計檔案不僅需要有logic view還要有physical view。。。當然還有更多,以後會一點點分享出來)

這邊的Session Factory是結合的原有框架的Hibernate的Session Factory,我們也可以把它改成iBatis,Jdbc Template等等等。。。它可以稍作變動就可適用於一切SSX這樣的架構。
該框架的優點如下:

3.3 構建spring+junit+dbunit的框架
除去上述的一些類和配置我們還需要3個基類,它們分別位於test/main/java目錄下(因為它們都屬於unit test對吧)
org.sky.ssh.ut.util.CleanTableXmlAdapter
package org.sky.ssh.ut.util;
import org.dom4j.Element;
import org.dom4j.VisitorSupport;
import java.util.*;
public class CleanTableXmlAdapter extends VisitorSupport {
private ArrayList tableList = new ArrayList();
public CleanTableXmlAdapter() {
}
public void visit(Element node) {
try {
if ((node.getName().toLowerCase()).equals(“table”)) {
TableBean tBean = new TableBean();
tBean.setTableName(node.getText());
tableList.add(tBean);
}
} catch (Exception e) {
}
}
public ArrayList getTablesList() {
if (tableList == null || tableList.size() < 1) {
return null;
} else {
return tableList;
}
}
}
org.sky.ssh.ut.util.TableBean
package org.sky.ssh.ut.util;
import java.io.*;
public class TableBean implements Serializable{
private String tableName = “”;
public String getTableName() {
return tableName;
}
public void setTableName(String tableName) {
this.tableName = tableName;
}
org.sky.ssh.ut.util.XmlUtil
package org.sky.ssh.ut.util;
import java.util.*;
import java.io.*;
import org.dom4j.Document;
import org.dom4j.Element;
import org.dom4j.VisitorSupport;
import org.dom4j.io.SAXReader;
import org.springframework.core.io.ClassPathResource;
public class XmlUtil {
public ArrayList getCleanTables(String xmlFile) {
ArrayList tablesList = new ArrayList();
try {
SAXReader reader = new SAXReader();
File file = new File(xmlFile);
Document doc = reader.read(file);
CleanTableXmlAdapter xmlAdapter = new CleanTableXmlAdapter();
doc.accept(xmlAdapter);
tablesList = xmlAdapter.getTablesList();
return tablesList;
} catch (Exception e) {
e.printStackTrace();
return null;
}
}
}
3.4使用框架
我們準備兩份測試用資料
test_del_table.xml檔案
t_student
test_insert_table.xml檔案
測試類org.sky.ssh.ut.TestStudentService
package org.sky.ssh.ut;
import static org.junit.Assert.assertEquals;
import java.io.File;
import java.io.FileInputStream;
import java.net.URL;
import java.util.ArrayList;
import java.util.Iterator;
import java.util.List;
import javax.annotation.Resource;
import javax.sql.DataSource;
import org.dbunit.database.DatabaseConfig;
import org.dbunit.database.DatabaseConnection;
import org.dbunit.database.IDatabaseConnection;
import org.dbunit.dataset.DefaultDataSet;
import org.dbunit.dataset.DefaultTable;
import org.dbunit.dataset.IDataSet;
import org.dbunit.dataset.xml.FlatXmlDataSet;
import org.dbunit.dataset.xml.FlatXmlDataSetBuilder;
import org.dbunit.ext.mysql.MySqlDataTypeFactory;
import org.dbunit.operation.DatabaseOperation;
import org.junit.After;
import org.junit.Before;
import org.junit.Test;
import org.sky.ssh.service.StudentService;
import org.sky.ssh.ut.util.TableBean;
import org.sky.ssh.ut.util.XmlUtil;
import org.sky.ssh.vo.StudentVO;
import org.springframework.beans.factory.annotation.Autowired;
import org.springframework.core.io.ClassPathResource;
import org.springframework.jdbc.datasource.DataSourceUtils;
import org.springframework.test.annotation.Rollback;
public class TestStudentService extends BaseSpringContextCommon {
private final static String INSERT_TBL = “org/sky/ssh/ut/xmldata/student/test_insert_table.xml”;
private final static String DEL_TBL = “org/sky/ssh/ut/xmldata/student/test_del_table.xml”;
@Autowired
private DataSource dataSource;
@Resource
private StudentService stdService;
@SuppressWarnings(“deprecation”)
@Before
public void setUp() throws Exception {
IDatabaseConnection connection = null;
try {
connection = new DatabaseConnection(DataSourceUtils.getConnection(dataSource));
DatabaseConfig config = connection.getConfig();
config.setProperty(“http://www.dbunit.org/properties/datatypeFactory”, new MySqlDataTypeFactory());
//trunkTables(connection);
ClassLoader classLoader = Thread.currentThread().getContextClassLoader();
URL url = classLoader.getResource(INSERT_TBL);
if (url == null) {
classLoader = ClassLoader.getSystemClassLoader();
url = classLoader.getResource(INSERT_TBL);
}
IDataSet dateSetInsert = new FlatXmlDataSetBuilder().build(new FileInputStream(url.getFile()));
DatabaseOperation.CLEAN_INSERT.execute(connection, dateSetInsert);
} catch (Exception e) {
e.printStackTrace();
throw e;
} finally {
if (connection != null) {
connection.close();
}
}
}
@After
public void tearDown() throws Exception {
IDatabaseConnection connection = null;
try {
connection = new DatabaseConnection(DataSourceUtils.getConnection(dataSource));
DatabaseConfig config = connection.getConfig();
config.setProperty(“http://www.dbunit.org/properties/datatypeFactory”, new MySqlDataTypeFactory());
//trunkTables(connection);
} catch (Exception e) {
e.printStackTrace();
throw e;
} finally {
if (connection != null) {
connection.close();
}
}
}
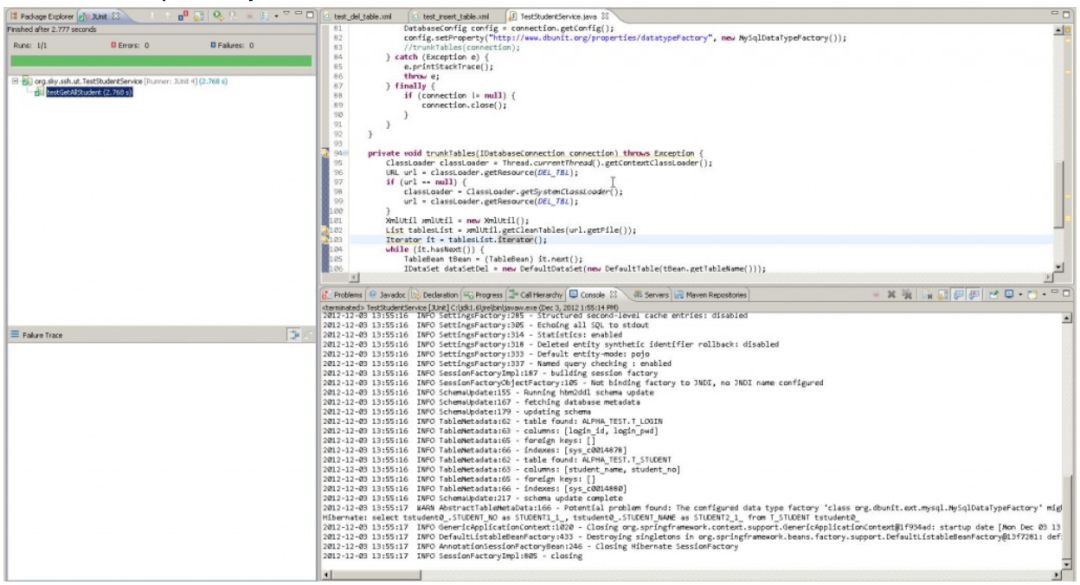
private void trunkTables(IDatabaseConnection connection) throws Exception {
ClassLoader classLoader = Thread.currentThread().getContextClassLoader();
URL url = classLoader.getResource(DEL_TBL);
if (url == null) {
classLoader = ClassLoader.getSystemClassLoader();
url = classLoader.getResource(DEL_TBL);
}
XmlUtil xmlUtil = new XmlUtil();
List tablesList = xmlUtil.getCleanTables(url.getFile());
Iterator it = tablesList.iterator();
while (it.hasNext()) {
TableBean tBean = (TableBean) it.next();
IDataSet dataSetDel = new DefaultDataSet(new DefaultTable(tBean.getTableName()));
DatabaseOperation.DELETE_ALL.execute(connection, dataSetDel);
}
}
@Test
@Rollback(false)
public void testGetAllStudent() throws Exception {
List
stdList = new ArrayList (); stdList = stdService.getAllStudent();
assertEquals(5, stdList.size());
}
}
-
該測試方法每次都清空t_student表
-
往t_student表裡註入5條資料
-
執行業務方法getAllStudent
-
比較getAllStudent方法傳回的list裡的size是否為5
-
清空註入的資料(也可不用去清空)
然後我們在eclipse裡用junit來執行我們這個測試類吧。
我們現在用我們的單元測試用資料庫帳號連入我們的資料庫,查詢t_student表

我們往該表中手動插入一條資料
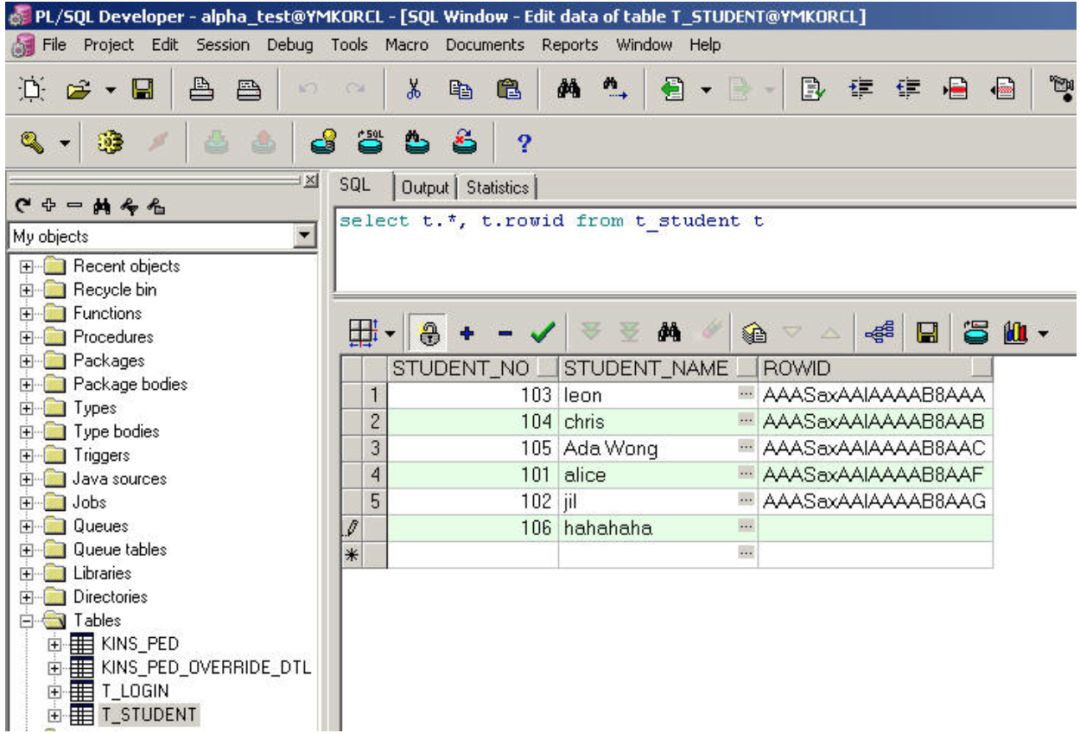
再重新執行一遍我們的單元測試
測試結果還是成功,再重新連入我們單元測試用資料庫實體查詢t_student表,發覺還是5條記錄,說明我們的框架達到了我們的標的。

四、將ant與我們的單元測試框架連線起來並生成單元測試報告
先來看一下我們的nightly building,即每天次日的零晨將要生成的單元測試與打包佈署的流程吧
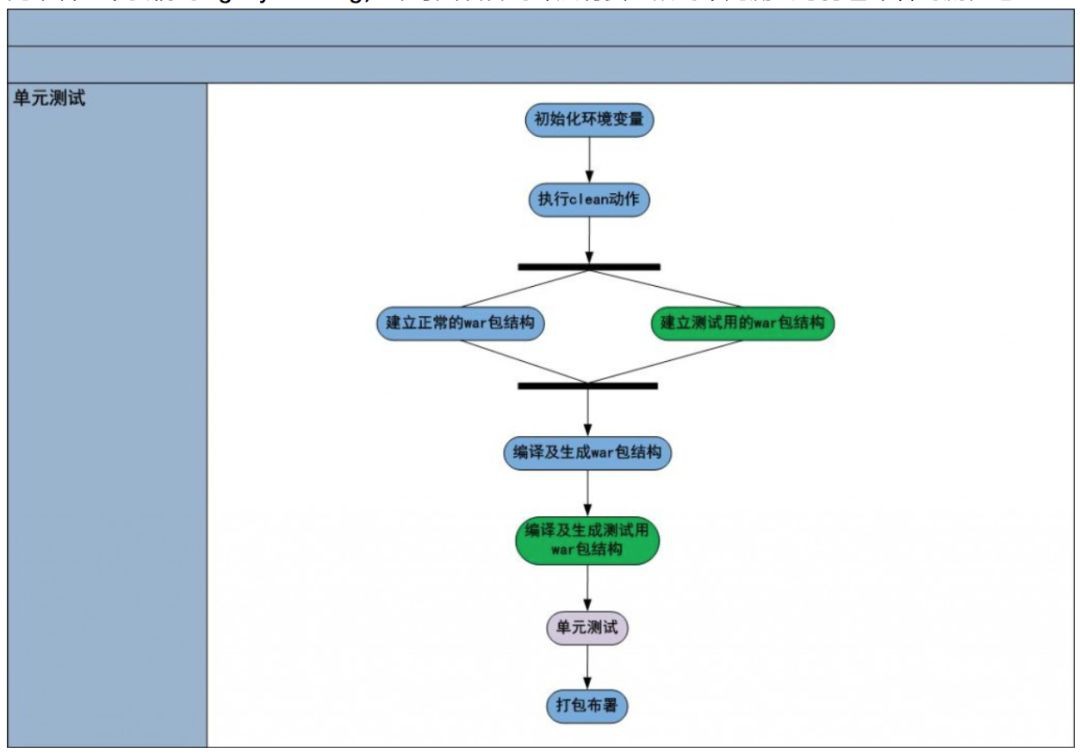
(需要ant1.8及以上版本執行)
然後下麵給出build.xml檔案(需要ant1.8及以上版本執行)(結合了maven的依賴庫機制)
build.properties檔案
# ant
appName=myssh2
webAppName=myssh2
webAppQAName=myssh2-UT
local.dir=C:/eclipsespace/${appName}
src.dir=${local.dir}/src/main/java
test.src.dir=${local.dir}/test/main/java
dist.dir=${local.dir}/dist
report.dir=${local.dir}/report
webroot.dir=${local.dir}/src/main/webapp
lib.dir=${local.dir}/lib
ext-lib.dir=${local.dir}/ext-lib
classes.dir=${webroot.dir}/WEB-INF/classes
build.xml檔案
———————————————————
One or more tests failed, check the report for detail…
———————————————————
對照著上面的build的流程圖,很容易看懂
開啟一個command視窗,進入到我們的工程的根目錄下,設定好ANT_HOME並將%ANT_HOME%\bin目錄加入到path中去,然後在工程的根據目錄下執行ant,就能看到打包和執行unit test的效果了。

build完後可以在工程的根目錄下找到一個report目錄,開啟后里面有一堆的html檔案
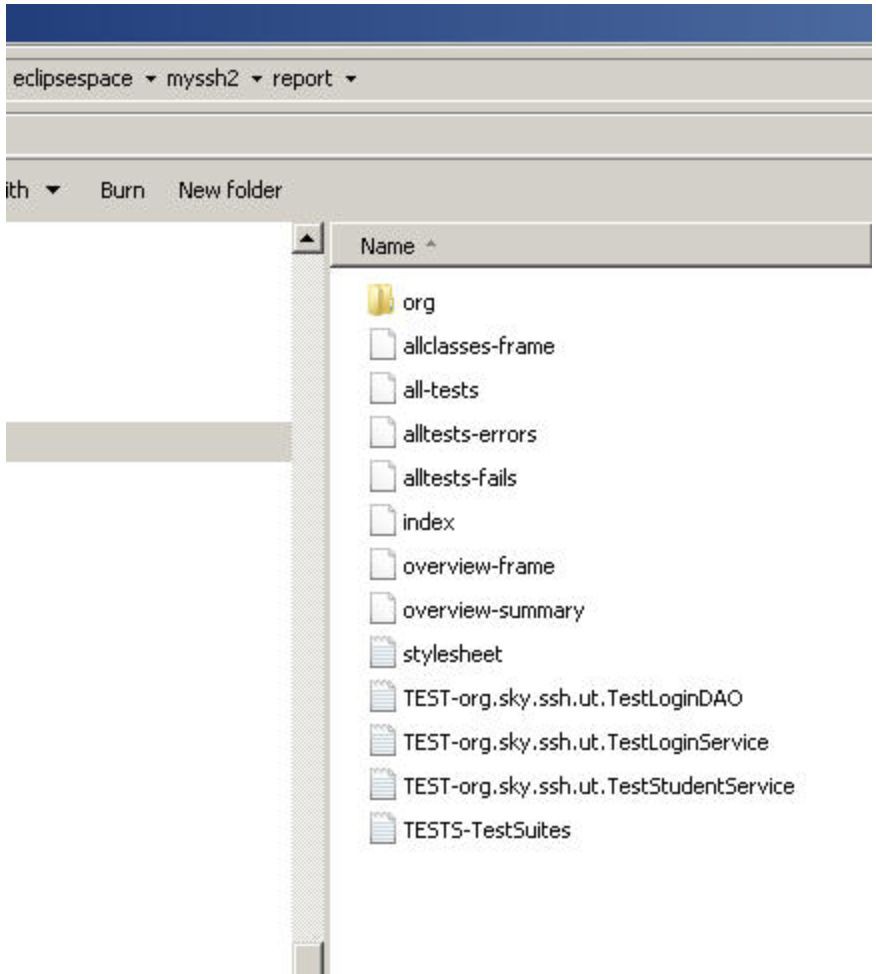
雙擊index.htm這個檔案檢視單元測試報告

我們在windows的資源管理器中開啟我們的工程,在根目錄下有一個dist目錄,開啟這個目錄,我們會開到兩個目錄與一個.war檔案,它們分別是:

其中myssh2-UT是專門用來run unit test的,而myssh2是可以用於釋出到production environment的,我們開啟myssh2.war這個包,我們可以看到,由於這個是正確佈署的war,因此裡面是不能夠含有unit test的相關類與方法的,完全按照上述的打包流程圖來做的。
系列
看完本文有收穫?請轉發分享給更多人
關註「ImportNew」,提升Java技能