來源:Msoso
https://www.jianshu.com/p/be18aa86f588
首先,膜拜一下這位大神,Ramotion(https://github.com/Ramotion/folding-cell),自從在github上看到這個動畫,驚為天人。

心裡不禁感嘆,原來動畫還可以這樣做,可能是技術限制了我的想象力。

於是乎,就一頭扎進了這個專案裡,看到issue裡有很多人提出想要一個Tutorial和OC版本,決定邊研究原始碼,邊寫一個OC版本,畢竟程式碼還是要自己碼一遍可以學的更快。文章結尾會放出OC版本的連結,如果想要swift版本的Demo,可以直接去這位大神的Git下載。
如何使用
1.先自建一個TableViewCell,父類為提供的FoldCell。
@interface DemoFoldingCell : HSFolderCell
2.初始化你的TableViewCell時,設定摺疊動畫的次數以及foregroundView和containerView。你所有的介面都是在這兩個View裡顯示的。然後執行父類的commonInit方法。
self.itemCount = 4;
self.foregroundView = [self createForegroundView];
self.containerView = [self createContainerView];

[self commonInit];
foregroundView:這個View是你的cell收起來的時候展示的,就像這樣:

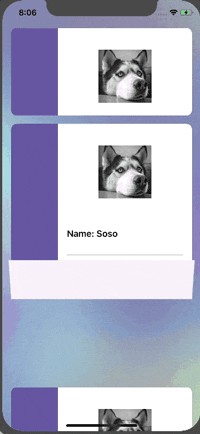
containerView:這是當你的cell展開時用於展示的,像這樣:

需要註意的是,如果你的摺疊次數為兩次,那麼這個View的高度應為foregroundView的兩倍,如果超過兩次,那麼高度需要滿足這個條件:
CGFloat itemHeight = (containerViewSize.height - 2 * foregroundViewSize.height) / (self.itemCount - 2);
    if(self.itemCount == 2){
        // decrease containerView height or increase itemCount
        NSAssert(containerViewSize.height - 2 * foregroundViewSize.height == 0, @"containerView.height too high");
    }else{
        // decrease containerView height or increase itemCount
        NSAssert(containerViewSize.height - 2 * foregroundViewSize.height >= itemHeight, @"containerView.height too high");
    }
3.在TableView的didSelect方法裡,呼叫unfold方法進行動畫展示。
   if([self.itemHeight[indexPath.row] floatValue] == closeHeight){
        //open cell
        self.itemHeight[indexPath.row] = [NSNumber numberWithFloat:openHeight];
        [cell unfold:YES animated:YES completion:nil];
        duration = 0.5;
    }else{
        //close cell
        self.itemHeight[indexPath.row] = [NSNumber numberWithFloat:closeHeight];
        [cell unfold:NO animated:YES completion:nil];
        duration = 1.1;
    }

    [UIView animateWithDuration:duration delay:0 options:UIViewAnimationOptionCurveEaseOut animations:^{
        [tableView beginUpdates];
        [tableView endUpdates];
    } completion:nil];
有幾點要註意的:
1.iOS11以後,TableView有時候會亂跳,需要設定
_tableView.estimatedRowHeight = 0;
 _tableView.estimatedSectionHeaderHeight = 0;
 _tableView.estimatedSectionFooterHeight = 0;
2.需要實現willDisplayCell方法,否則在滑動過程會因為Cell復用而出現錯亂。
if([self.itemHeight[indexPath.row] floatValue] == closeHeight){
    [(DemoFoldingCell *)cell unfold:NO animated:NO completion:nil];
} else {
    [(DemoFoldingCell *)cell unfold:YES animated:NO completion:nil];
}
3.一定要將兩個View的Top型別的Constraint設定到Cell提供的兩個屬性上,像這樣:
NSLayoutConstraint * topConstraint = [NSLayoutConstraint constraintWithItem:foregroundView attribute:NSLayoutAttributeTop relatedBy:NSLayoutRelationEqual toItem:self.contentView attribute:NSLayoutAttributeTop multiplier:1 constant:8];
self.foregroundViewTop = topConstraint;
//
NSLayoutConstraint * topConstraint = [NSLayoutConstraint constraintWithItem:containerView attribute:NSLayoutAttributeTop relatedBy:NSLayoutRelationEqual toItem:self.contentView attribute:NSLayoutAttributeTop multiplier:1 constant:181];
self.containerViewTop = topConstraint;
原理解析
我一直認為,要理清程式碼,就要跟著程式碼走一遍,自己碼一遍,這樣才能體會到每一個地方的作用。另外,這裡我貼的是我自己改過後的OC程式碼,想看Swift版本的,可以去這位大神的Git上下載,我在文章開頭貼了連結。
先感嘆一下,Swift在很多情況下,真的是要比OC方便太多,舉幾個程式碼裡的例子:
for case let itemView as RotatedView in animationView.subviews.filter({ $0 is RotatedView }).sorted(by: { $0.tag < $1.tag }) {
     rotatedViews.append(itemView)
     if let backView = itemView.backView {
         rotatedViews.append(backView)
     }
}
這裡Swift只用了一句話,就對animationVIew的subview陣列進行了過濾,找到了所有為RotatedView的subview,且做了排序。而我寫的OC版本是這樣:
- (NSArray *)rotatedViewsInAnimationView{
    NSArray * arr = [self.animationView.subviews filteredArrayUsingPredicate:[NSPredicate predicateWithBlock:^BOOL(UIView * evaluatedObject, NSDictionary<NSString *,id> * _Nullable bindings) {
        return [evaluatedObject isMemberOfClass:[HSRotatedView class]] && evaluatedObject.tag > 0 && evaluatedObject.tag < self.animationView.subviews.count;
    }]];

    return arr;
}

- (NSArray *)sortRotatedViewsInAnimationView{
    NSArray * arr = [self rotatedViewsInAnimationView];

    NSArray * sortedArr = [arr sortedArrayUsingComparator:^NSComparisonResult(UIView * obj1, UIView * obj2) {
        if(obj1.tag < obj2.tag){
            return NSOrderedAscending;
        }
        if(obj1.tag > obj2.tag){
            return NSOrderedDescending;
        }
        return NSOrderedSame;
    }];

    return sortedArr;
}
別的不多說了,來看程式碼吧!
最開始是在commonInit方法裡呼叫了configureDefaultState方法,方法裡對兩個TopConstraint屬性是否賦值做了判斷,然後建立了AnimationView。這個View是一層蓋在你Cell上的View,當你Cell摺疊起來的時候是不顯示的,當展開時顯示出來用於做動畫。它的約束完全和你的ContainerView的約束一樣。
到這裡,準備工作就做好了。另外要提一句的是,這裡面有一種用於做翻轉動畫的View,我給它命名為HSRotatedView,它提供了三個方法:
- (CATransform3D)transform3d;

- (void)addBackView:(CGFloat)height color:(UIColor *)color;

- (void)foldingAnimation:(NSString *)timing from:(CGFloat)from to:(CGFloat)to duration:(NSTimeInterval)duration delay:(NSTimeInterval)delay hidden:(BOOL)hidden;
transform3d是傳回一個transform3D實體,並且設定了m34值,這樣才能看到3d動畫。
addBackView方法是為該RotatedView新增一個背部view,當你的cell展開或者摺疊時,除了你想給使用者看到的view以外,翻轉後背部的view也應該呈現出來,這裡我們的背部view就是一個單純顏色的view。最後一個方法就是摺疊動畫了。
還有一個檔案是UIView的category,用於截出特定位置的畫面。
當我們選擇某個Cell執行unfold方法時,比如展開Cell,會先執行addImageItemsToAnimationView方法。簡單來說,就是透過截圖的方法,將你的containerView分部分截出來,包括你的所需要建立的背部view,每一個都設定好屬性,然後加到animationView上去。接著呼叫createAnimationItemView方法,將所有剛才建立的view都加入到陣列裡。
最後就是按順序一個個執行動畫了,我放慢了動畫效果,可以看一下:
最後調皮一下,作者有一波操作沒看懂,首先是把subView命名為superView,然後這個迴圈…可能技術又限制了我的想象力,這是原始碼程式碼:
guard let animationViewSuperView = animationView?.subviews else {
    fatalError()
}

if animationType == .open {
     for view in animationViewSuperView.filter({ $0 is RotatedView }) {
         view.alpha = 0
    }
} else {
    for case let view as RotatedView in animationViewSuperView.filter({ $0 is RotatedView }) {
         if animationType == .open {
            view.alpha = 0
        } else {
            view.alpha = 1
            view.backView?.alpha = 0
         }
     }
}
這是我改了之後的迴圈:
for (HSRotatedView * view in arr) {
    if(animationType == AnimationTypeOpen){
         view.alpha = 0;
    }else{
        view.alpha = 1;
        view.backView.alpha = 0;
    }
}
Demo
附上我自己寫的OC連結啦,喜歡的可以點個star。
HSFolderCellDemo(https://github.com/Hsoso/HSFolderCellDemo)
●編號259,輸入編號直達本文
●輸入m獲取文章目錄

Linux學習
更多推薦:《18個技術類微信公眾號》
涵蓋:程式人生、演演算法與資料結構、駭客技術與網路安全、大資料技術、前端開發、Java、Python、Web開發、安卓開發、iOS開發、C/C++、.NET、Linux、資料庫、運維等。
