前言
consul-template 是 Consul 的一個守護程式,使用 consul-template 可以方便快速的實現對 Consul Key/Value 儲存系統的訪問,可以從 KV 系統中讀取資料、監視變動、同步本地檔案;還可以在執行模板更新的同時,執行本地系統命令,比如常見的就是在同步資料到本地模板檔案後,生成 Nginx 配置檔案,並執行 nginx -s reload 命令,使 Nginx 重新載入配置檔案。
consul-template 的特點
- 智慧發現:一旦開始執行 consul-template ,consul-template 將會自動的發現 Consul 中的 Key/Value 變更,並自動更新到本地模板檔案
- 重覆過濾:consul-template 內部可以跨實體對資料進行重覆篩選,多個 consul-template 實體進行選舉,確定只有一個 consul-template 執行 KV 查詢,然後將結果同步到其它 consul-template 實體,在命令列中使用 -dedup 標記或者在配置檔案中配置“deduplicate” 來啟用重覆過濾功能
- 快速使用:支援命令列和配置檔案,有多種方法可以執行Consul Template,但最常見的樣式是將Consul Template作為系統服務執行。
- Dry Mode:在Dry樣式,Consul-Template會將結果呈現在STDOUT,操作員可以檢查輸出是否正常,以決定更換模板是否安全。
參考檔案:
https://www.google.com
https://github.com/hashicorp/consul-template
https://www.consul.io
https://www.hi-linux.com/posts/36431.html
Centos7.0 安裝 nginx
執行以下命令
// 新增源rpm -Uvh http://nginx.org/packages/centos/7/noarch/RPMS/nginx-release-centos-7-0.el7.ngx.noarch.rpm// 執行安裝yum install -y nginx// 修改 nginx 預設埠為 8010vi /etc/nginx/conf.d/default.conf// 加入開機啟動systemctl enable nginx.service// 啟動 nginxsystemctl start nginx.service
開啟瀏覽器
http://172.16.1.218:8010

設定 Consul-template 的生成 nginx 配置檔案的目錄
建立目錄
mkdir -p /etc/nginx/conf.d/consul
編輯 nginx.conf
編輯 nginx.conf 檔案,將上面的目錄 /etc/nginx/conf.d/consul 作為配置檔案目錄匯入到 nginx 中
vi /etc/nginx/nginx.conf// 將下麵這句程式碼加入到nginx倒數第二行include /etc/nginx/consul/*.conf
編輯好的 nginx.conf 檔案

安裝 consul-template
因為 consul-template 只有一個二進位制包,所以其安裝過程非常的簡單;首先是下載二進位制包
wget https://releases.hashicorp.com/consul-template/0.20.0/consul-template_0.20.0_linux_amd64.tgz
解壓到當前目錄
tar -zxf consul-template_0.20.0_linux_amd64.tgz
移動到 consul 相同目錄下
mkdir /usr/local/bin/consul-templatemv consul-template /usr/local/bin/consul-template
設定環境變數,輸入命令:vi /etc/profile
// 將這裡的程式碼新增到 profile 檔案末尾export CONSUL_TEMPLATE_HOME=/usr/local/bin/consul-templateexport PATH=$PATH:$CONSUL_HOME:$CONSUL_TEMPLATE_HOME// 執行命令使環境變數生效source /etc/profile
將模板檔案存入 KV系統
為了獲得變更自動通知,我們呢需要將 consul-template 模板檔案新增到 Consul 的 Key/Value 儲存系統中
從控制檯存入

程式碼格式選擇 HCL,會自動高亮喔。關於 consul-template 的語法,請參考:https://github.com/hashicorp/consul-template,為了方便,我直接複製了官方的 examples/nginx.md 檔案內容
在 consul-template 本地建立 tpl 檔案
回到 consul-template 伺服器上的目錄 /usr/local/bin/consul-template ,建立一個 find_adress.tpl 檔案內容
// 建立檔案vi find_adress.tpl// 輸入以下內容{{ key "hashicorp/street_address" }}// 儲存退出
根據 find_adress.tpl 獲得模板內容
// 執行命令consul-template --template "find_address.tpl:hashicorp_address.tpl" -once
好了,準備工作進行到這裡,已基本結束;經過這麼長時間的命令執行,相信很多同學已經把網頁關閉了,但是沒辦法,這這些事情還是得一步一步的來。
啟動 consul-template
終於可以啟動了 consul-template 了,激動人心哪,consul-template 提供兩種啟動方式,命令列引數/載入配置檔案 方式啟動,就便利性來說,還是推薦“載入配置檔案”方式啟動,一次配置,終身有效嘛。
命令列引數啟動方式
consul-template --consul-addr 172.16.1.218:8500 --template "hashicorp_address.tpl:/etc/nginx/consul/vhost.conf:/usr/sbin/nginx -s reload" --log-level=info
上面的程式碼引數這裡做簡單的解釋
- –consul-addr:指定 Consul 代理伺服器的地址,預設 127.0.0.1:8500
- –template :指定模板,這裡有3個值,每個值以冒號(:)進行分隔,首先是利用 hashicorp_address.tpl 生成 /etc/nginx/consul/vhost.conf 配置檔案,然後馬上執行命令 /usr/sbin/nginx -s reload 重新載入 nginx 配置
- –log-level:日誌輸出級別
檢視生成的 vhost.conf 檔案
載入配置檔案啟動方式
編寫 hashicorp 的 nginx 配置檔案
wait {min = "3s"max = "9s"}syslog {enabled = truefacility = "LOCAL5"}consul {address = "172.16.1.218:8500"}template {source = "hashicorp_address.tpl"destination = "/etc/nginx/consul/vhost.conf"command = "service nginx reload"}
命令列引數和配置檔案中的引數名稱是一致的,配置檔案編寫完成,以載入配置檔案形式啟動 consul-template
consul-template -config "nginx.hcl" --log-level=info

透過上圖看到,consul-template 啟動後即刻進入偵聽狀態,在偵聽 Consul 服務變動,如果有服務註冊進來,馬上就會更新 nginx 檔案;下麵,我們嘗試啟動一個 Ron.Consul.dll:12008 的服務,該服務將會註冊到 Consul,讓我們來看看在不重新啟動 consul-template 的情況下,是否會自動更新 vhost.conf 檔案
啟動 12008 服務註冊

12008註冊為 home 節點的服務已經啟動了,下麵檢視 /etc/nginx/consul/vhost.conf 配置檔案
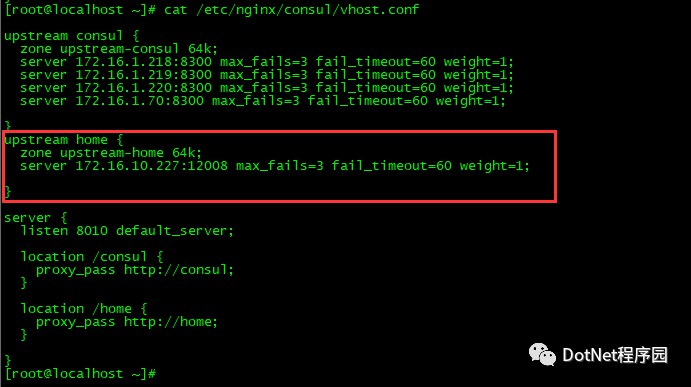
上圖紅框處內容就是自動更新的配置檔案
透過訪問 nginx 訪問服務
還記得最開始的時候,我們設定 nginx 的預設偵聽埠為 8010 嗎;現在,我們在瀏覽器中開啟下麵的地址
http://172.16.1.218:8010/home/add/10/20
得到傳回值:30,表示本次搭建 consul-template+nginx 成功!
結束語
寫了這麼長時間的部落格,這篇文章應該是輸入命令最多的一篇文章了,這也是和 Windows 下程式設計的最大的不同,很有快感,希望大家也樂在其中。
.NETCore 整合 Consul 導讀
- 1、Consul初探-在深交之前先認識
- 2、Consul初探-從安裝到執行
- 3、Consul初探-服務註冊和發現
- 4、Consul初探-整合ocelot
- 5、Consul初探-Consul-template+nginx實現自動負載均衡

朋友會在“發現-看一看”看到你“在看”的內容