

-
服務註冊與發現
-
身份驗證與授權
-
服務的伸縮控制
-
反向代理與負載均衡
-
路由控制
-
流量切換
-
日誌管理
-
效能度量、監控與調優
-
分散式跟蹤
-
過載保護
-
服務降級
-
服務部署與版本升級策略支援
-
錯誤處理
-
……


# wget -c https://github.com/istio/istio/releases/download/0.4.0/istio-0.4.0-linux.tar.gz
解壓後,進入istio-0.4.0目錄,
# ls -F
bin/  install/  istio.VERSION  LICENSE  README.md  samples/
# cat istio.VERSION
# DO NOT EDIT THIS FILE MANUALLY instead use
# install/updateVersion.sh (see install/README.md)
export CA_HUB="docker.io/istio"
export CA_TAG="0.4.0"
export MIXER_HUB="docker.io/istio"
export MIXER_TAG="0.4.0"
export PILOT_HUB="docker.io/istio"
export PILOT_TAG="0.4.0"
export ISTIOCTL_URL="https://storage.googleapis.com/istio-release/releases/0.4.0/istioctl"
export PROXY_TAG="0.4.0"
export ISTIO_NAMESPACE="istio-system"
export AUTH_DEBIAN_URL="https://storage.googleapis.com/istio-release/releases/0.4.0/deb"
export PILOT_DEBIAN_URL="https://storage.googleapis.com/istio-release/releases/0.4.0/deb"
export PROXY_DEBIAN_URL="https://storage.googleapis.com/istio-release/releases/0.4.0/deb"
export FORTIO_HUB="docker.io/istio"
export FORTIO_TAG="0.4.2"
# cd install/kubernetes
我們先不用auth功能,因此使用istio.yaml這個檔案進行Istio元件安裝:
# kubectl apply -f istio.yaml
namespace "istio-system" created
clusterrole "istio-pilot-istio-system" created
clusterrole "istio-initializer-istio-system" created
clusterrole "istio-mixer-istio-system" created
clusterrole "istio-ca-istio-system" created
clusterrole "istio-sidecar-istio-system" created
clusterrolebinding "istio-pilot-admin-role-binding-istio-system" created
clusterrolebinding "istio-initializer-admin-role-binding-istio-system" created
clusterrolebinding "istio-ca-role-binding-istio-system" created
clusterrolebinding "istio-ingress-admin-role-binding-istio-system" created
clusterrolebinding "istio-sidecar-role-binding-istio-system" created
clusterrolebinding "istio-mixer-admin-role-binding-istio-system" created
configmap "istio-mixer" created
service "istio-mixer" created
serviceaccount "istio-mixer-service-account" created
deployment "istio-mixer" created
customresourcedefinition "rules.config.istio.io" created
customresourcedefinition "attributemanifests.config.istio.io" created
... ...
customresourcedefinition "reportnothings.config.istio.io" created
attributemanifest "istioproxy" created
attributemanifest "kubernetes" created
stdio "handler" created
logentry "accesslog" created
rule "stdio" created
metric "requestcount" created
metric "requestduration" created
metric "requestsize" created
metric "responsesize" created
metric "tcpbytesent" created
metric "tcpbytereceived" created
prometheus "handler" created
rule "promhttp" created
rule "promtcp" created
kubernetesenv "handler" created
rule "kubeattrgenrulerule" created
kubernetes "attributes" created
configmap "istio" created
customresourcedefinition "destinationpolicies.config.istio.io" created
customresourcedefinition "egressrules.config.istio.io" created
customresourcedefinition "routerules.config.istio.io" created
service "istio-pilot" created
serviceaccount "istio-pilot-service-account" created
deployment "istio-pilot" created
service "istio-ingress" created
serviceaccount "istio-ingress-service-account" created
deployment "istio-ingress" created
serviceaccount "istio-ca-service-account" created
deployment "istio-ca" created
unable to recognize "istio.yaml": no matches for config.istio.io/, Kind=metric
unable to recognize "istio.yaml": no matches for config.istio.io/, Kind=metric
unable to recognize "istio.yaml": no matches for config.istio.io/, Kind=metric
unable to recognize "istio.yaml": no matches for config.istio.io/, Kind=metric
unable to recognize "istio.yaml": no matches for config.istio.io/, Kind=metric
unable to recognize "istio.yaml": no matches for config.istio.io/, Kind=metric
# kubectl get pods -n istio-system
NAME                             READY     STATUS    RESTARTS   AGE
istio-ca-1363003450-jskp5        1/1       Running   0          3d
istio-ingress-1005666339-c7776   1/1       Running   4          3d
istio-mixer-465004155-twhxq      3/3       Running   24         3d
istio-pilot-1861292947-6v37w     2/2       Running   18         3d
# kubectl get svc -n istio-system
NAME            CLUSTER-IP       EXTERNAL-IP   PORT(S)                                                   AGE
istio-ingress   10.98.10.87           80:31759/TCP,443:25804/TCP                         4d
istio-mixer     10.109.244.155   <none>        9091/TCP,15004/TCP,9093/TCP,9094/TCP,9102/TCP,9125/UDP,42422/TCP   4d
istio-pilot     10.105.80.55     <none>        15003/TCP,443/TCP                                              4d

-
servicea:模擬pay服務,在收到client請求後,進行pay處理,並將處理結果透過serviceb提供的msg notify服務下發給user。該服務的endpoint為/pay;
-
serviceb:模擬notify服務,在收到servicea請求後,將message轉發給external service,完成notify邏輯。該服務的endpoint為/notify;
-
external service:位於Service Mesh之外;
-
client:我們使用curl模擬。

//svca-v0.1.yaml
apiVersion: extensions/v1beta1
kind: Deployment
metadata:
  name: svca
spec:
  replicas: 1
  template:
    metadata:
      labels:
        app: svca
        version: v0.1
    spec:
      containers:
      - name: svca
        image: docker.io/bigwhite/istio-demo-svca:v0.1
        imagePullPolicy: Always
 ---
apiVersion: v1
kind: Service
metadata:
  name: svca
  labels:
    app: svca
spec:
  ports:
  - port: 80
    targetPort: 8080
    protocol: TCP
  selector:
    app: svca
# kubectl apply -f
deployment "svca" created
service "svca" created
# kubectl get pods
NAME                               READY     STATUS    RESTARTS   AGE
svca-1997590752-tpwjf              2/2       Running   0          2m
# kubectl apply -f
deployment "svcb" created
service "svcb" created
# nohup ./msgd > 1.log & 2>&1
[1] 9423
# kubectl get svc
NAME               CLUSTER-IP       EXTERNAL-IP   PORT(S)
svca               10.105.38.238    <none>        80/TCP                                         9h
svcb               10.105.119.194   <none>        80/TCP                                         9h
# curl {svca_ip}/pay
//service_a的日誌:
service_a:v0.1 is serving the request...
service_a:v0.1 pays ok
&{500 Internal Server Error 500 HTTP/1.1 1 1 map[X-Content-Type-Options:[nosniff] Date:[Tue, 02 Jan 2018 15:41:50 GMT] Content-Length:[66] Content-Type:[text/plain; charset=utf-8]] 0xc420058d40 66 [] false false map[] 0xc4200eaf00 }
service_a:v0.1 notify customer ok
// service_b的日誌:
&{GET /notify?msg=service_a:v0.1-pays-ok HTTP/1.1 1 1 map[User-Agent:[Go-http-client/1.1] Accept-Encoding:[gzip]] {}  0 [] false svcb map[] map[]  map[] 127.0.0.1:58778 /notify?msg=service_a:v0.1-pays-ok    0xc4200fa3c0}
service_b:v0.1 is serving the request...
service_b:v0.1 send msg error: Get http://10.100.35.27:9997/send?msg=service_a:v0.1-pays-ok: EOF
//rules/enable-svcb-engress-rule.yaml
apiVersion: config.istio.io/v1alpha2
kind: EgressRule
metadata:
  name: enable-svcb-engress-rule
spec:
  destination:
    service: 10.100.35.27
  ports:
    - port: 9997
      protocol: http
# istioctl create -f enable-svcb-engress-rule.yaml
Created config egress-rule/default/enable-svcb-engress-rule at revision 30031258
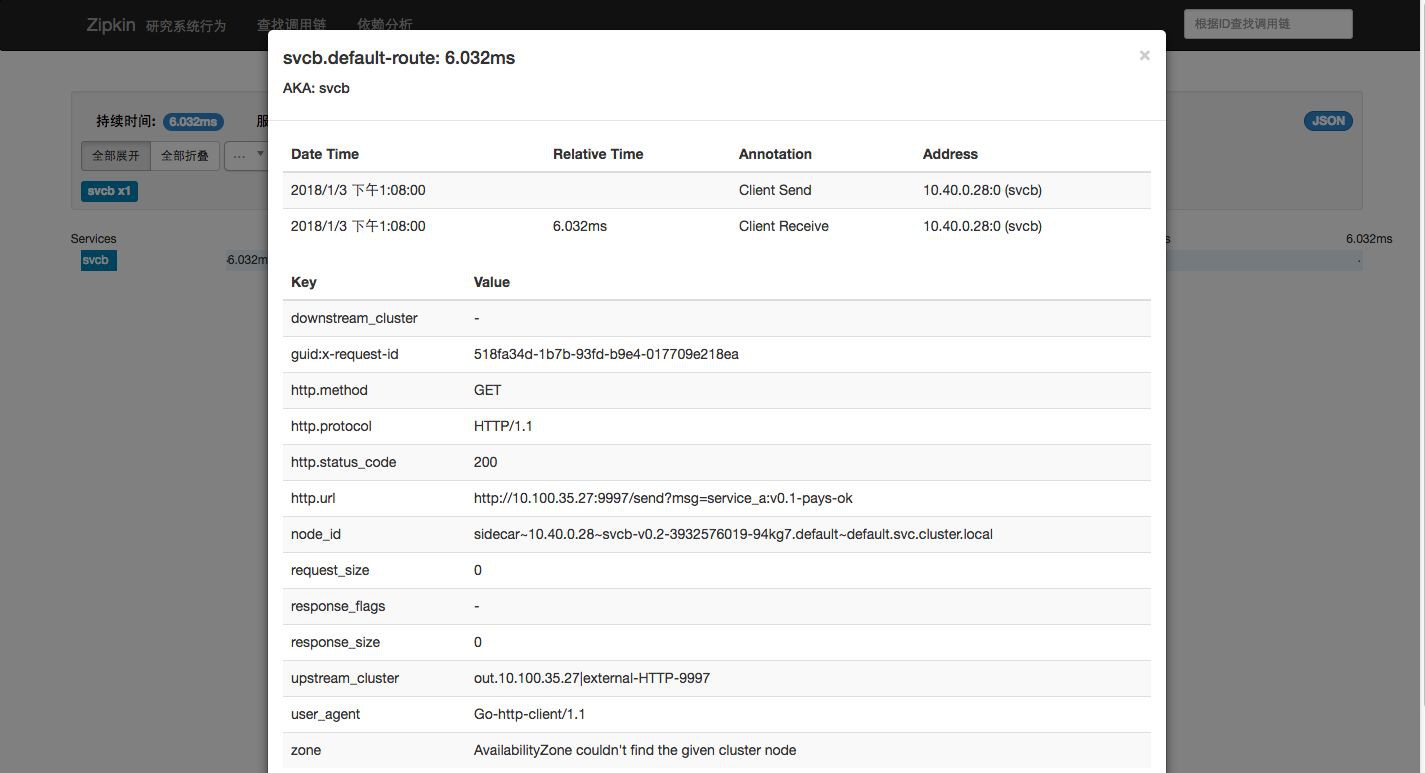
2018/01/02 23:58:16 &{GET /send?msg=service_a:v0.1-pays-ok HTTP/1.1 1 1 map[X-Ot-Span-Context:[2157e7ffb8105330;2157e7ffb8105330;0000000000000000] Content-Length:[0] User-Agent:[Go-http-client/1.1] X-Forwarded-Proto:[http] X-Request-Id:[13c3af6e-2f52-993d-905f-aa6aa4b57e2d] X-Envoy-Decorator-Operation:[default-route] X-B3-Spanid:[2157e7ffb8105330] X-B3-Sampled:[1] Accept-Encoding:[gzip] X-B3-Traceid:[2157e7ffb8105330] X-Istio-Attributes:[Ch8KCXNvdXJjZS5pcBISMhAAAAAAAAAAAAAA//8KLgAMCjoKCnNvdXJjZS51aWQSLBIqa3ViZXJuZXRlczovL3N2Y2ItMjAwODk3Mzc2OS1ncTBsaC5kZWZhdWx0]] {}  0 [] false 10.100.35.27:9997 map[] map[]  map[] 10.100.35.28:38188 /send?msg=service_a:v0.1-pays-ok    0xc4200584c0}
2018/01/02 23:58:16 Msgd is serving the request...
2018/01/02 23:58:16 Msgd recv msg ok, msg= service_a:v0.1-pays-ok
// svcb-v0.2.yaml
apiVersion: extensions/v1beta1
kind: Deployment
metadata:
  name: svcb-v0.2
spec:
  replicas: 1
  template:
    metadata:
      labels:
        app: svcb
        version: v0.2
    spec:
      containers:
      - name: svcb
        image: docker.io/bigwhite/istio-demo-svcb:v0.2
        imagePullPolicy: Always
# kubectl apply -f
deployment "svcb-v0.2" created
# kubectl get pods
NAME                               READY     STATUS    RESTARTS   AGE
svca-1997590752-pq9zg              2/2       Running   0          9h
svcb-2008973769-gq0lh              2/2       Running   0          9h
svcb-v0.2-3233505404-0g55w         2/2       Running   0          1m
svcb服務下又增加了一個endpoint:
# kubectl describe svc/svcb
.... ...
Selector:        app=svcb
Type:            ClusterIP
IP:            10.105.119.194
Port:                80/TCP
Endpoints:        10.40.0.28:8080,10.46.0.12:8080
... ...
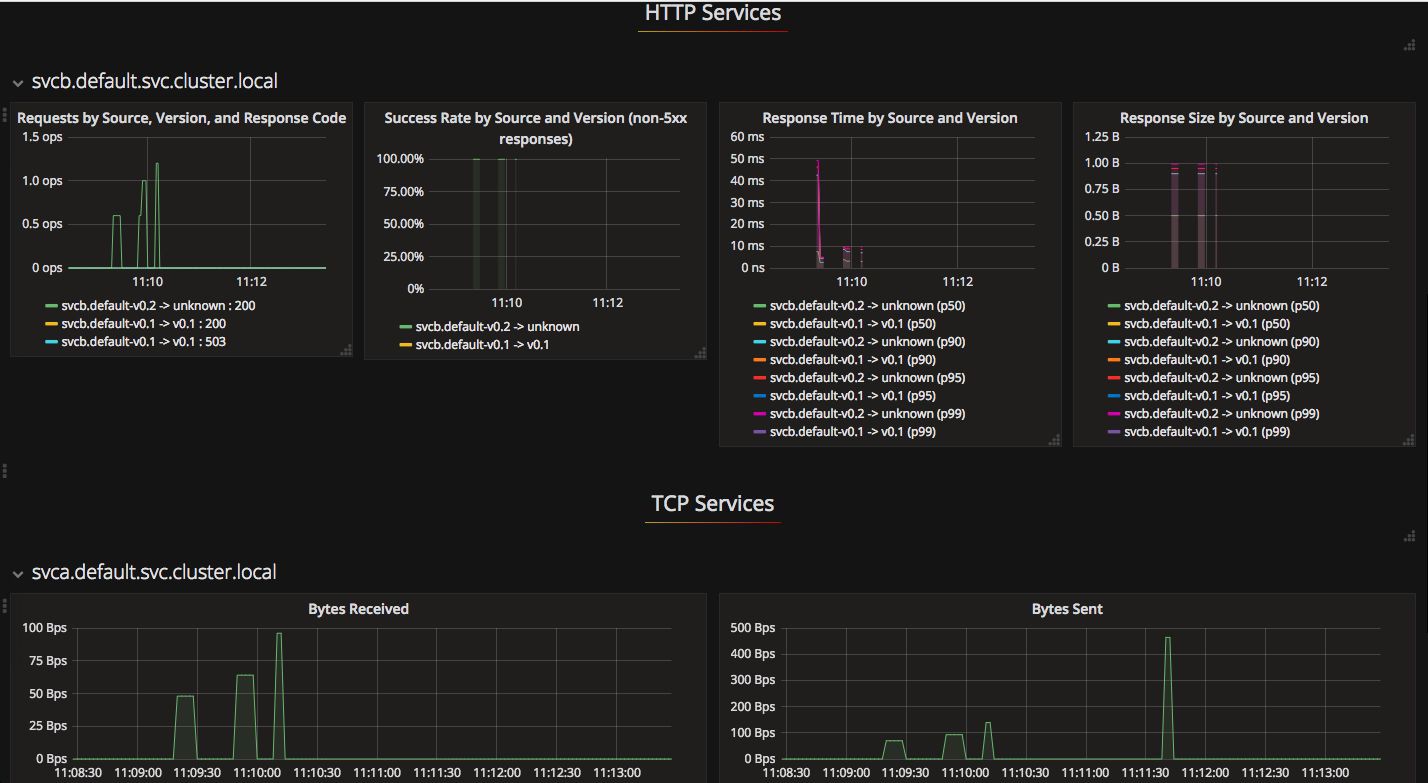
// route-rules-svcb-v0.2-50.yaml
apiVersion: config.istio.io/v1alpha2
kind: RouteRule
metadata:
  name: route-rules-svcb
spec:
  destination:
    name: svcb
  precedence: 1
  route:
  - labels:
      version: v0.1
    weight: 50
  - labels:
      version: v0.2
    weight: 50
# istioctl create -f route-rules-svcb-v0.2-50.yaml
Created config route-rule/default/route-rules-svcb at revision 30080638
//route-rules-svcb-v0.2-100.yaml
apiVersion: config.istio.io/v1alpha2
kind: RouteRule
metadata:
  name: route-rules-svcb
spec:
  destination:
    name: svcb
  precedence: 1
  route:
  - labels:
      version: v0.2
    weight: 100
# istioctl replace -f route-rules-svcb-v0.2-100.yaml
Updated config route-rule/default/route-rules-svcb to revision 30082944
# kubectl apply -f prometheus.yaml
configmap "prometheus" created
service "prometheus" created
deployment "prometheus" created
# kubectl apply -f grafana.yaml
service "grafana" created
deployment "grafana" created
# kubectl get pods -n istio-system
NAME                             READY     STATUS    RESTARTS   AGE
grafana-3617079618-zpglx         1/1       Running   0          5m
prometheus-168775884-ppfxr       1/1       Running   0          5m
... ...
# kubectl get svc -n istio-system
NAME            CLUSTER-IP       EXTERNAL-IP   PORT(S)            AGE
grafana         10.105.21.25     <none>        3000/TCP                     16m
prometheus      10.103.160.37    <none>        9090/TCP                16m
... ...


# kubectl apply -f servicegraph.yaml
deployment "servicegraph" created
service "servicegraph" created
# kubectl get svc -n istio-system
NAME            CLUSTER-IP       EXTERNAL-IP   PORT(S)                 AGE
servicegraph    10.108.245.21    <none>        8088/TCP                     52s
... ...

# kubectl apply -f zipkin.yaml
deployment "zipkin" created
service "zipkin" created
# kubectl get svc -n istio-system
NAME            CLUSTER-IP       EXTERNAL-IP   PORT(S)                  AGE
zipkin          10.105.7.219     <none>        9411/TCP                             1h


-
http://www.servicemesh.cn/?/article/27
-
https://istio.io/docs/tasks/telemetry/distributed-tracing.html
-
https://github.com/bigwhite/experiments/tree/master/istio-demo
-
https://hub.docker.com/u/bigwhite/
本次培訓包含:Kubernetes核心概念;Kubernetes叢集的安裝配置、運維管理、架構規劃;Kubernetes元件、監控、網路;針對於Kubernetes API介面的二次開發;DevOps基本理念;Docker的企業級應用與運維等,點選識別下方二維碼加微信好友瞭解具體培訓內容。

